A Little Dob Project

Meade ETX90 Owner’s Manual

This is the story of the death and resurrection of my Meade ETX90 Maksutov-Cassegrain telescope. I bought this telescope secondhand for about $200 in 2010 from a guy in Winchester, VA. It is one of the earliest ETX-90 models. The base, as seen on the cover of the owner’s manual in the picture, has a fork mount for altitude-azimuth (alt-az) functioning and is motorized in the RA (right ascension) axis to track objects compensating for the rotation of the earth. (This works best with the legs attached as shown in the picture, but it works without them, too.) It is not a go-to or computerized mount, so one must find one’s own way around the sky. Shortly after I bought it, the motor tracking failed, making it a fully manual scope. The fine motion controls to make small adjustments this way or that have become increasingly sticky and curmudgeonly over the years, making the scope less fun to use. That’s too bad, because the optics are actually not bad for a 3.5″ f/13.5 scope. I’ve clearly seen Jupiter’s Great Red Spot with it, for example, and better than with my 8″ f/4 Newtonian. So it has been a good scope, but had fallen into disuse due to the crotchety mount.

Well, early in 2021, or maybe even in 2020 (time has lost all meaning during the pandemic), once when I planned to use the ETX90, when I opened its case I found that both the fork arms had sheared off from the base of the mount. I’m not sure exactly how this happened, but it was not well secured in its case – no foam padding or anything – so I suppose it got a hard jostle at some point at just the wrong angle, and BANG! There you go. While annoying at first, this actually opened up some possibilities for remounting the thing and making it useful again. I had already been giving thought to a number of options, and now I had only to settle on one.

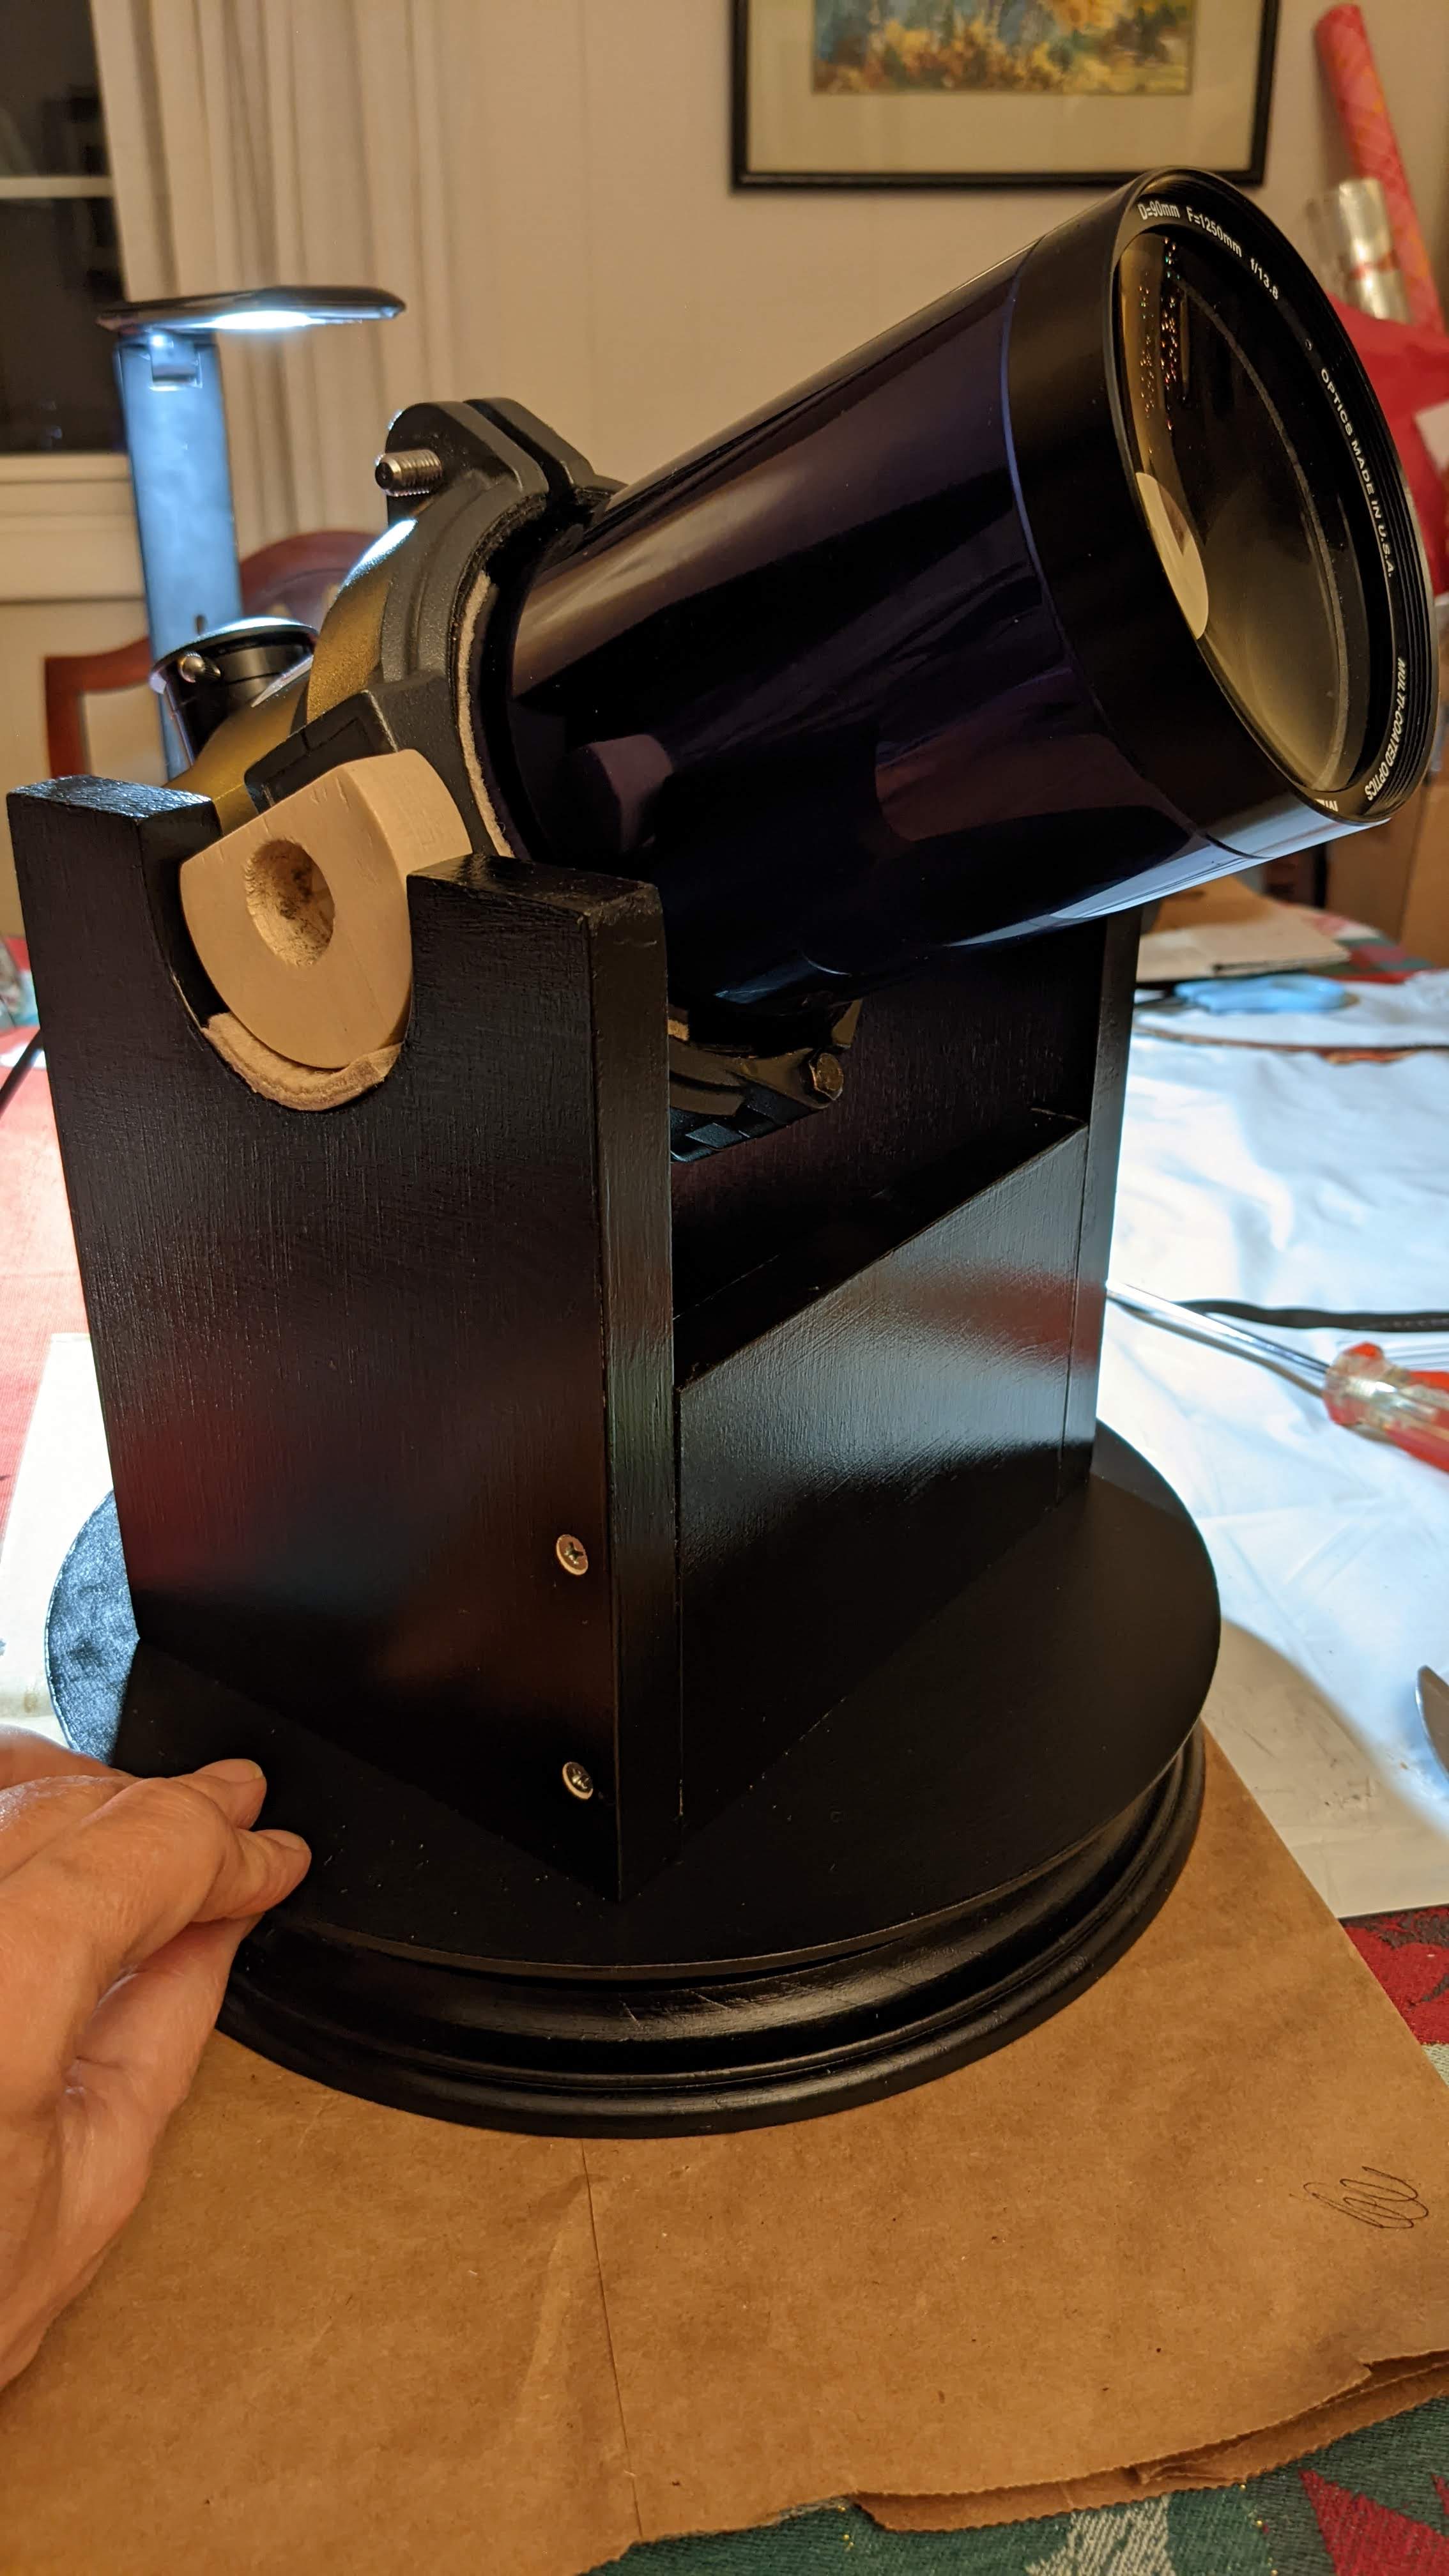
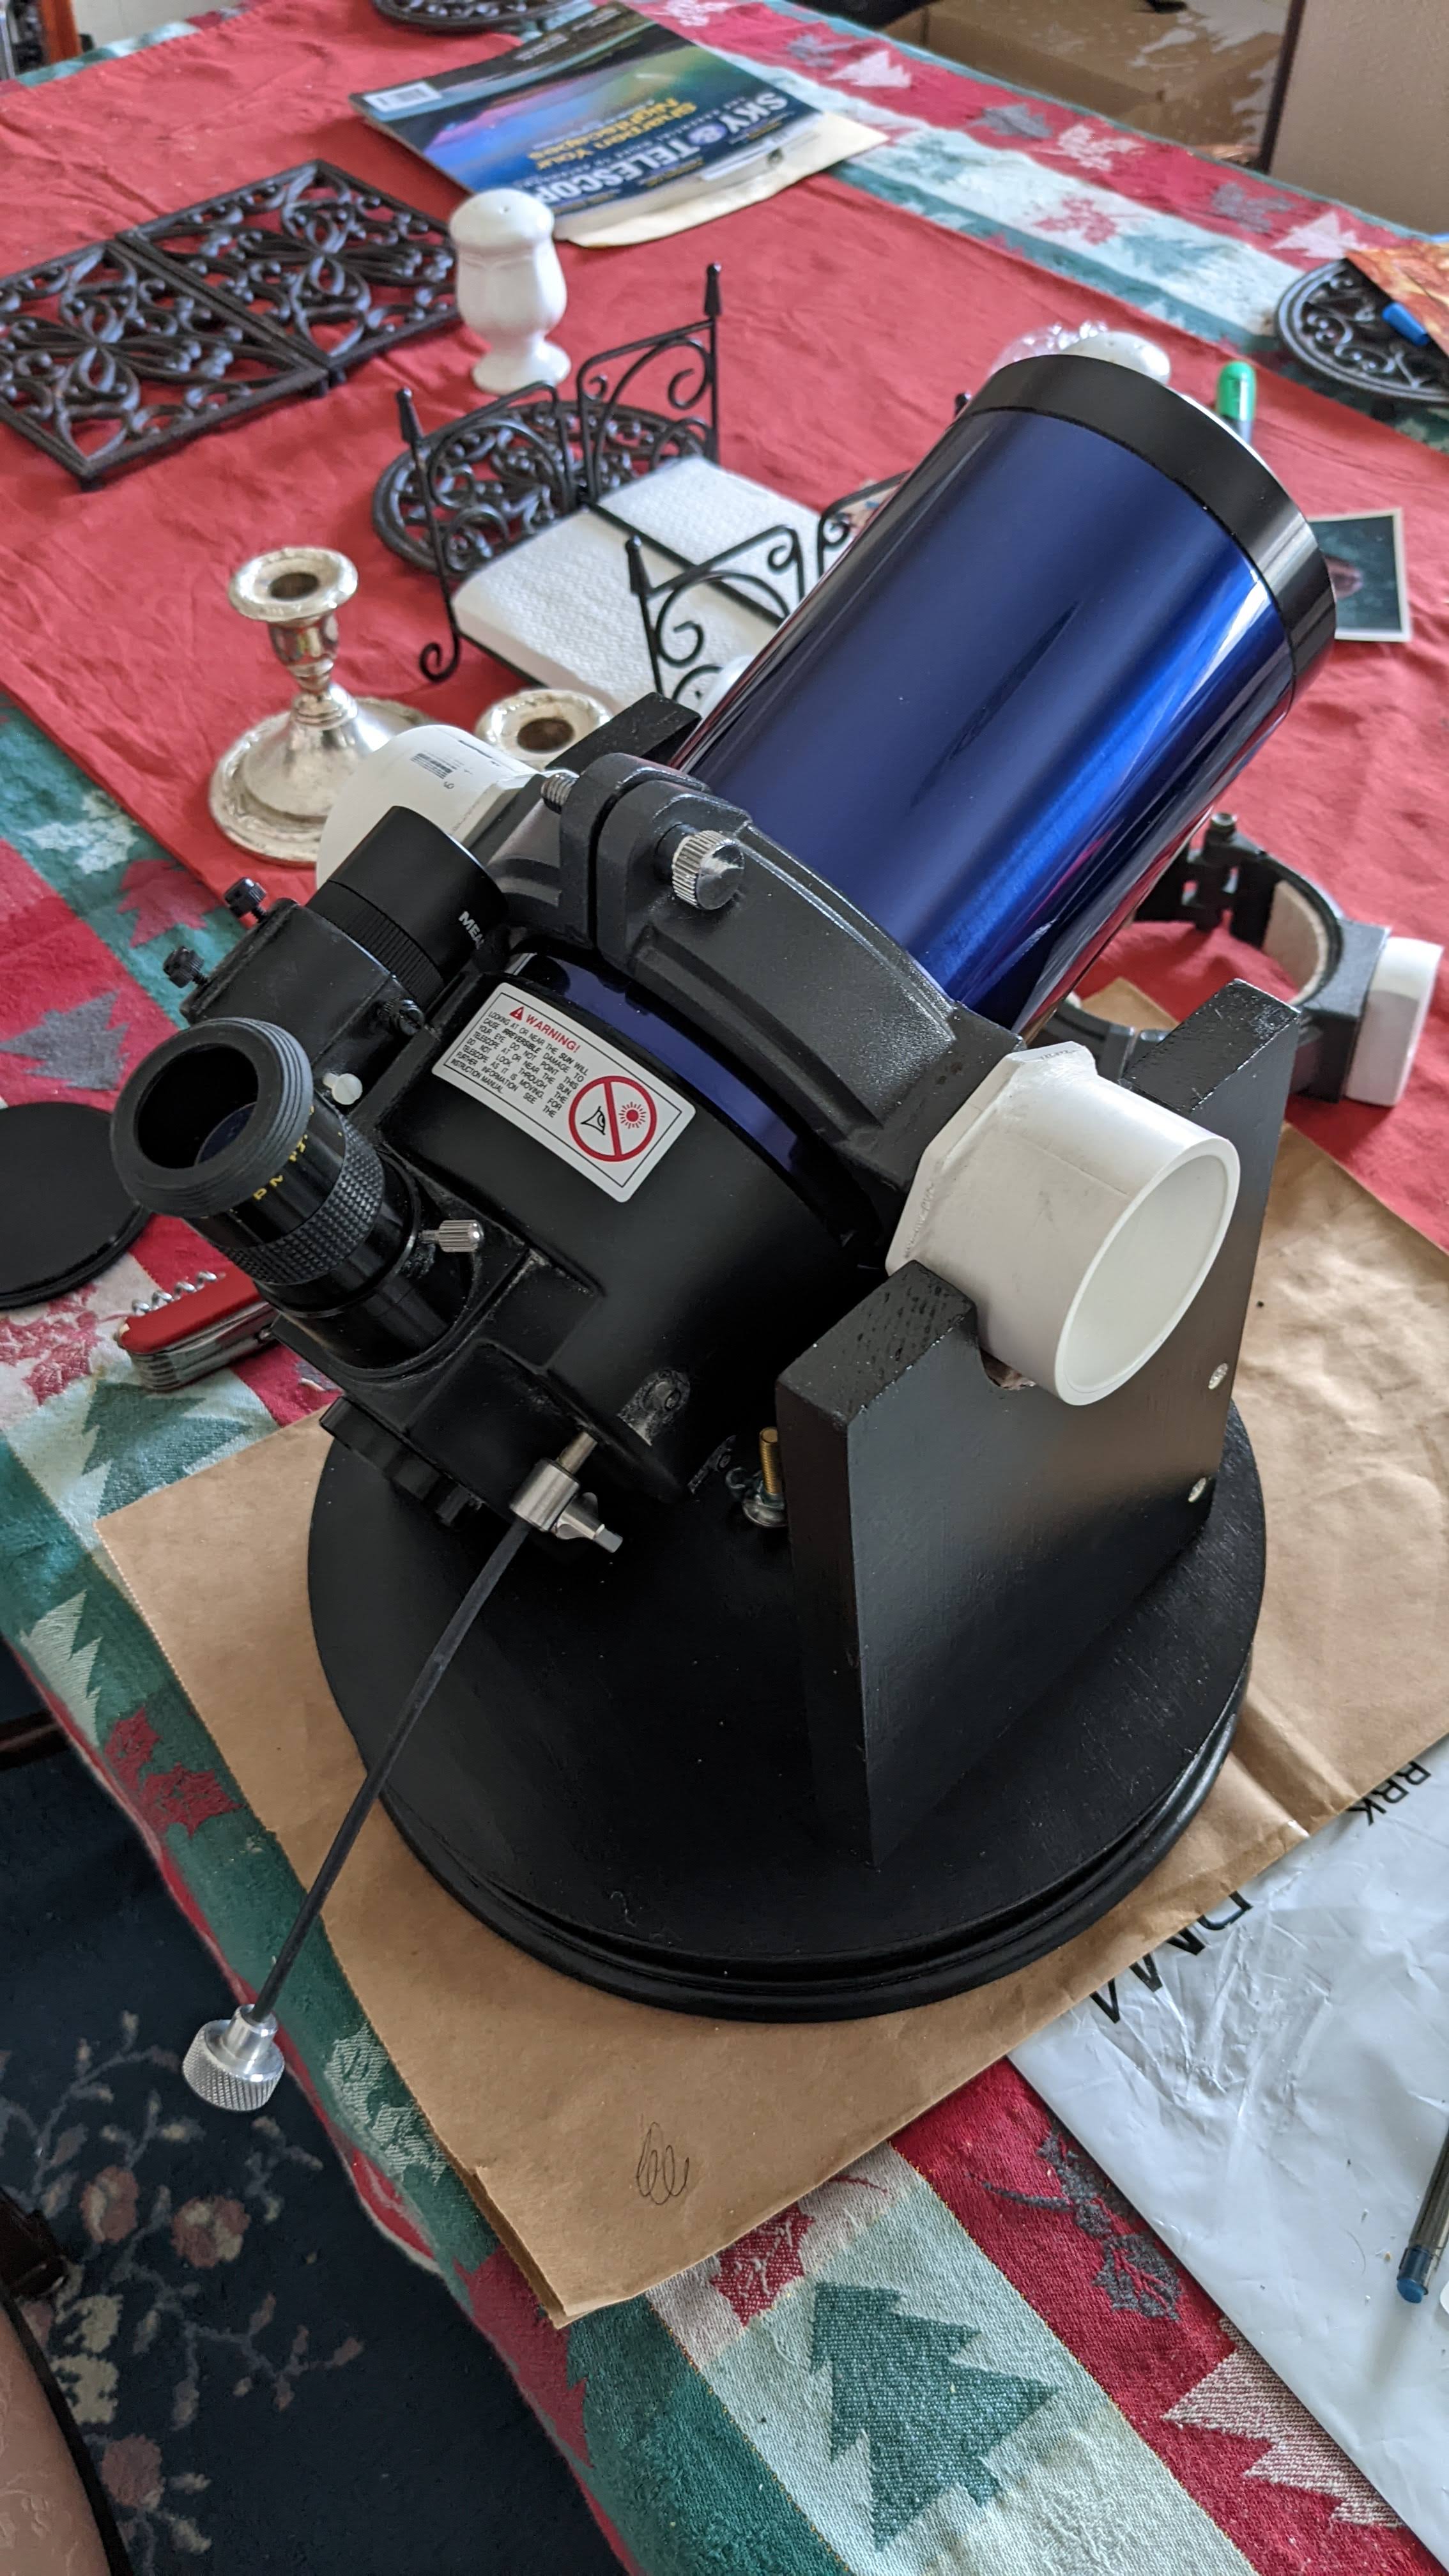
My first thought was to try to find a new or used base to replace the cranky, broken one. These turned out to be quite rare and rather expensive – at least 3/4 of what I paid for the whole setup in the first place. I thought I could do better. As I tinkered with the broken pieces, figuring how to get the still-attached fork arms off the optical tube assembly (OTA), I found that there were two trunnions, or round bearings, built onto the OTA, as can be seen in the first picture below. This narrowed my thinking for a new mount to building a small, tabletop Dobsonian mount.

John Dobson popularized this sort of alt-az mount about five decades ago in an effort to make astronomy more accessible to the general public. His design was built from plywood and scrap odds and ends mostly so it would be as cheap and easy to make as possible. The design has since become wildly popular, not only with amateurs making their own mounts and scopes, but also with mass production consumer telescopes, and even with the most high-end professional research telescopes you’ll find on the planet. Its simplicity is what makes it attractive – a box with bearings on the sides, sitting on a turntable. With that, you can spot anyplace on the sky.

Most homemade Dobsonian (“Dob”) mounts are for telescopes of 6″ or more aperture and four feet or more length. I wanted to make one for this scope of 3.5″ aperture and one foot in length. Again, plans or even examples of such a small setup are remarkably rare on the internet, at least in any of the places I looked. Some I found were modified Dobs with only one vertical arm. This makes for an interesting and attractive option, even used in some consumer versions, but it complicates the construction by introducing unbalanced forces. Frankly, my skills in building things just didn’t seem to be up to that. To be really honest, I wasn’t sure my skills were up to building a simple, straightforward box, based on my experiences of wood shop in junior high school. So I decided to try to modify the original Dobsonian plans on my own.

The Prototype: Proof of Concept

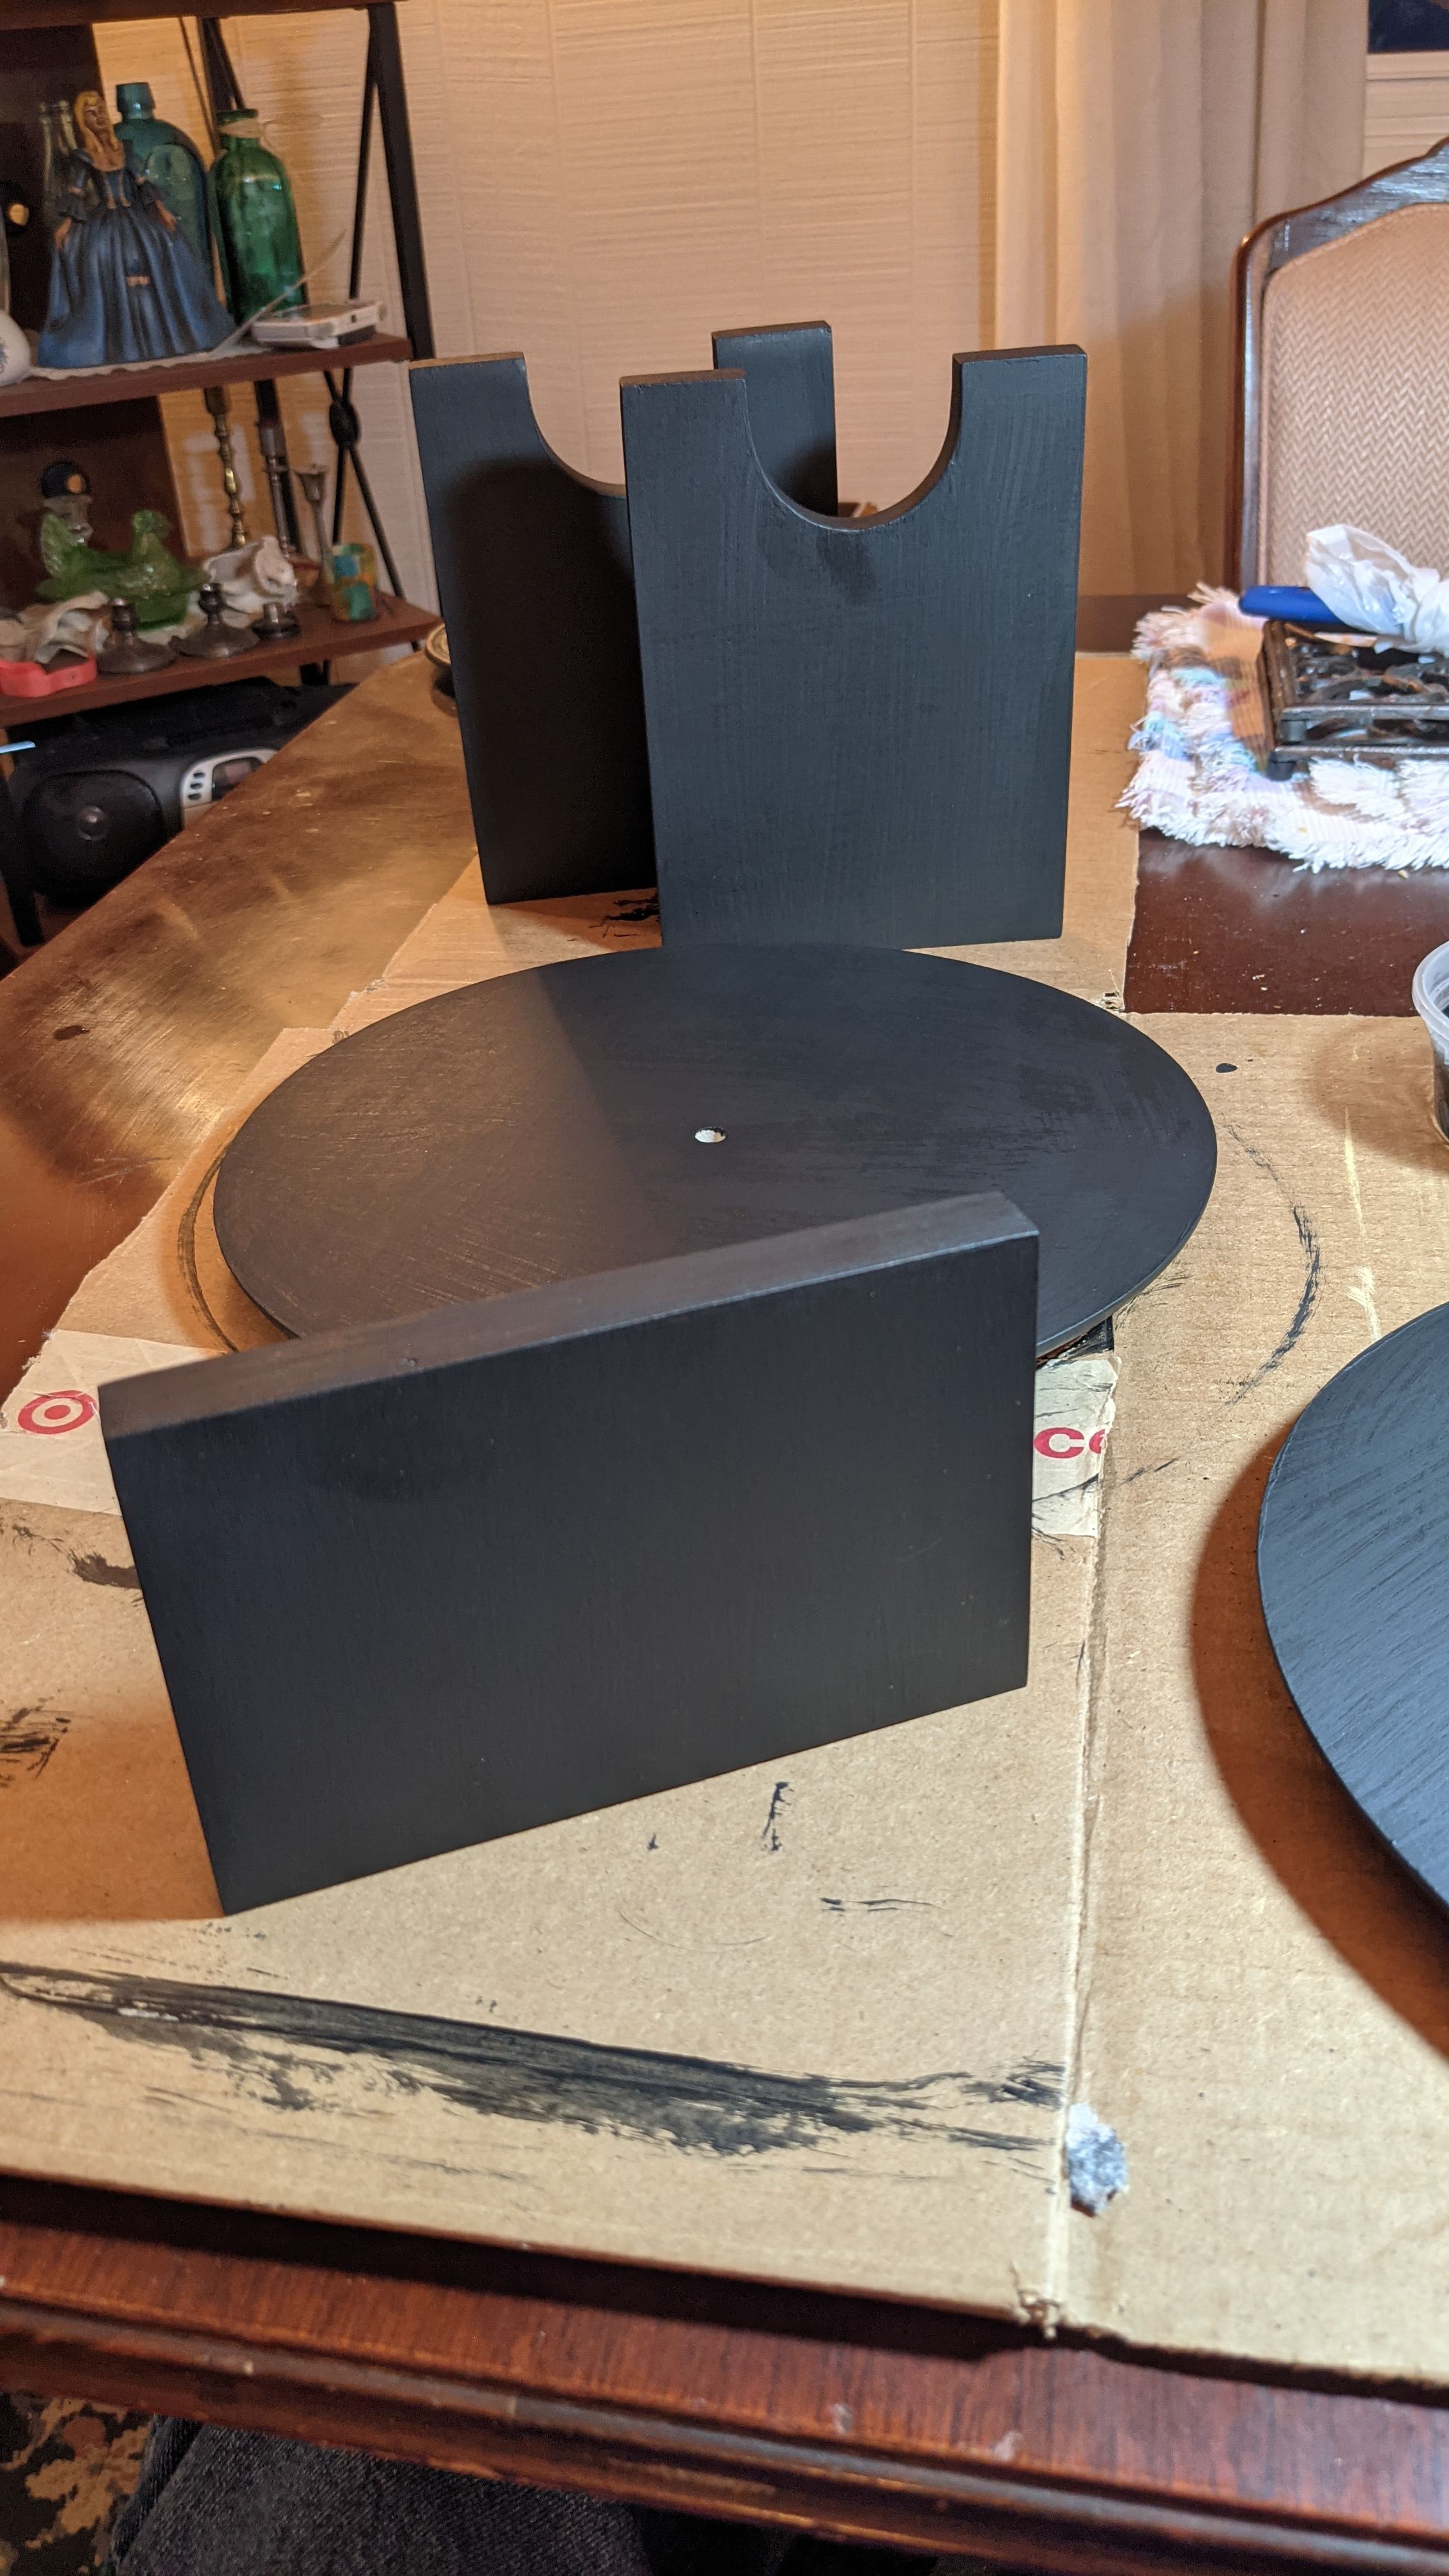
These pictures show an early attempt at a prototype made from some scrap 3/4″ plywood. I cut two pieces to be essentially the same size and cut a V-shaped notch in each to serve as the bearing for the trunnions on the OTA. It kind of worked, mostly. I wasn’t sure about how well balanced it was going to be, but it was a start. I even took this simple version outside to the deck and played with it a bit on the table out there. Okay, not well balanced at all. Apparently, all the balance came from torque or tension applied by being screwed in place with the now gone fork arms. This could be a problem.

While noodling around on the internet one day, I found a picture of someone’s ETX-90 with no trunnions. On further investigation, I found that, while I thought the trunnion structures were part of the moulded plastic end of the OTA, they were in fact easily detachable. This was exciting news! I could correct the balance problem by removing the trunnions! But, without the trunnions, what will hold the OTA? The original Dob plans call for a box built snuggly around the OTA and onto which trunnions are attached on the sides. This allows for finding the balance point of the OTA and even being able to adjust one way or the other to accommodate heavier eyepieces or whatnot. Since my OTA is so short, and my woodworking skills are so feeble, I didn’t really want to go that route.

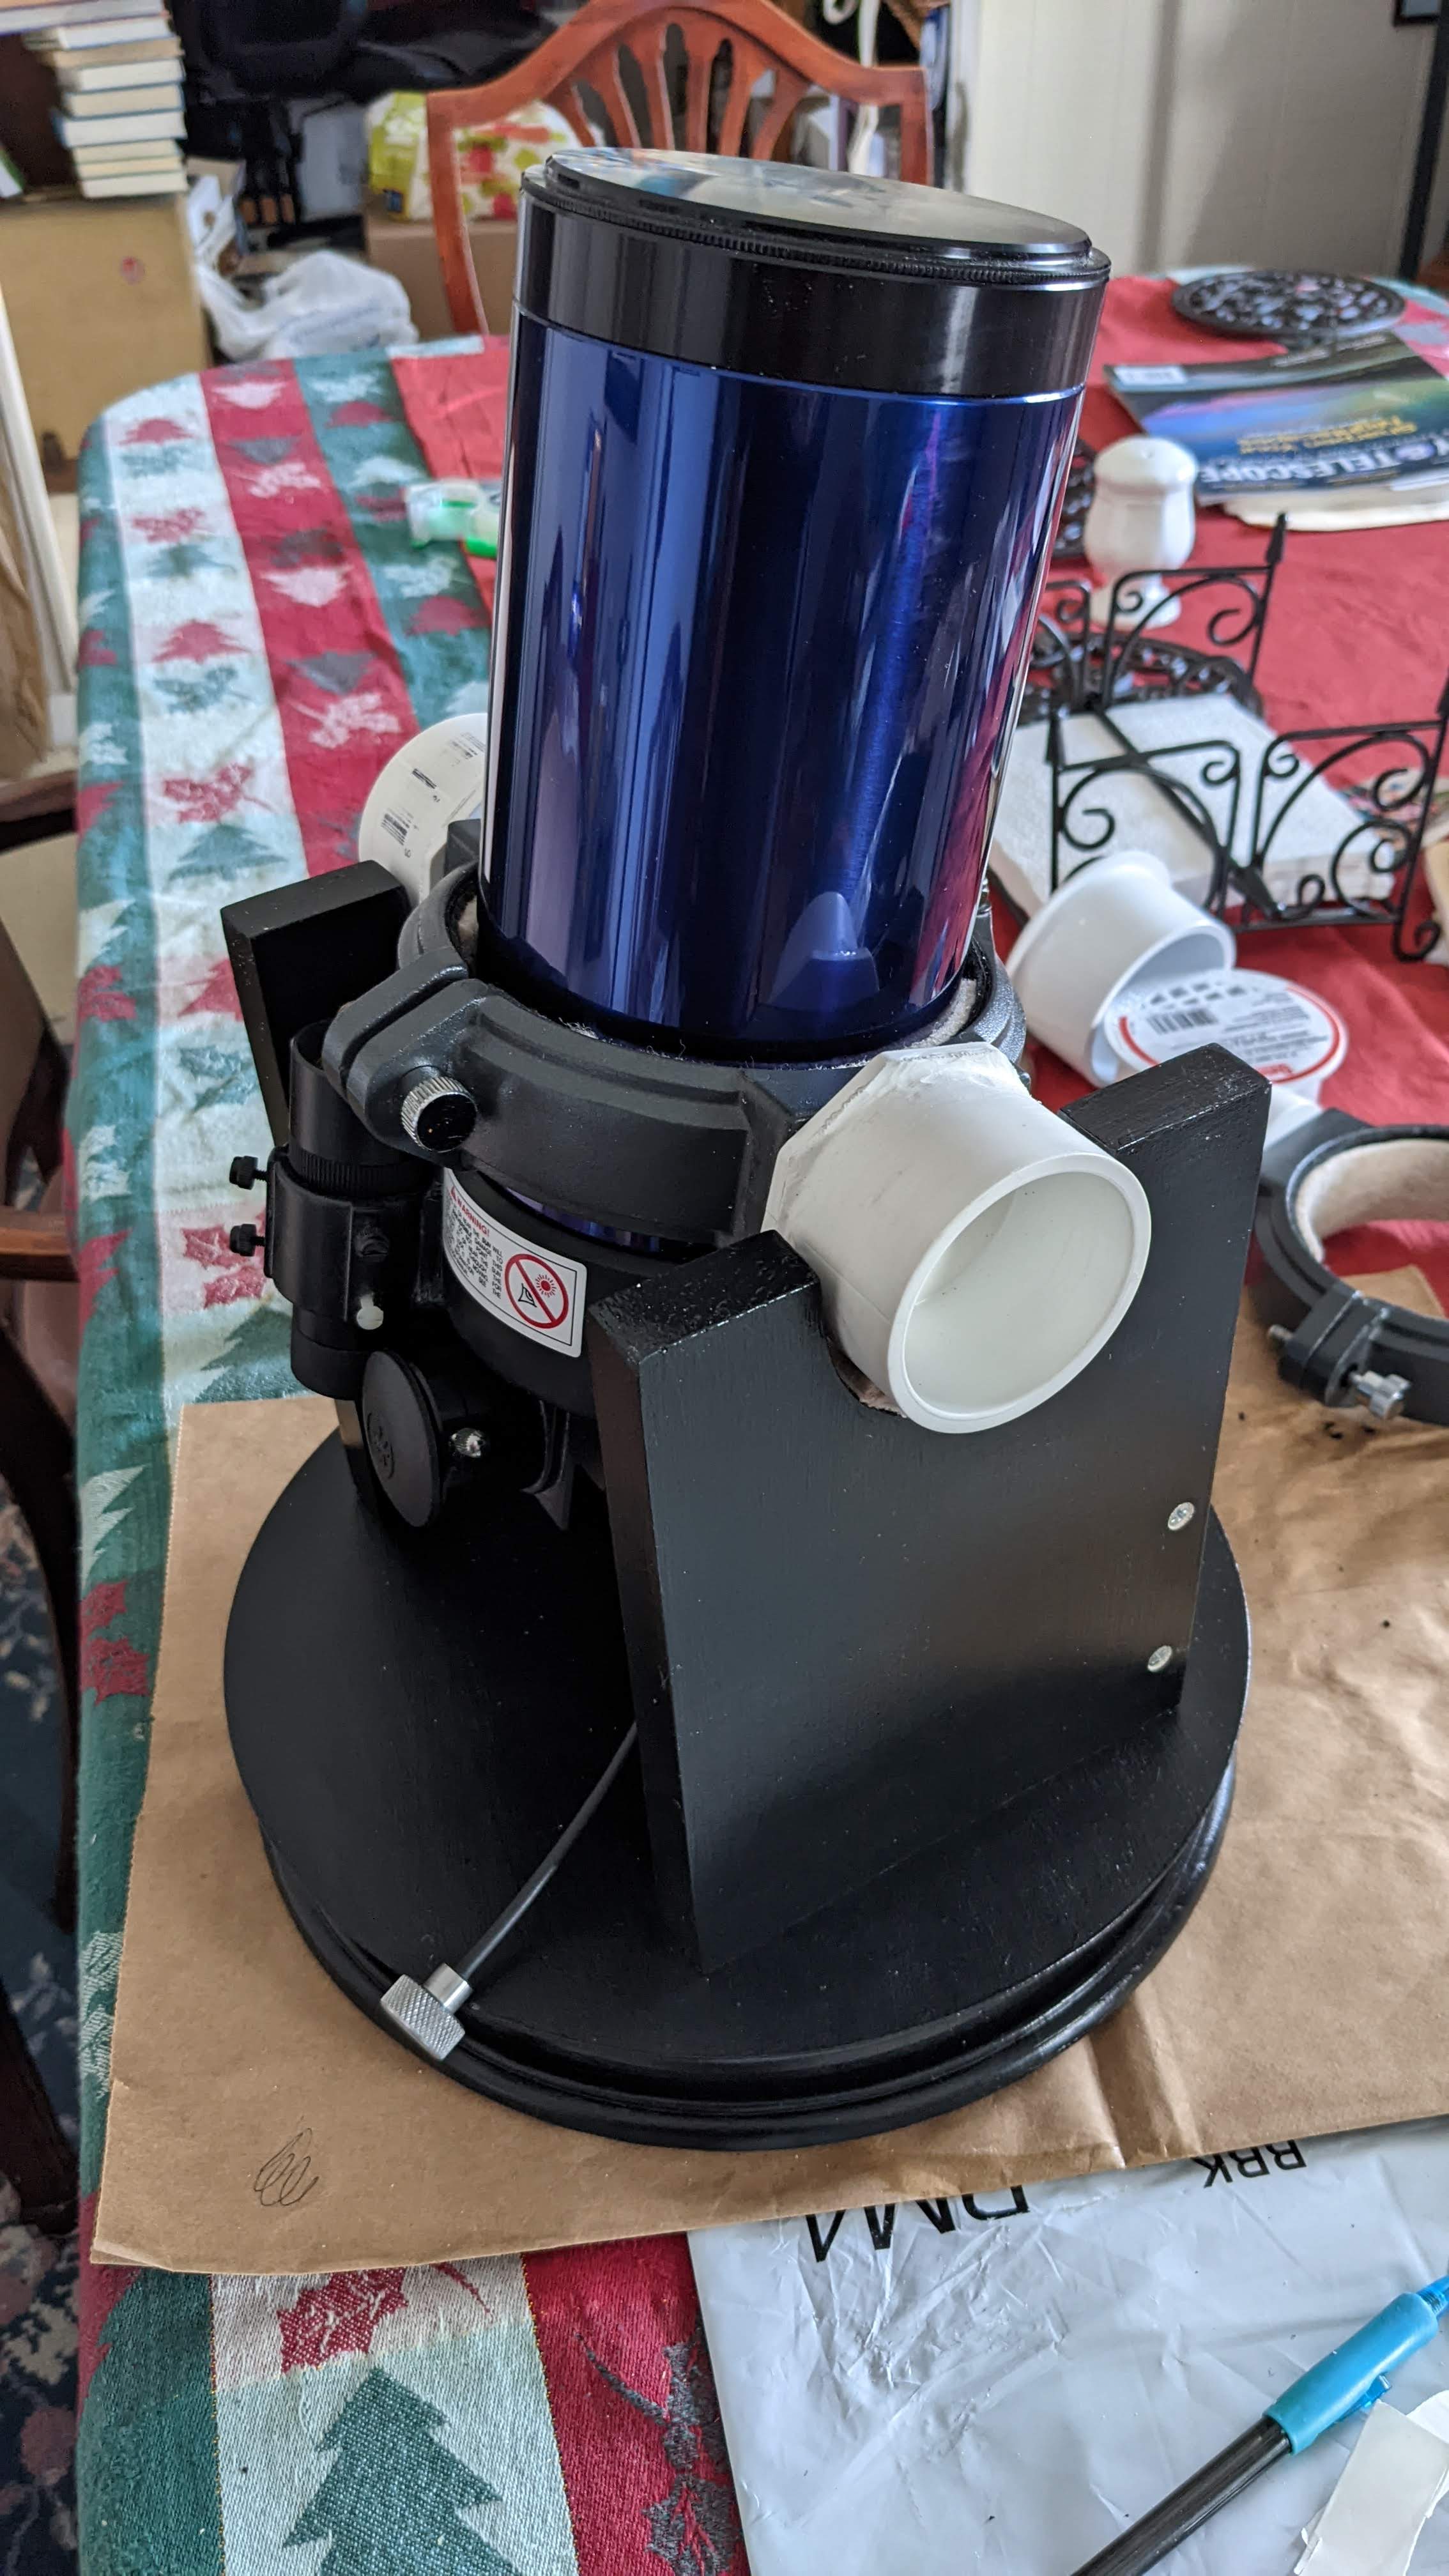
I hit on the idea of buying some tube rings, which are pretty much what they sound like: hinged rings that clamp around the optical tube to hold it fast and attach to a mount. This would also give me options. For example, if I wanted to try the one-armed mount, I could just use a tube ring to hold it on…. well, that was still going to be more complicated. With tube rings or a tube ring, I could screw trunnions on what would ordinarily the ring’s top and bottom where it would screw onto the mount and hold other equipment, and then turn it sideways so those trunnions would then be the sides. If that doesn’t make sense, you’ll see in the later pictures how it works. I went on eBay and found a pair of 90 mm tube rings for a lot more than I really wanted to pay, but they were also a pretty rare find, and they would hopefully save me a lot of hassle, so whatever.

Eventually, I found what I wanted at Michael’s, the arts and craft store. For the turntable base I found two 11″ diameter clock faces, unfinished, and an 11″ square piece of pine that would ordinarily be used for a plaque or trivet or whatnot. I took the board to Home Depot to have someone make three cuts for me that would give me the right sized pieces. My assumption here was that they would have a saw that would make nice straight, square cuts and someone who knew how to use it. I may have overestimated. The fellow who ended up doing the cuts for me seemed to be (1) kind of disgruntled, (2) only nominally skilled on aforementioned saw, (3) not at all invested in my project, and (4) really high. Consequently, my little board was pretty much brutalized and my right sized pieces were rough, uneven, and no better than if I had done them myself with my limited resources. Let this be a lesson to you all! And to me, because now I had to figure out how to make them beautiful again and work. Which I did, more or less, through some clever cutting and (for me) careful hand sanding. It also involved buying a new Dremel tool and practicing on various scraps of wood lying about. At any rate, I got it to a place that I was able to accept.

The next problem comes back to my woodworking. Here is my confession. Because I don’t have much experience, I don’t have much skill. Because I don’t have much skill, I don’t do much woodworking. Because I don’t do much woodworking, I don’t have many woodworking tools that would make woodworking a lot easier. Because I don’t have many tools or the right tools, the projects I have done have been hard and haven’t really come out square most of the time. Because my previous projects haven’t be perfect, and because I’m a perfectionist, I don’t do much woodworking. You start to get the idea. Meanwhile, I knew this was a project that would require some precision in the work if it were going to work properly. Pieces would need to be reasonably square, parallel, and smooth to provide the kind of platform that telescopic viewing requires. Again, because I don’t have things like a table saw, or a joiner, or a straight edge guide for saws, or a plane, or whatever else to make wood square, or round for that matter, this delayed the process considerably. Eventually, I decided to try to find pre-cut pieces that would come properly square or properly round to begin with. Then I would just have to do my best not to screw them up too much. This was in conjunction with my efforts at designing the required sizes of the various pieces. So some 35 years after my last engineering class, I managed to work out what seemed to be workable dimensions. Yay, me!

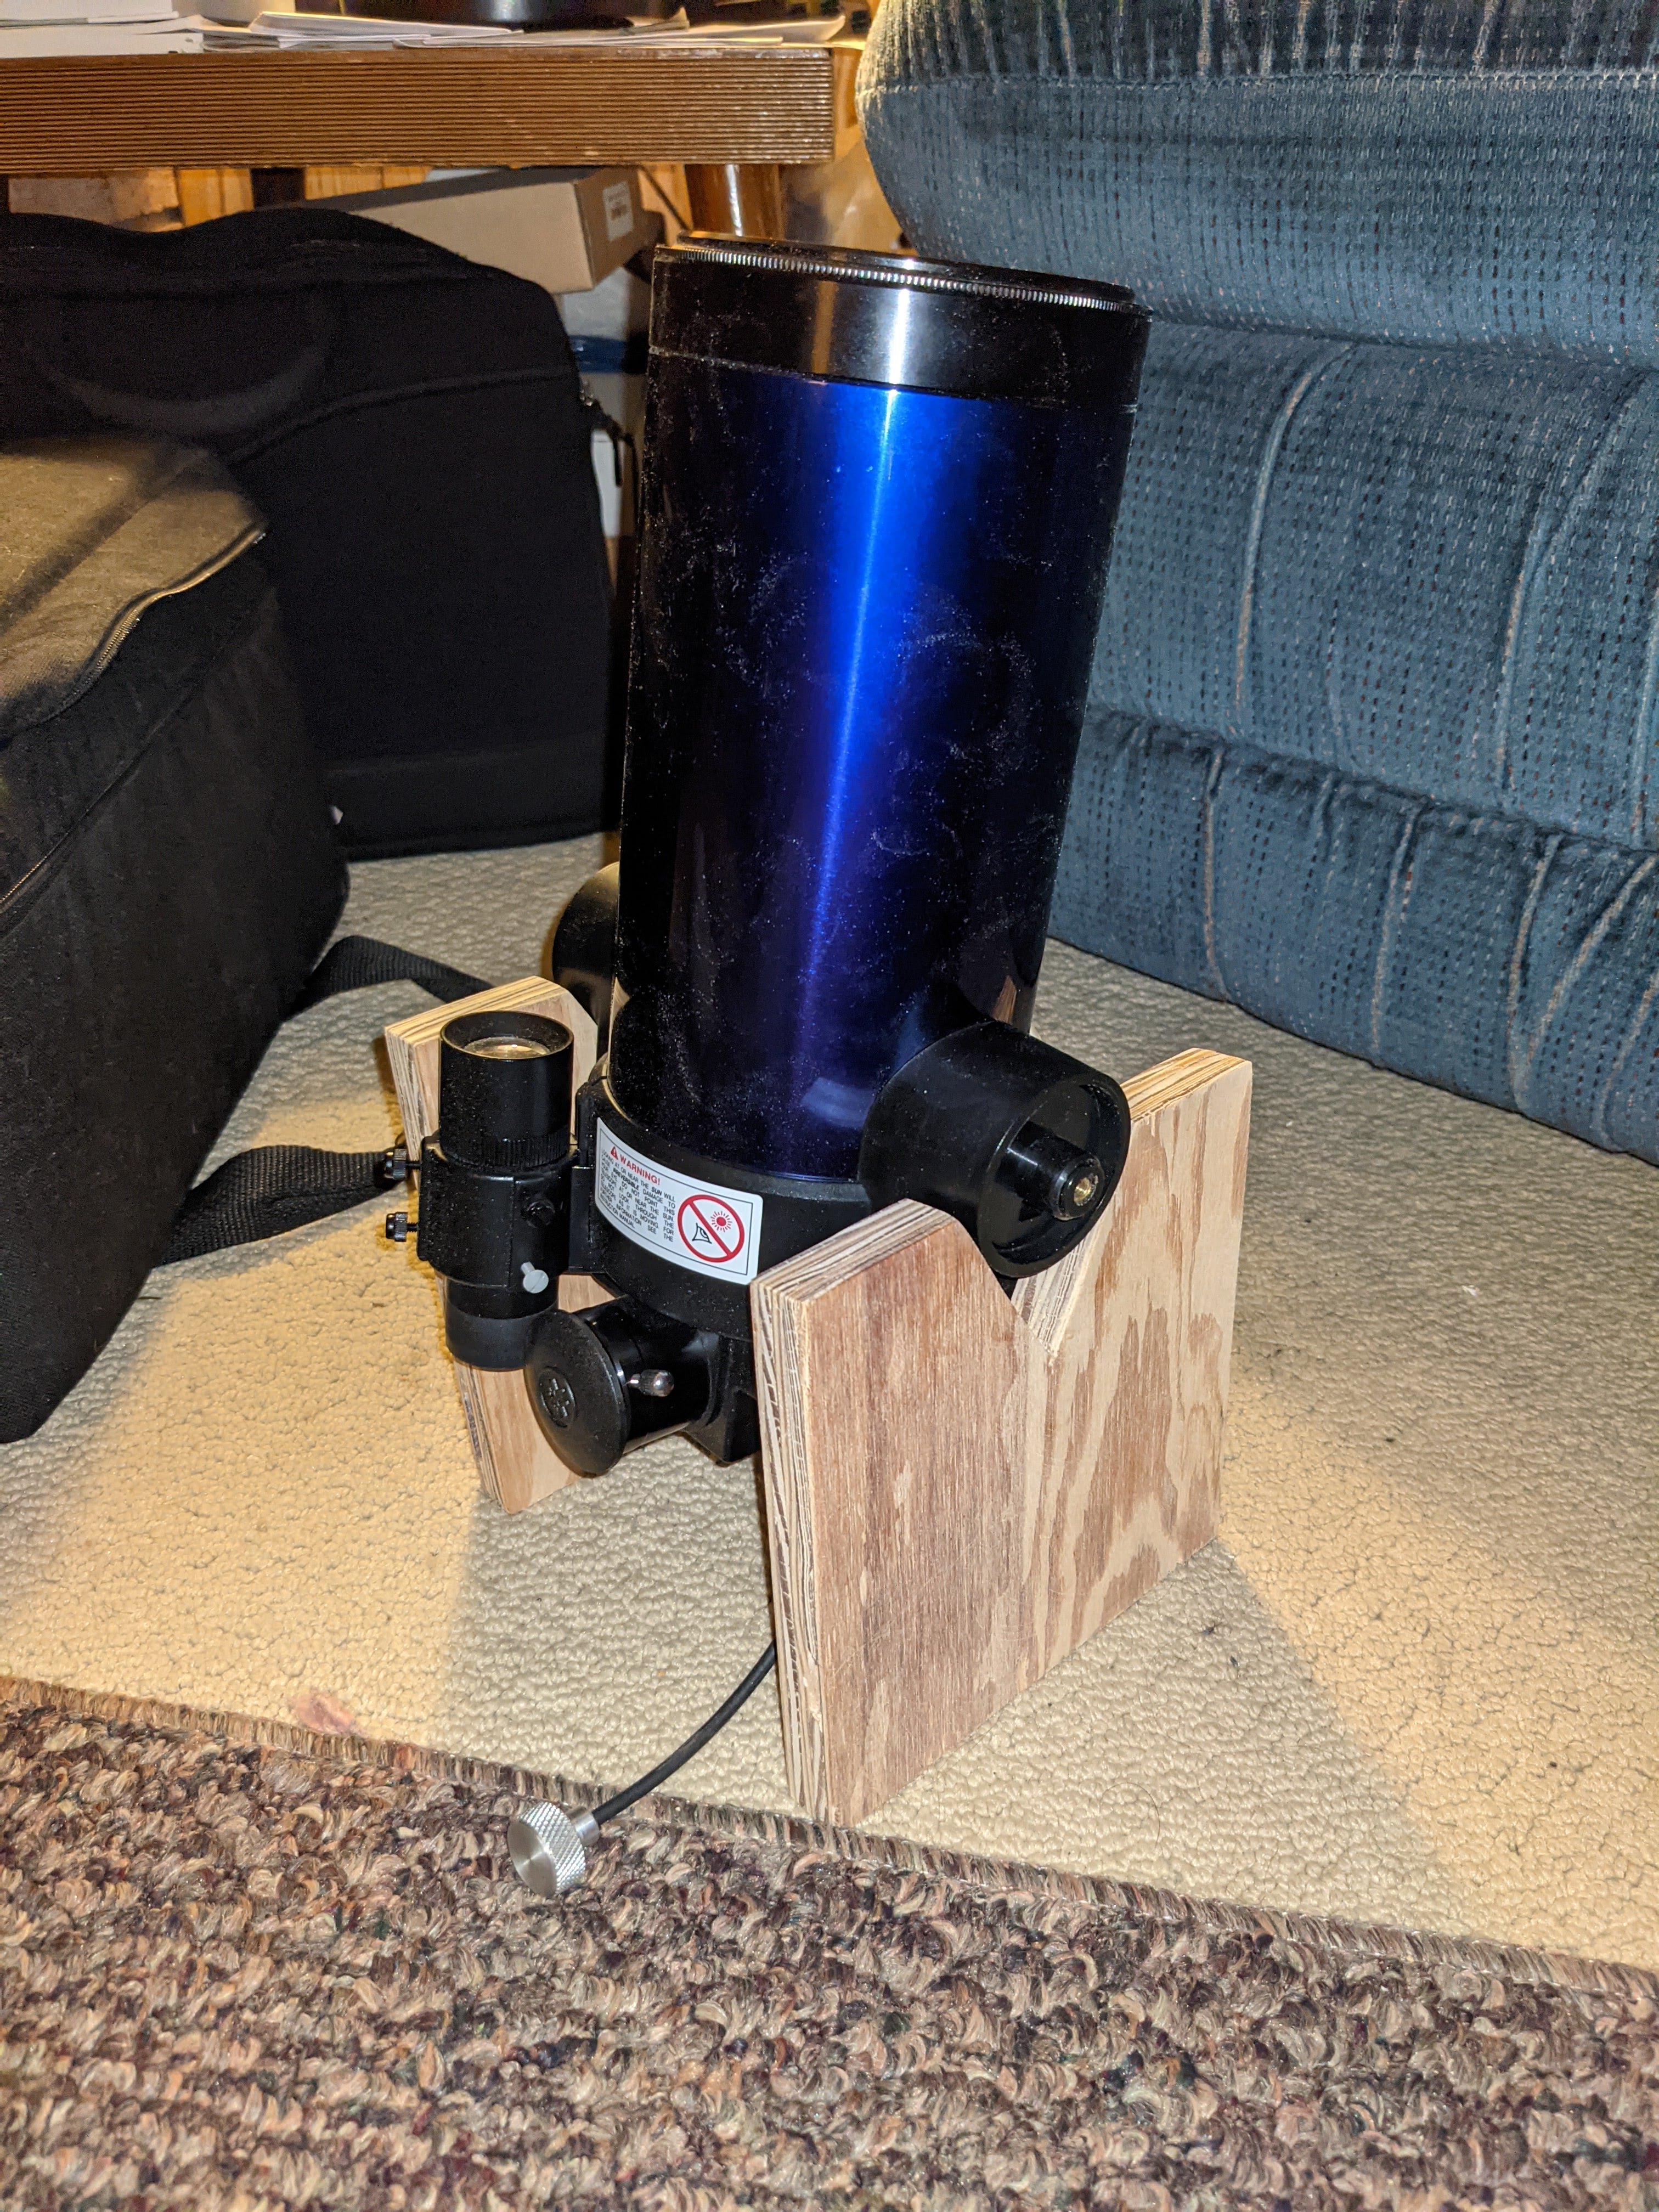
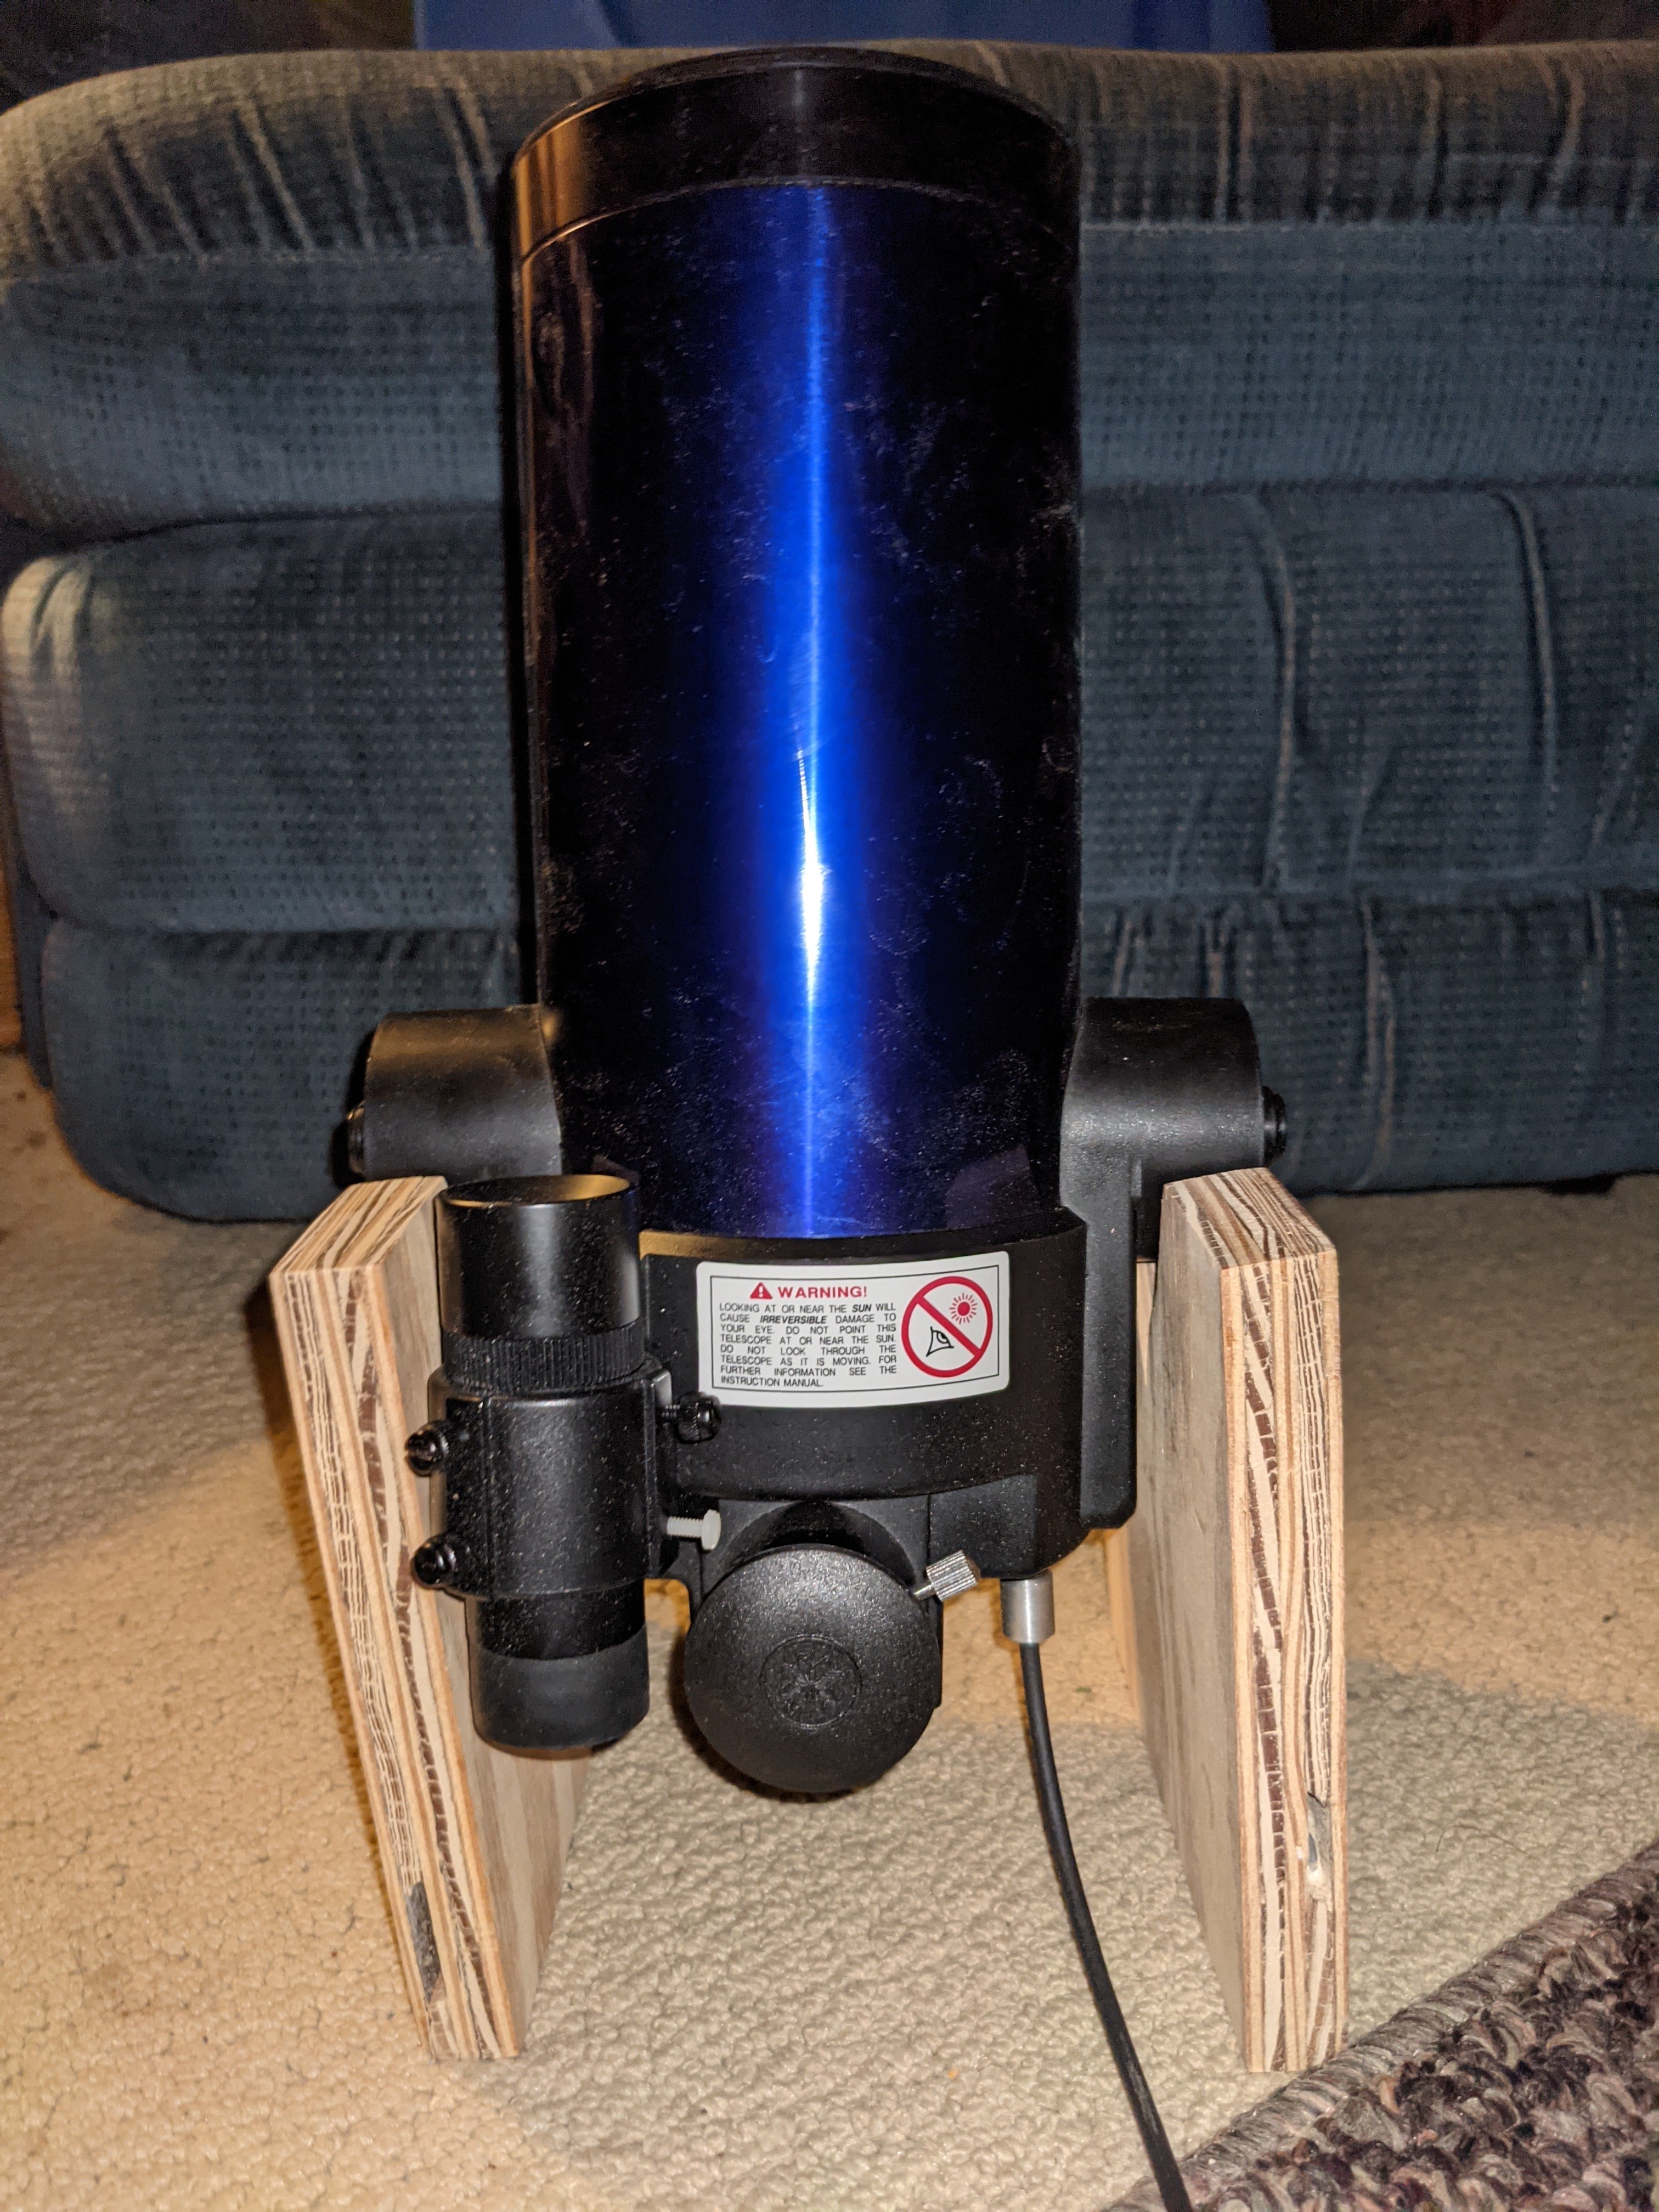
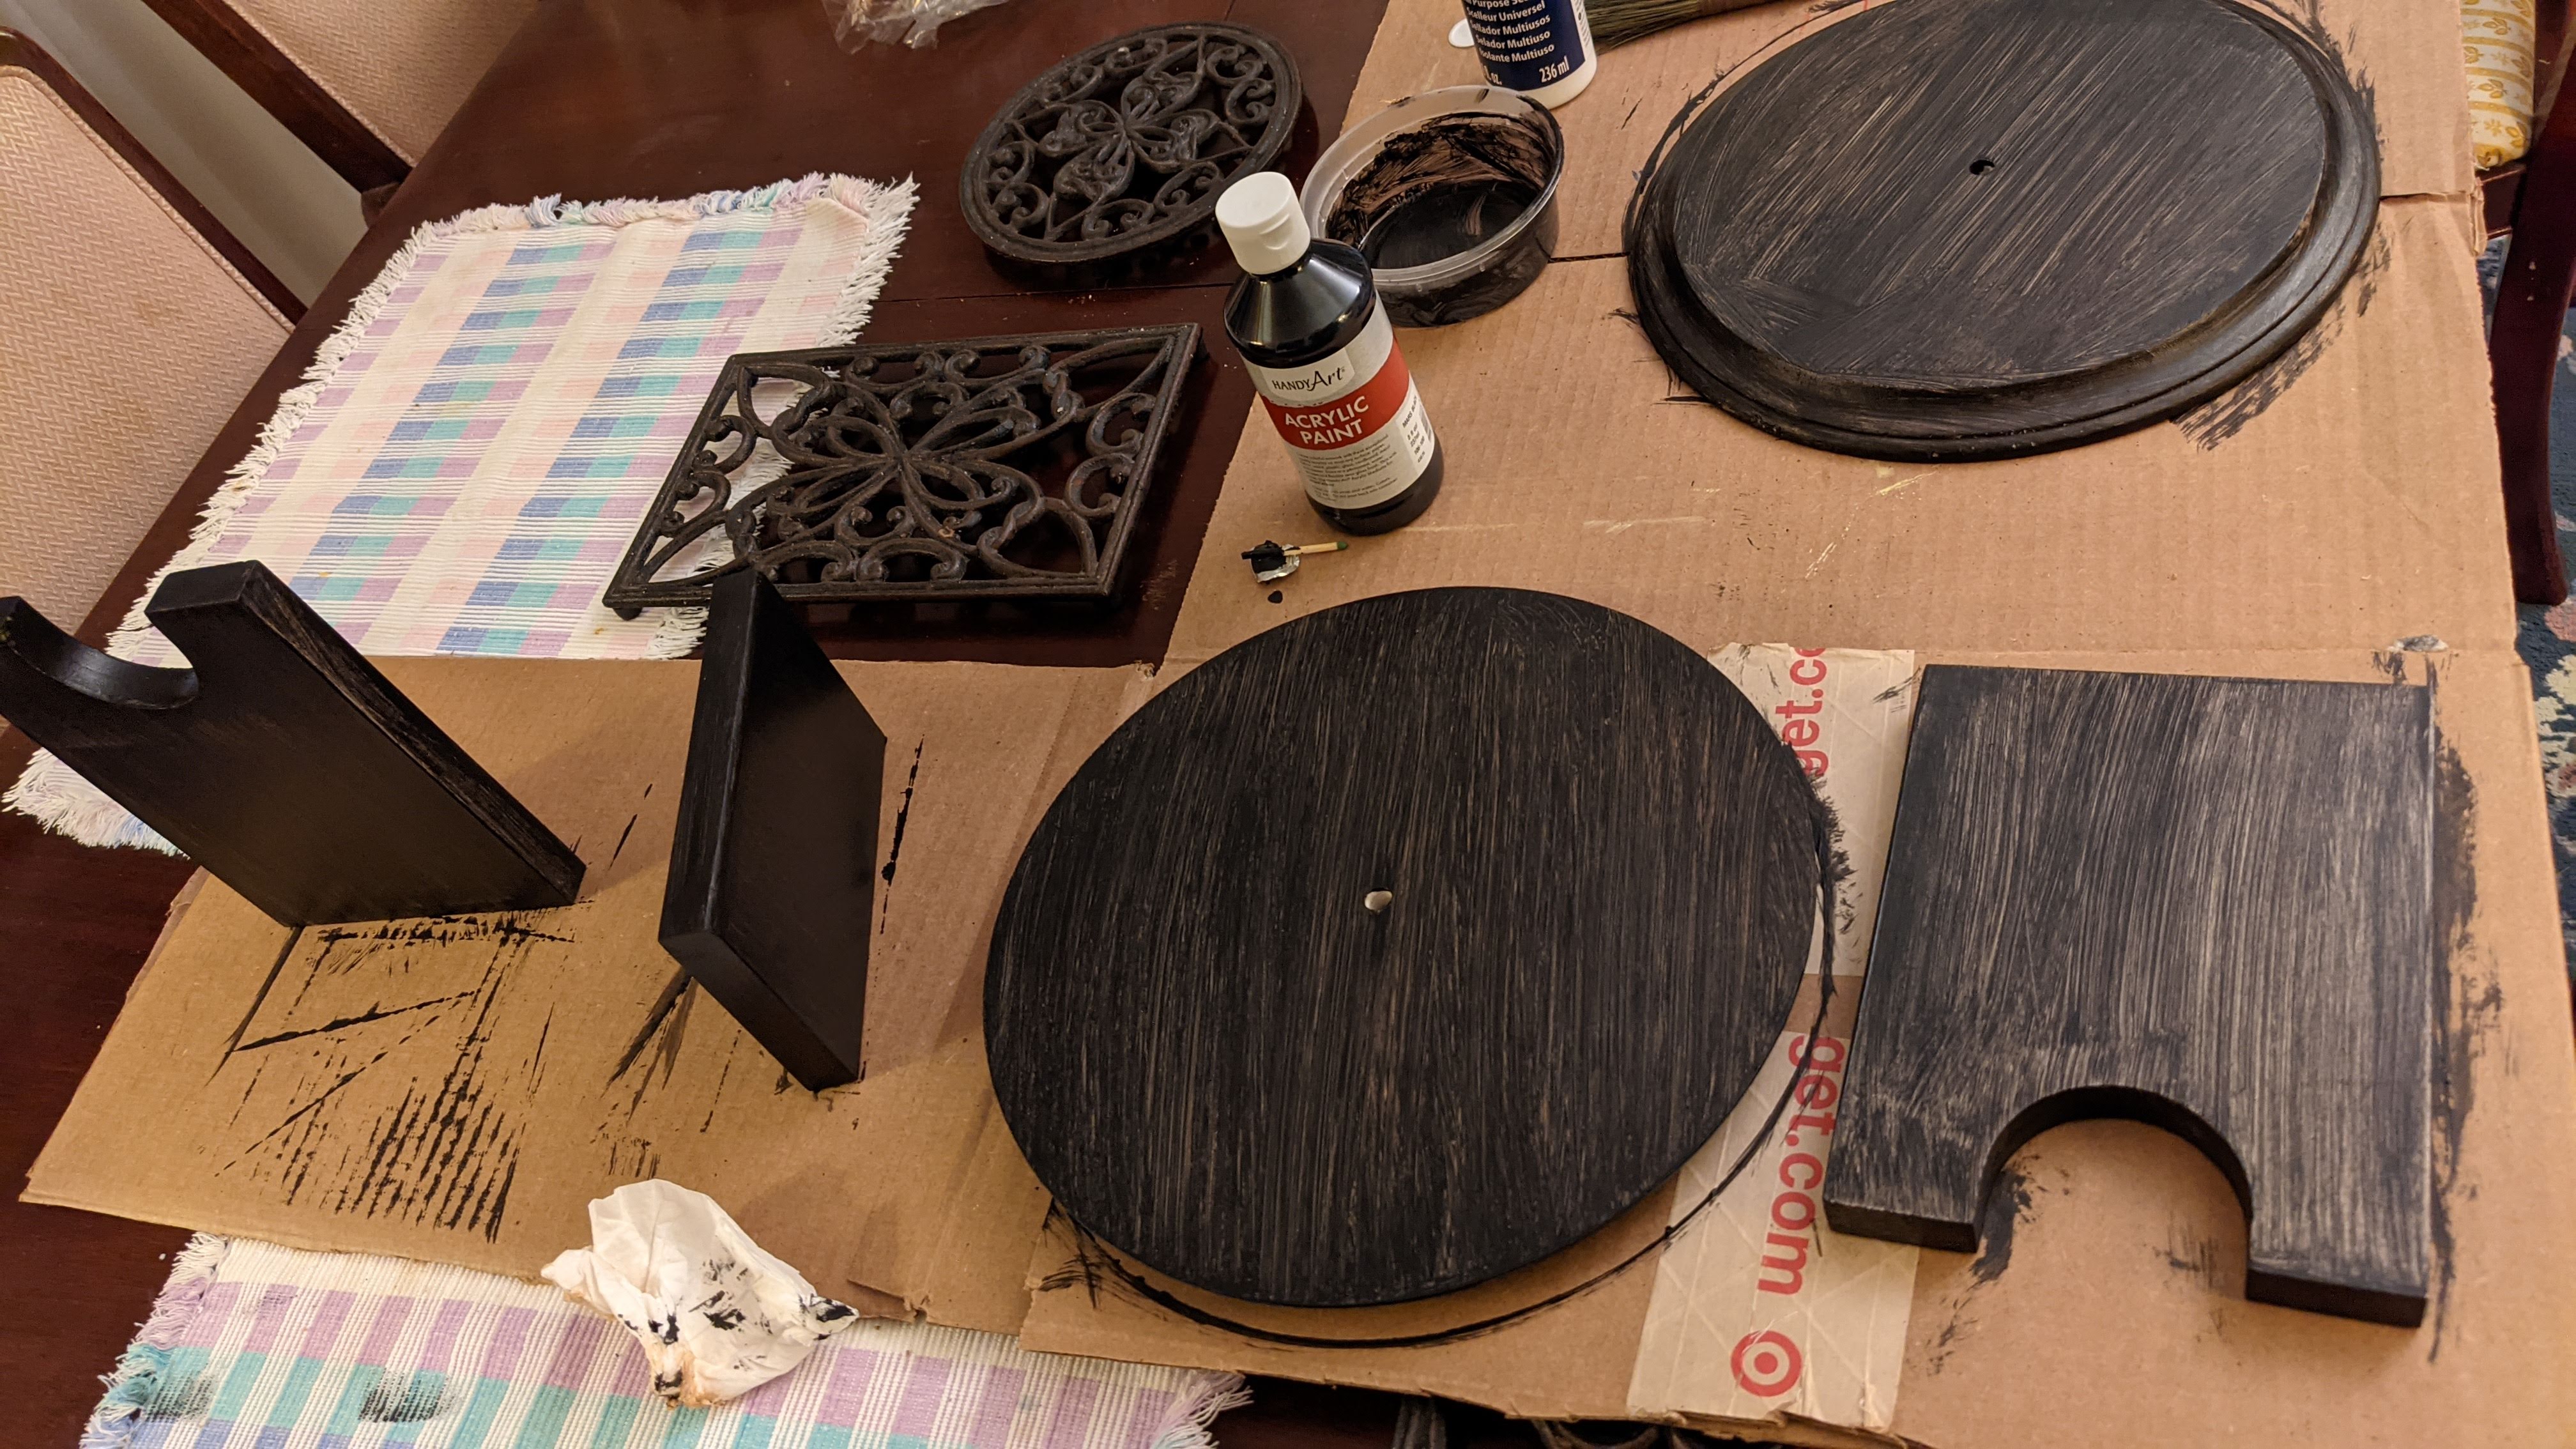
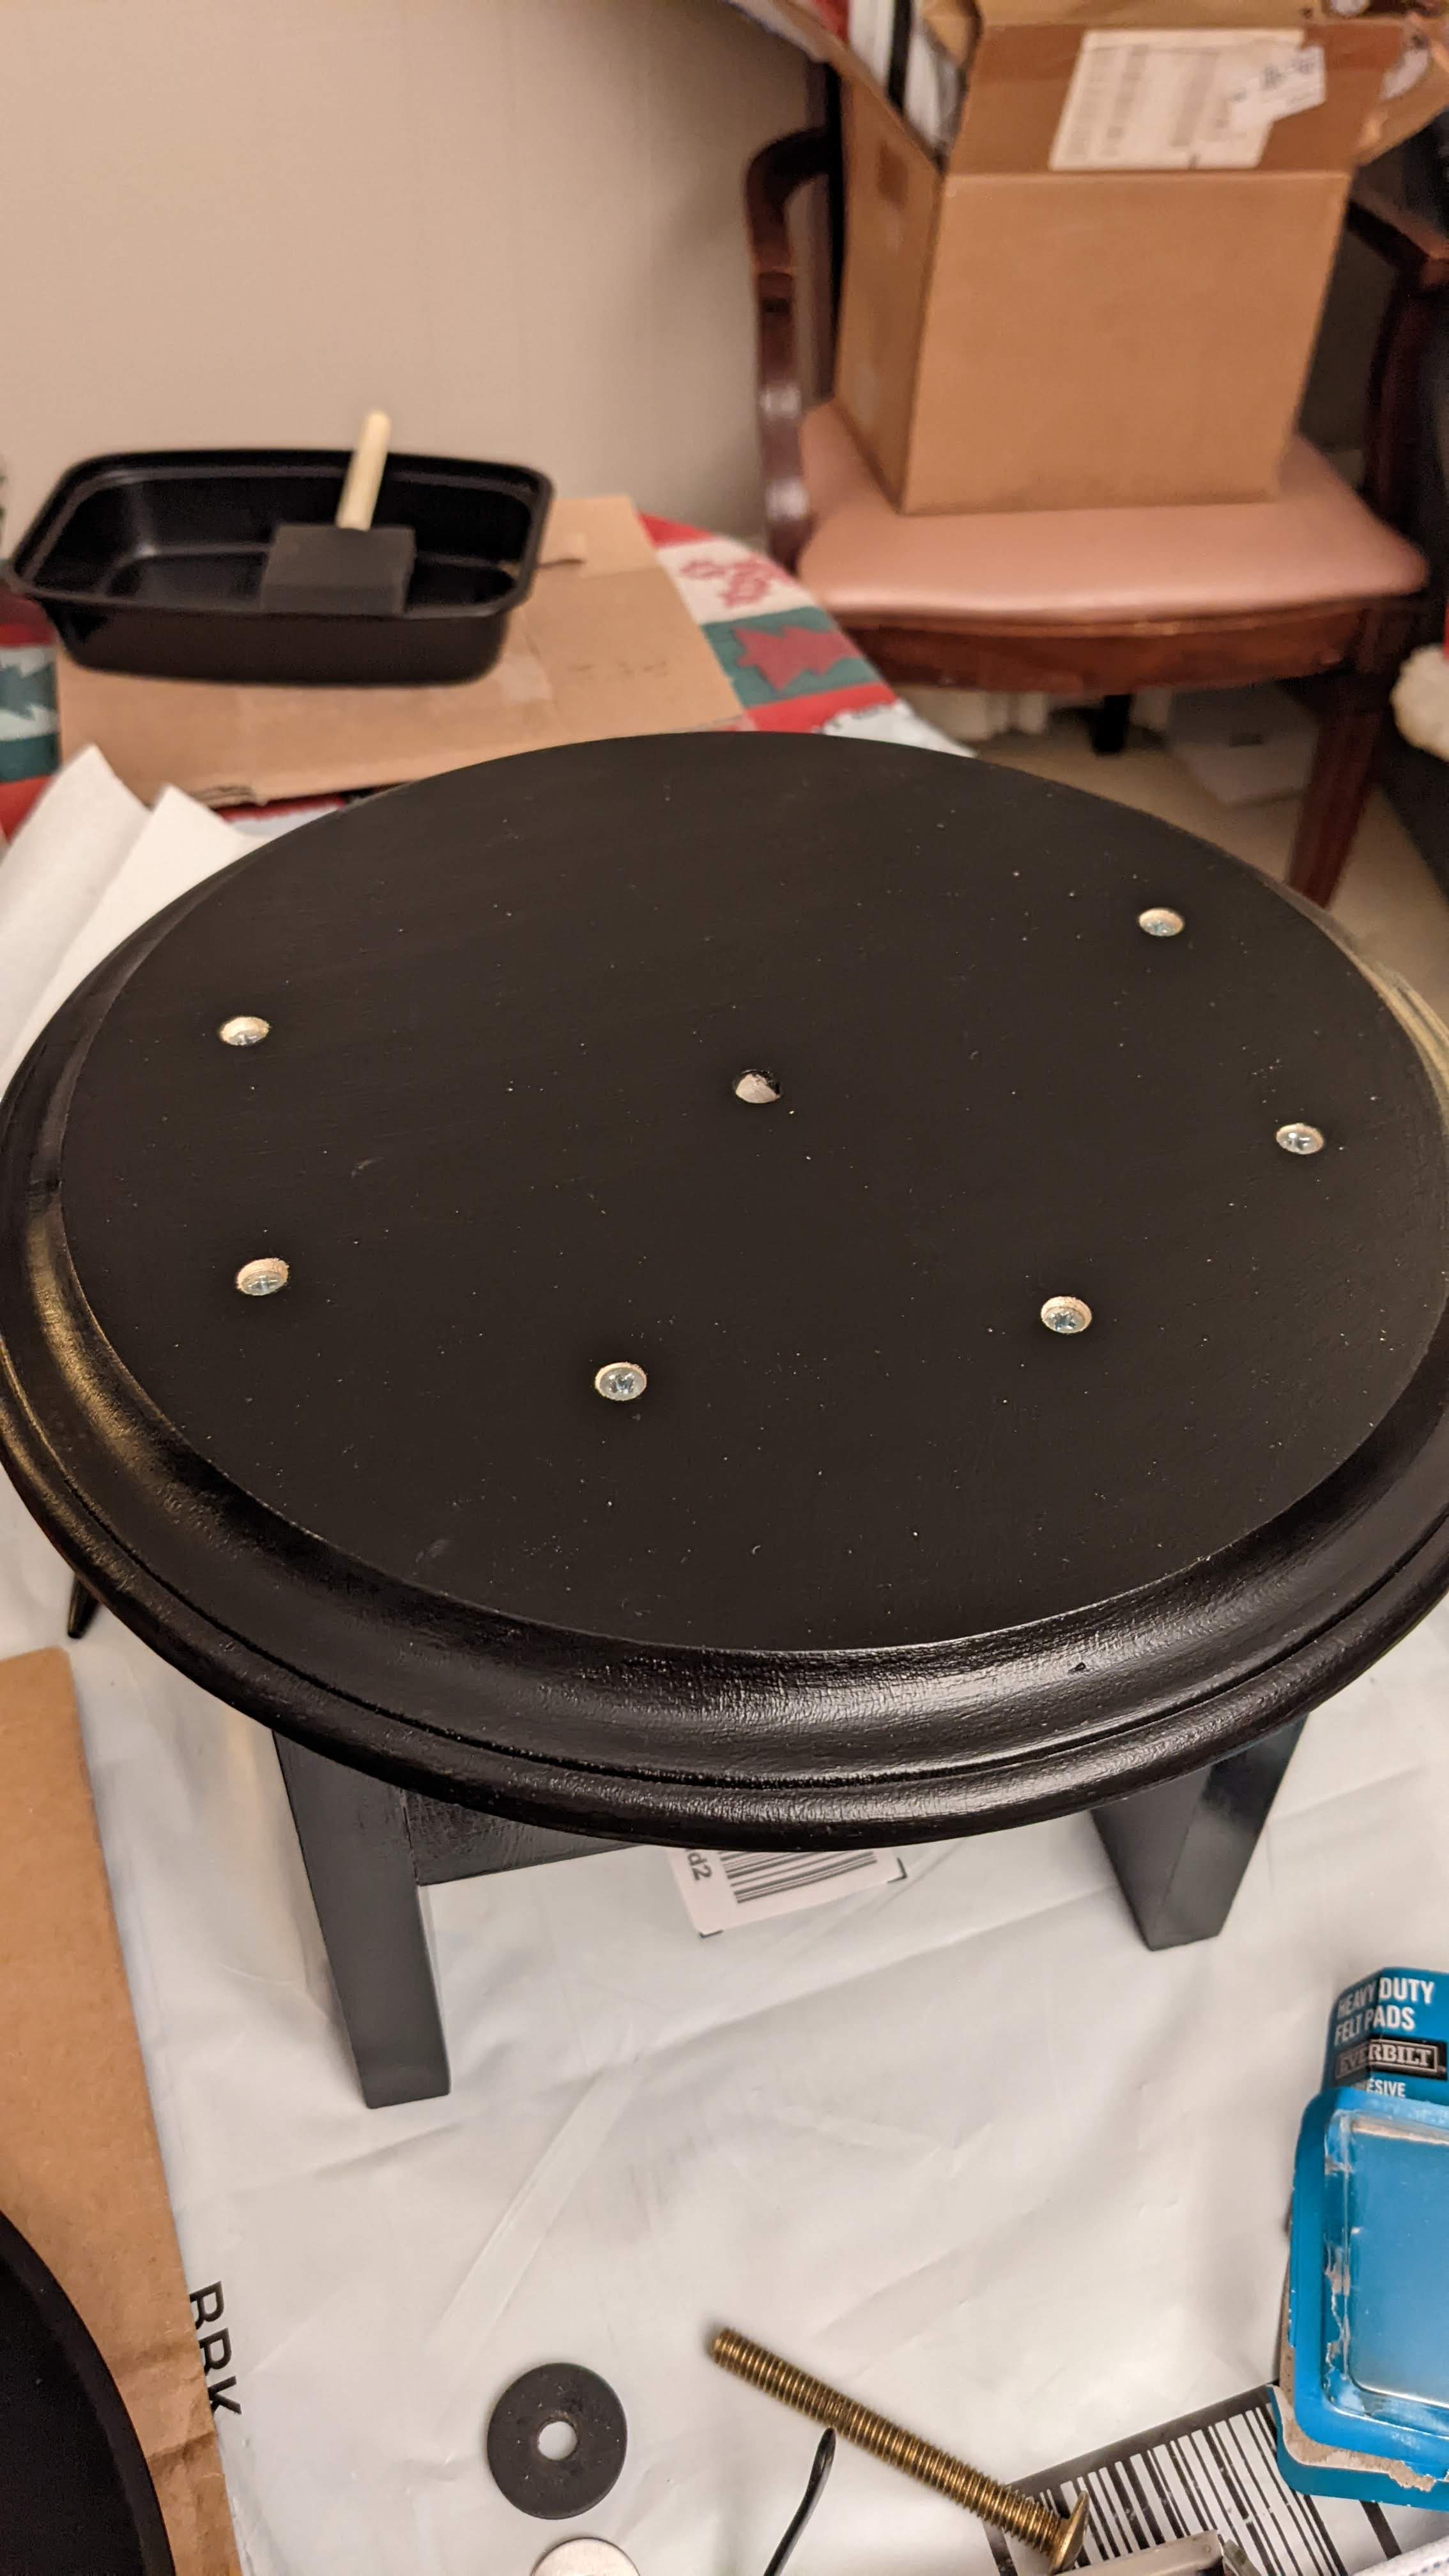
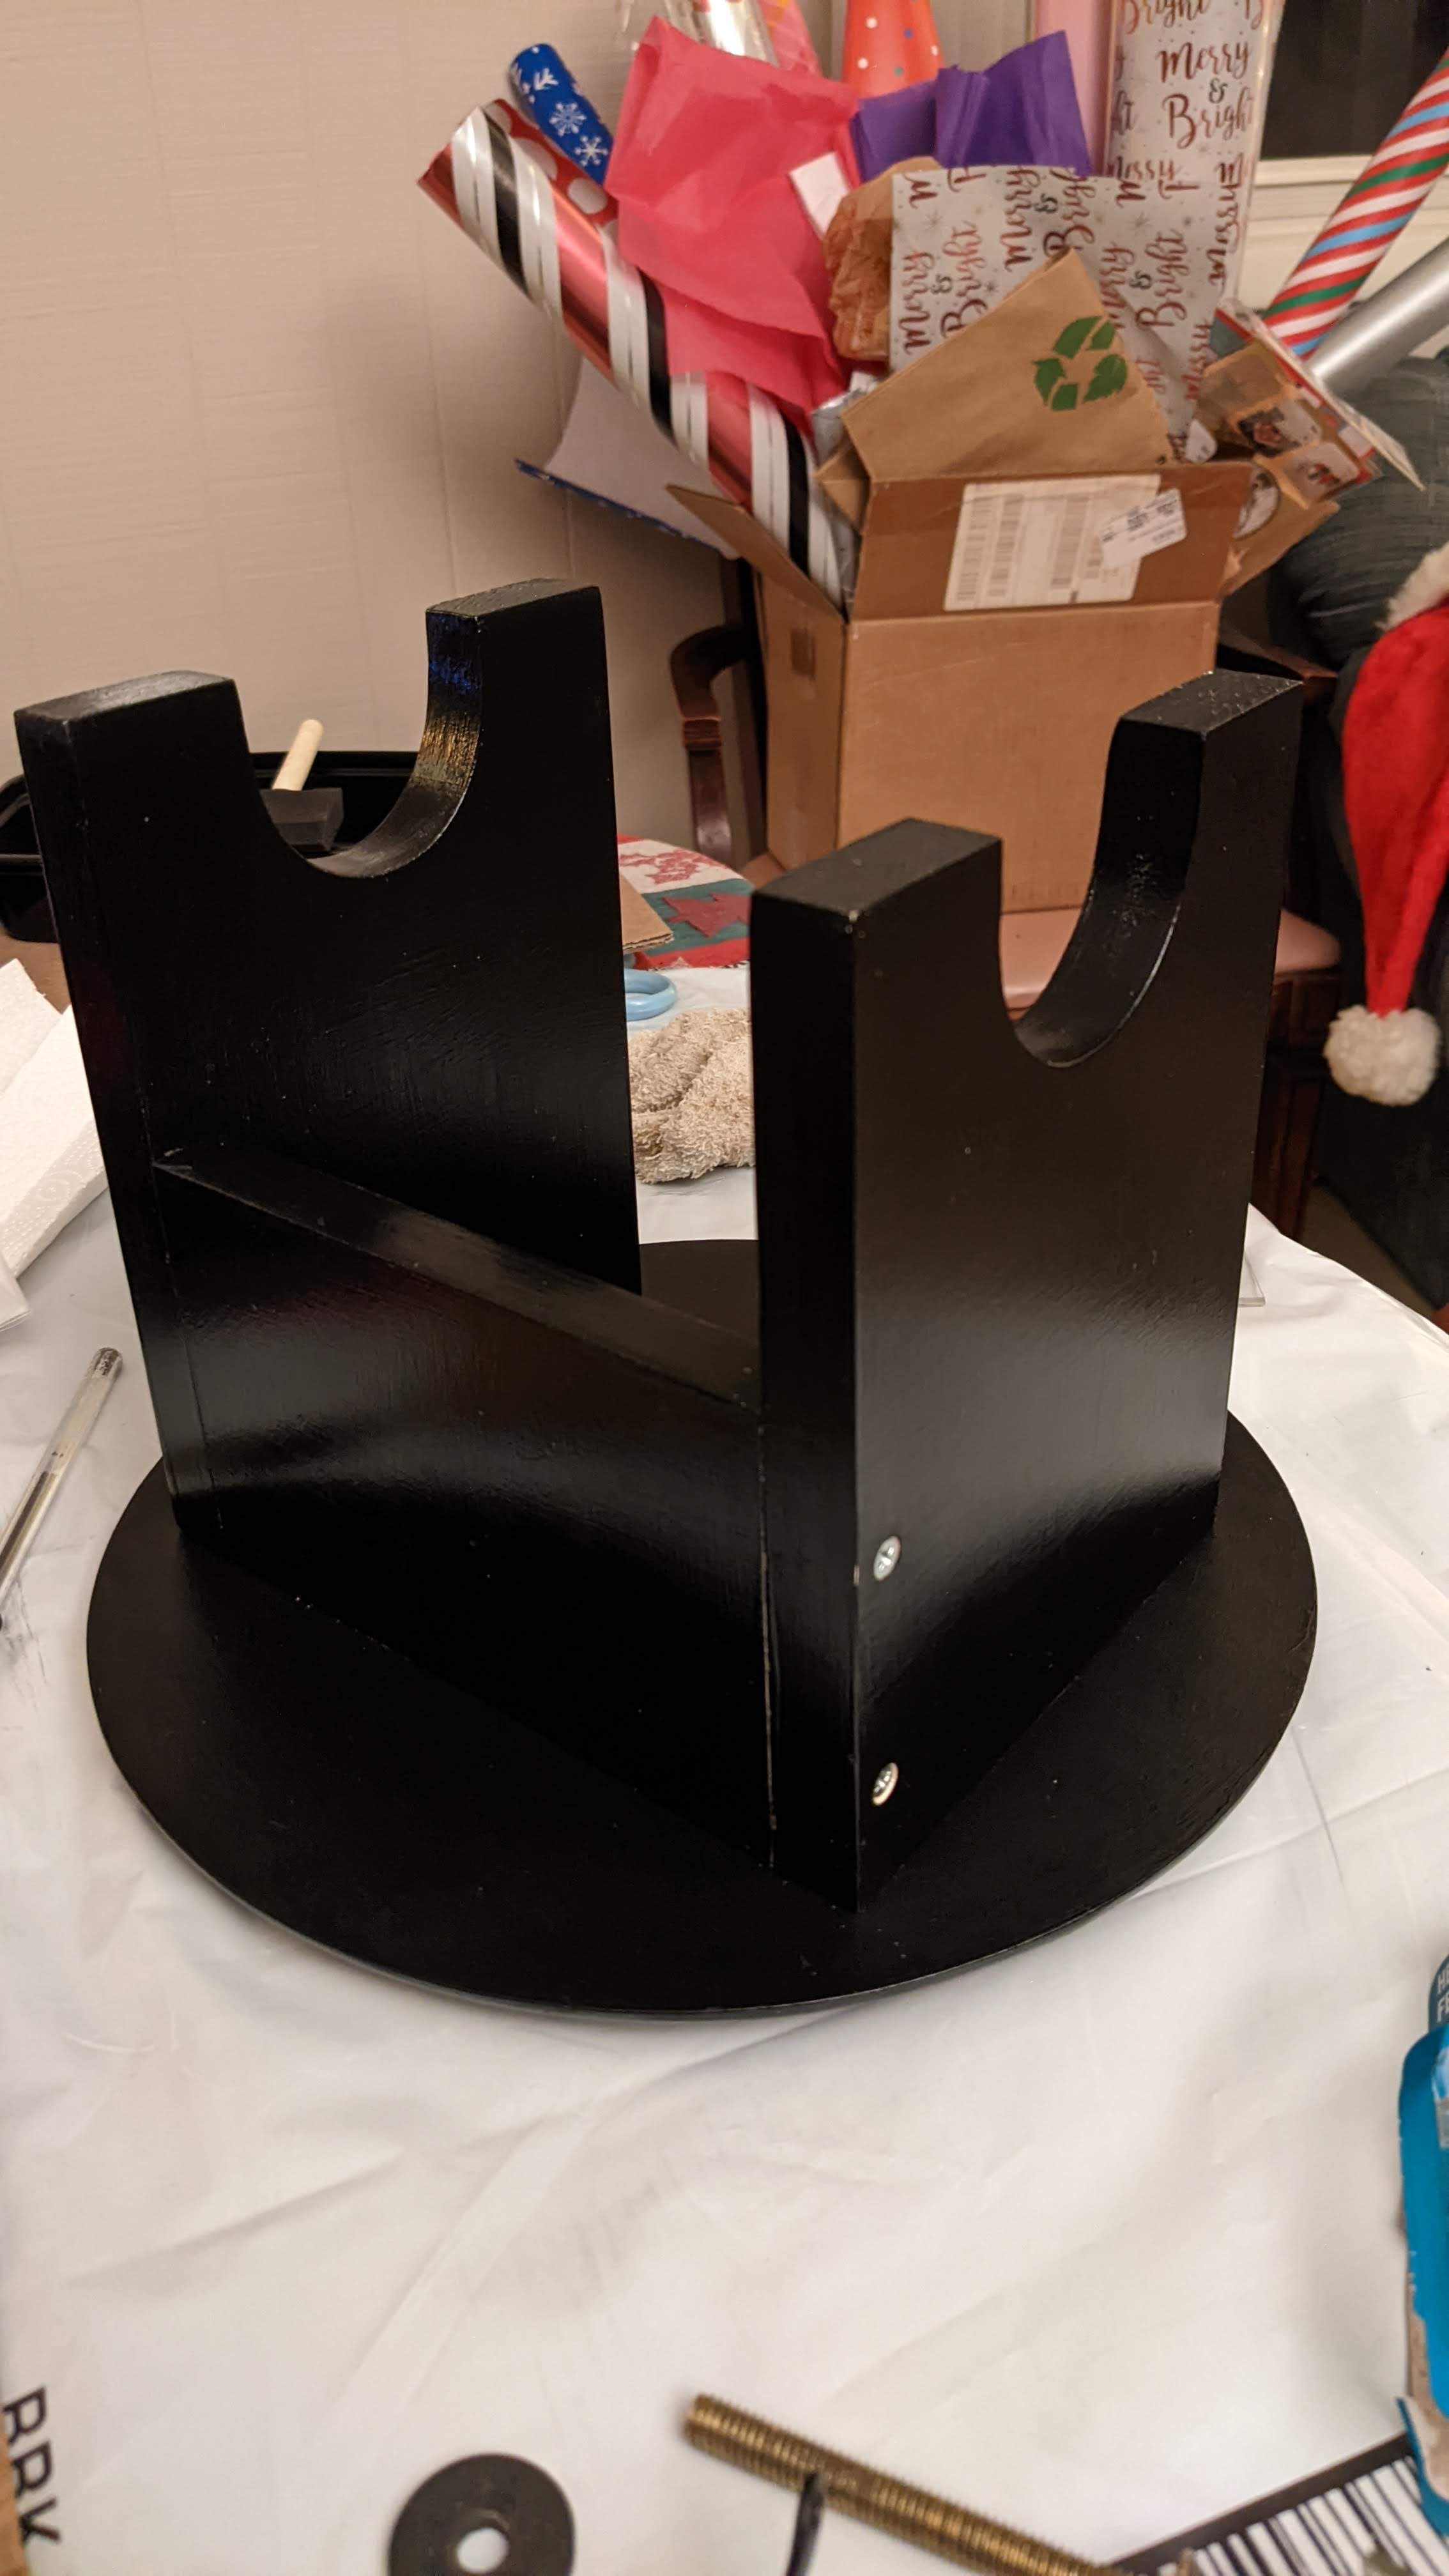
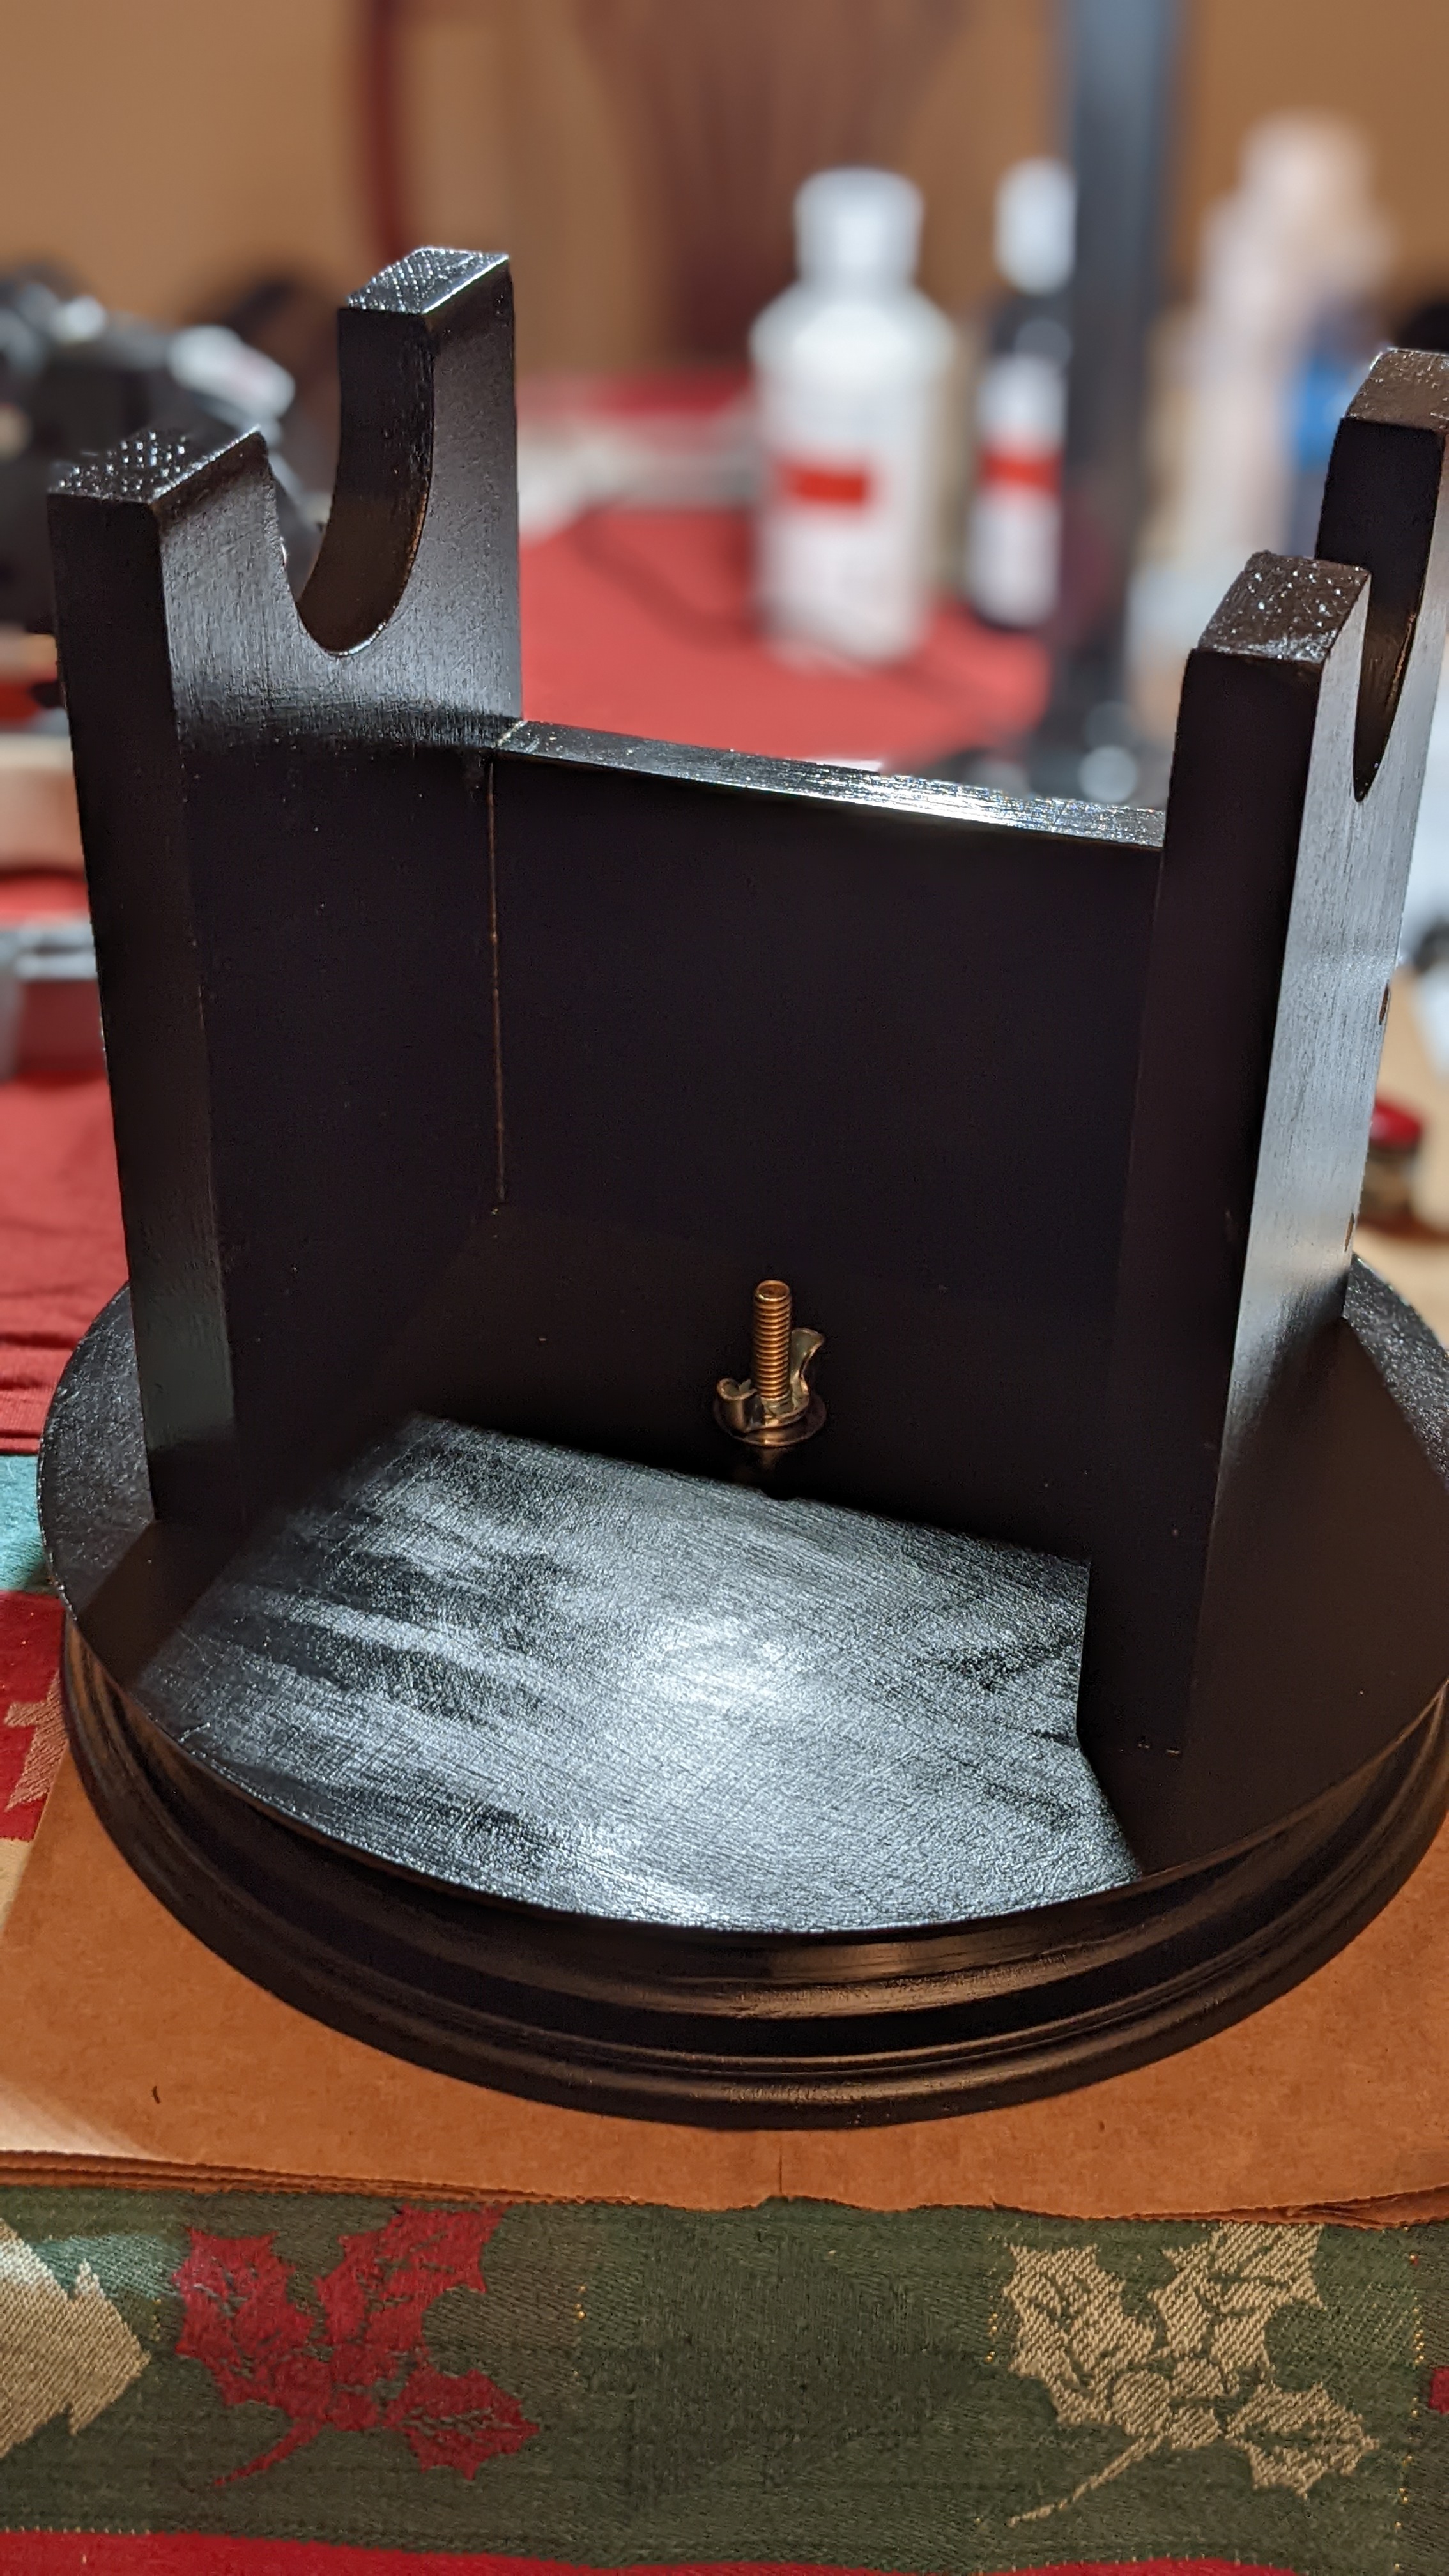
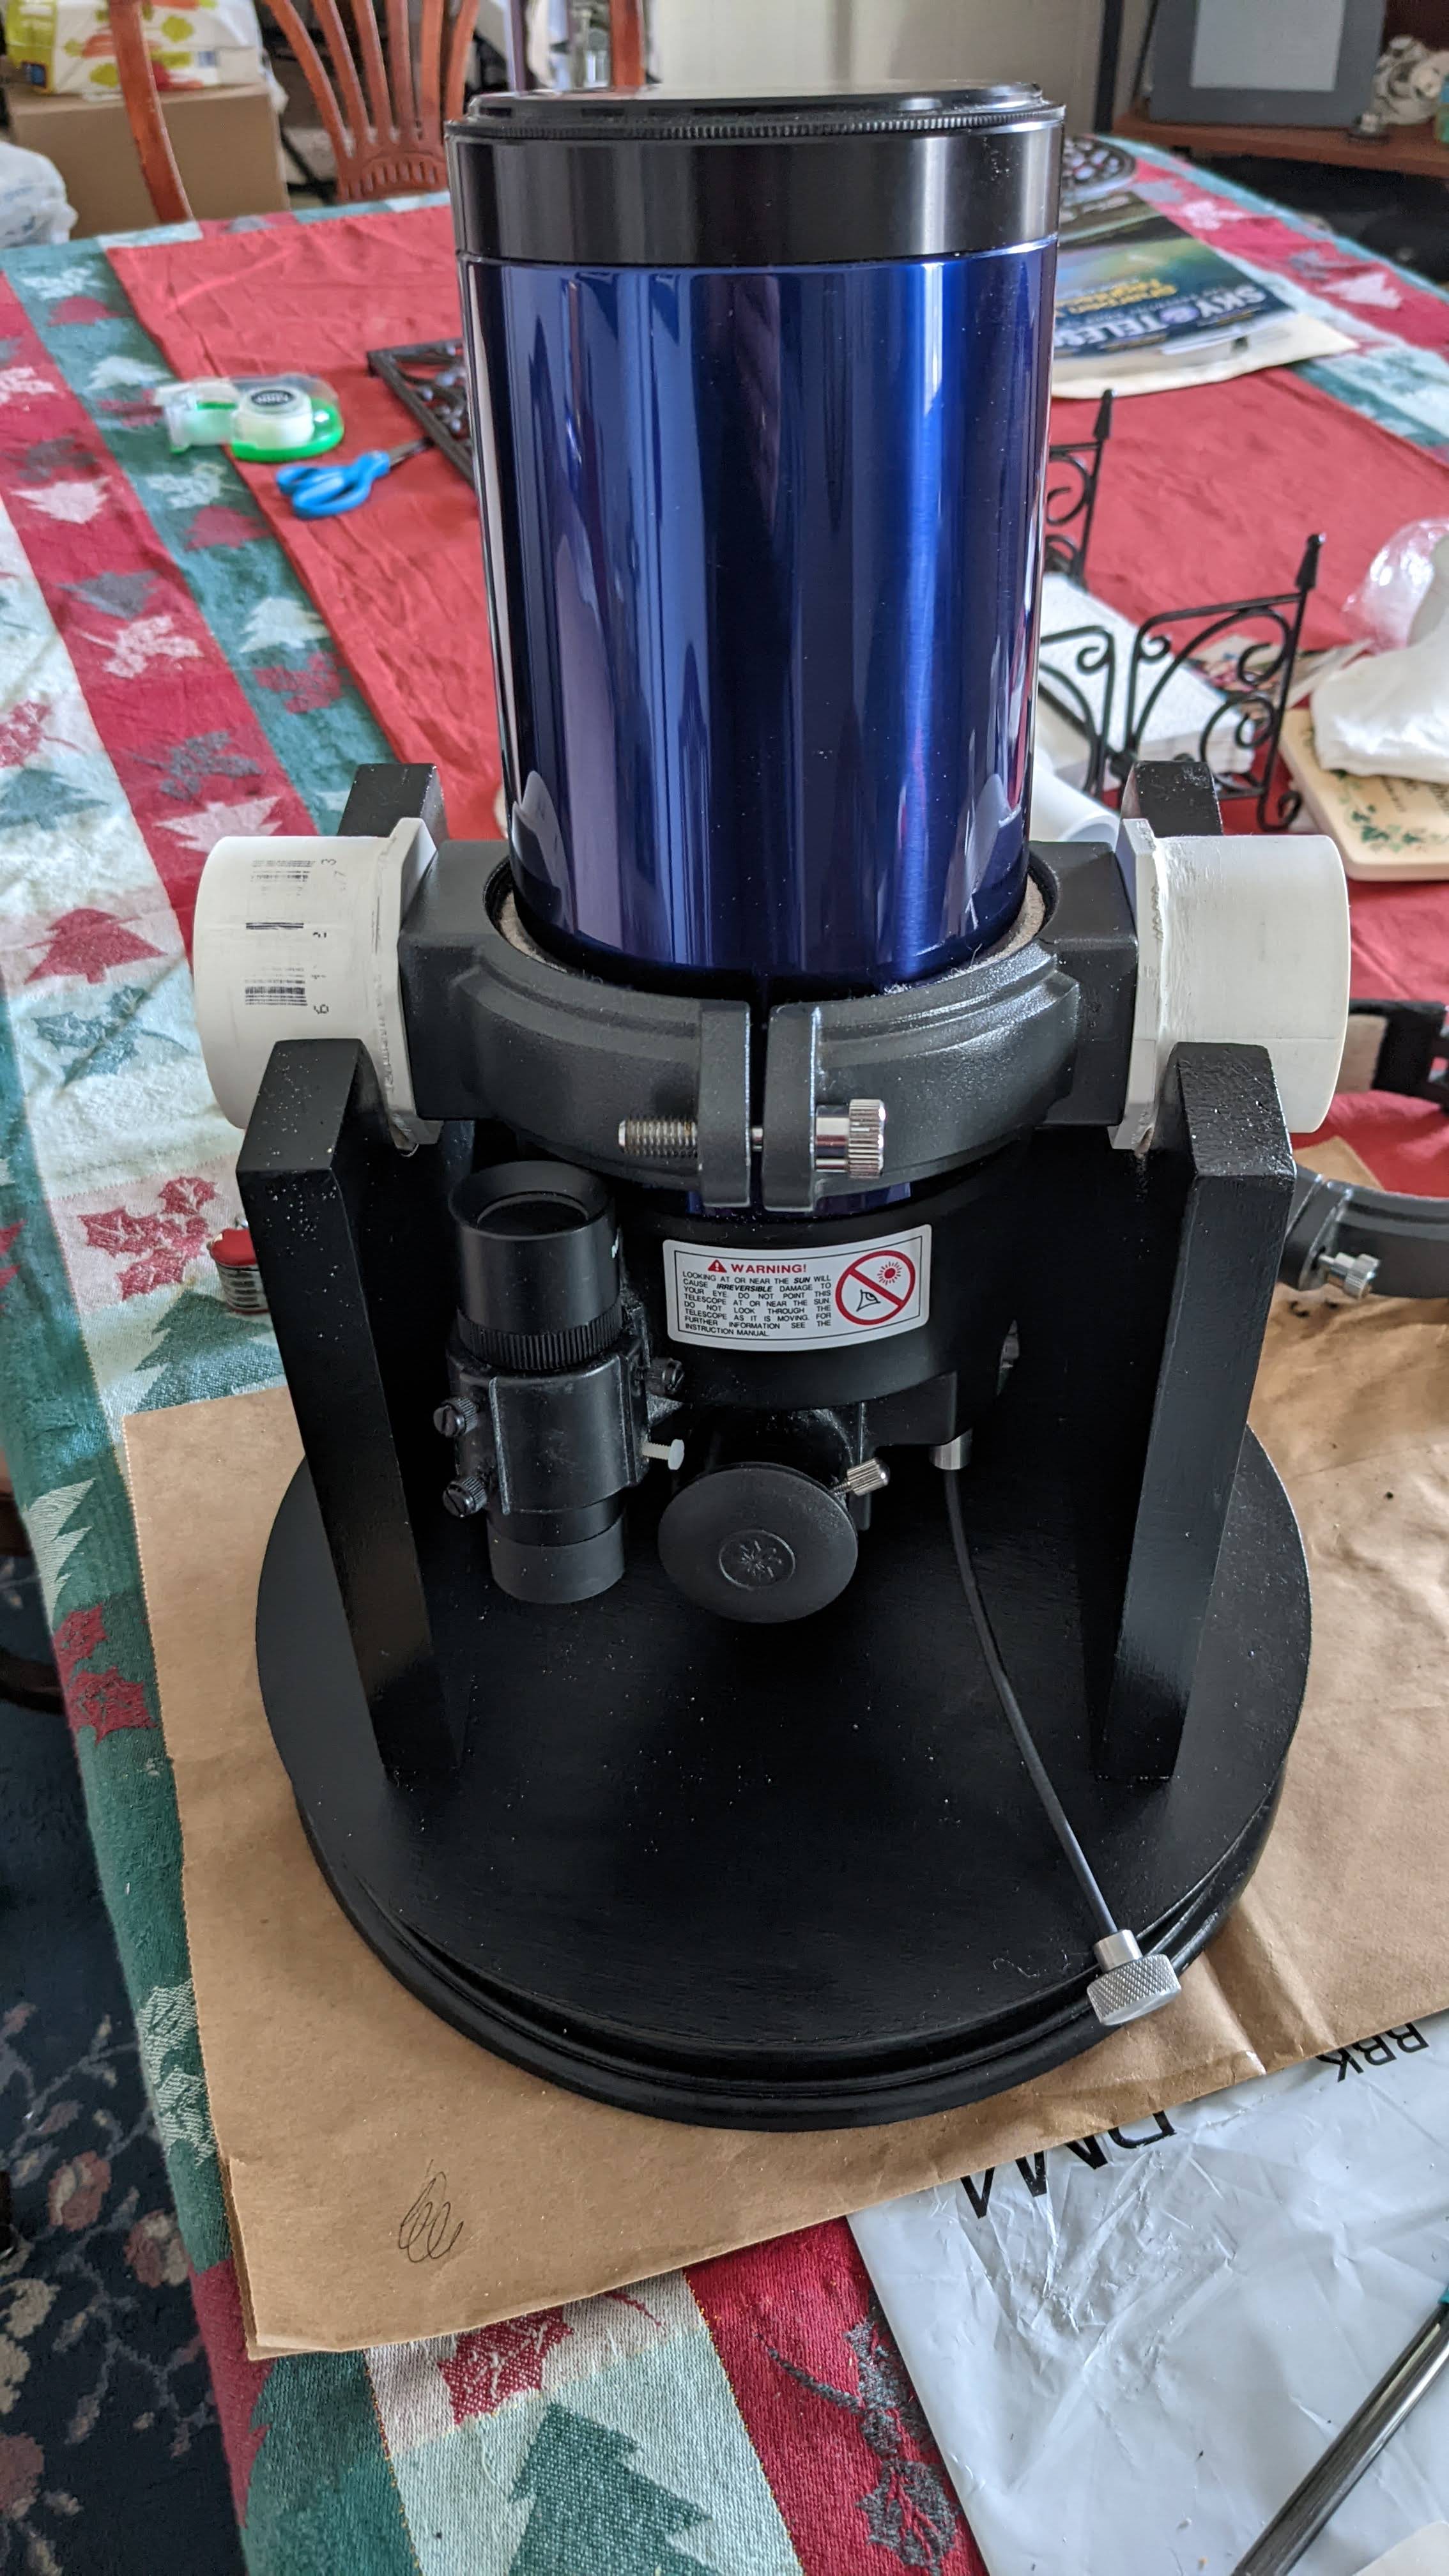
The pictures below show various stages of development of the assembly, from painting to putting the bearing box on the top turntable piece, adding the bearing materials between the turntable pieces, and the whole set up with two sets of trunnions. I ended up with two sets of trunnions, one pair made from the wood cutouts of the bearing slots, and the other pair a couple PVC pieces on which I needed to trim some flanges in order to get them to fit between the uprights. The PVC ones will be the preferred set, I think, because they don’t allow for lateral movement of the OTA in the bearing slots as the wooden set do.

Putting On a Coat or Two

Coming Together

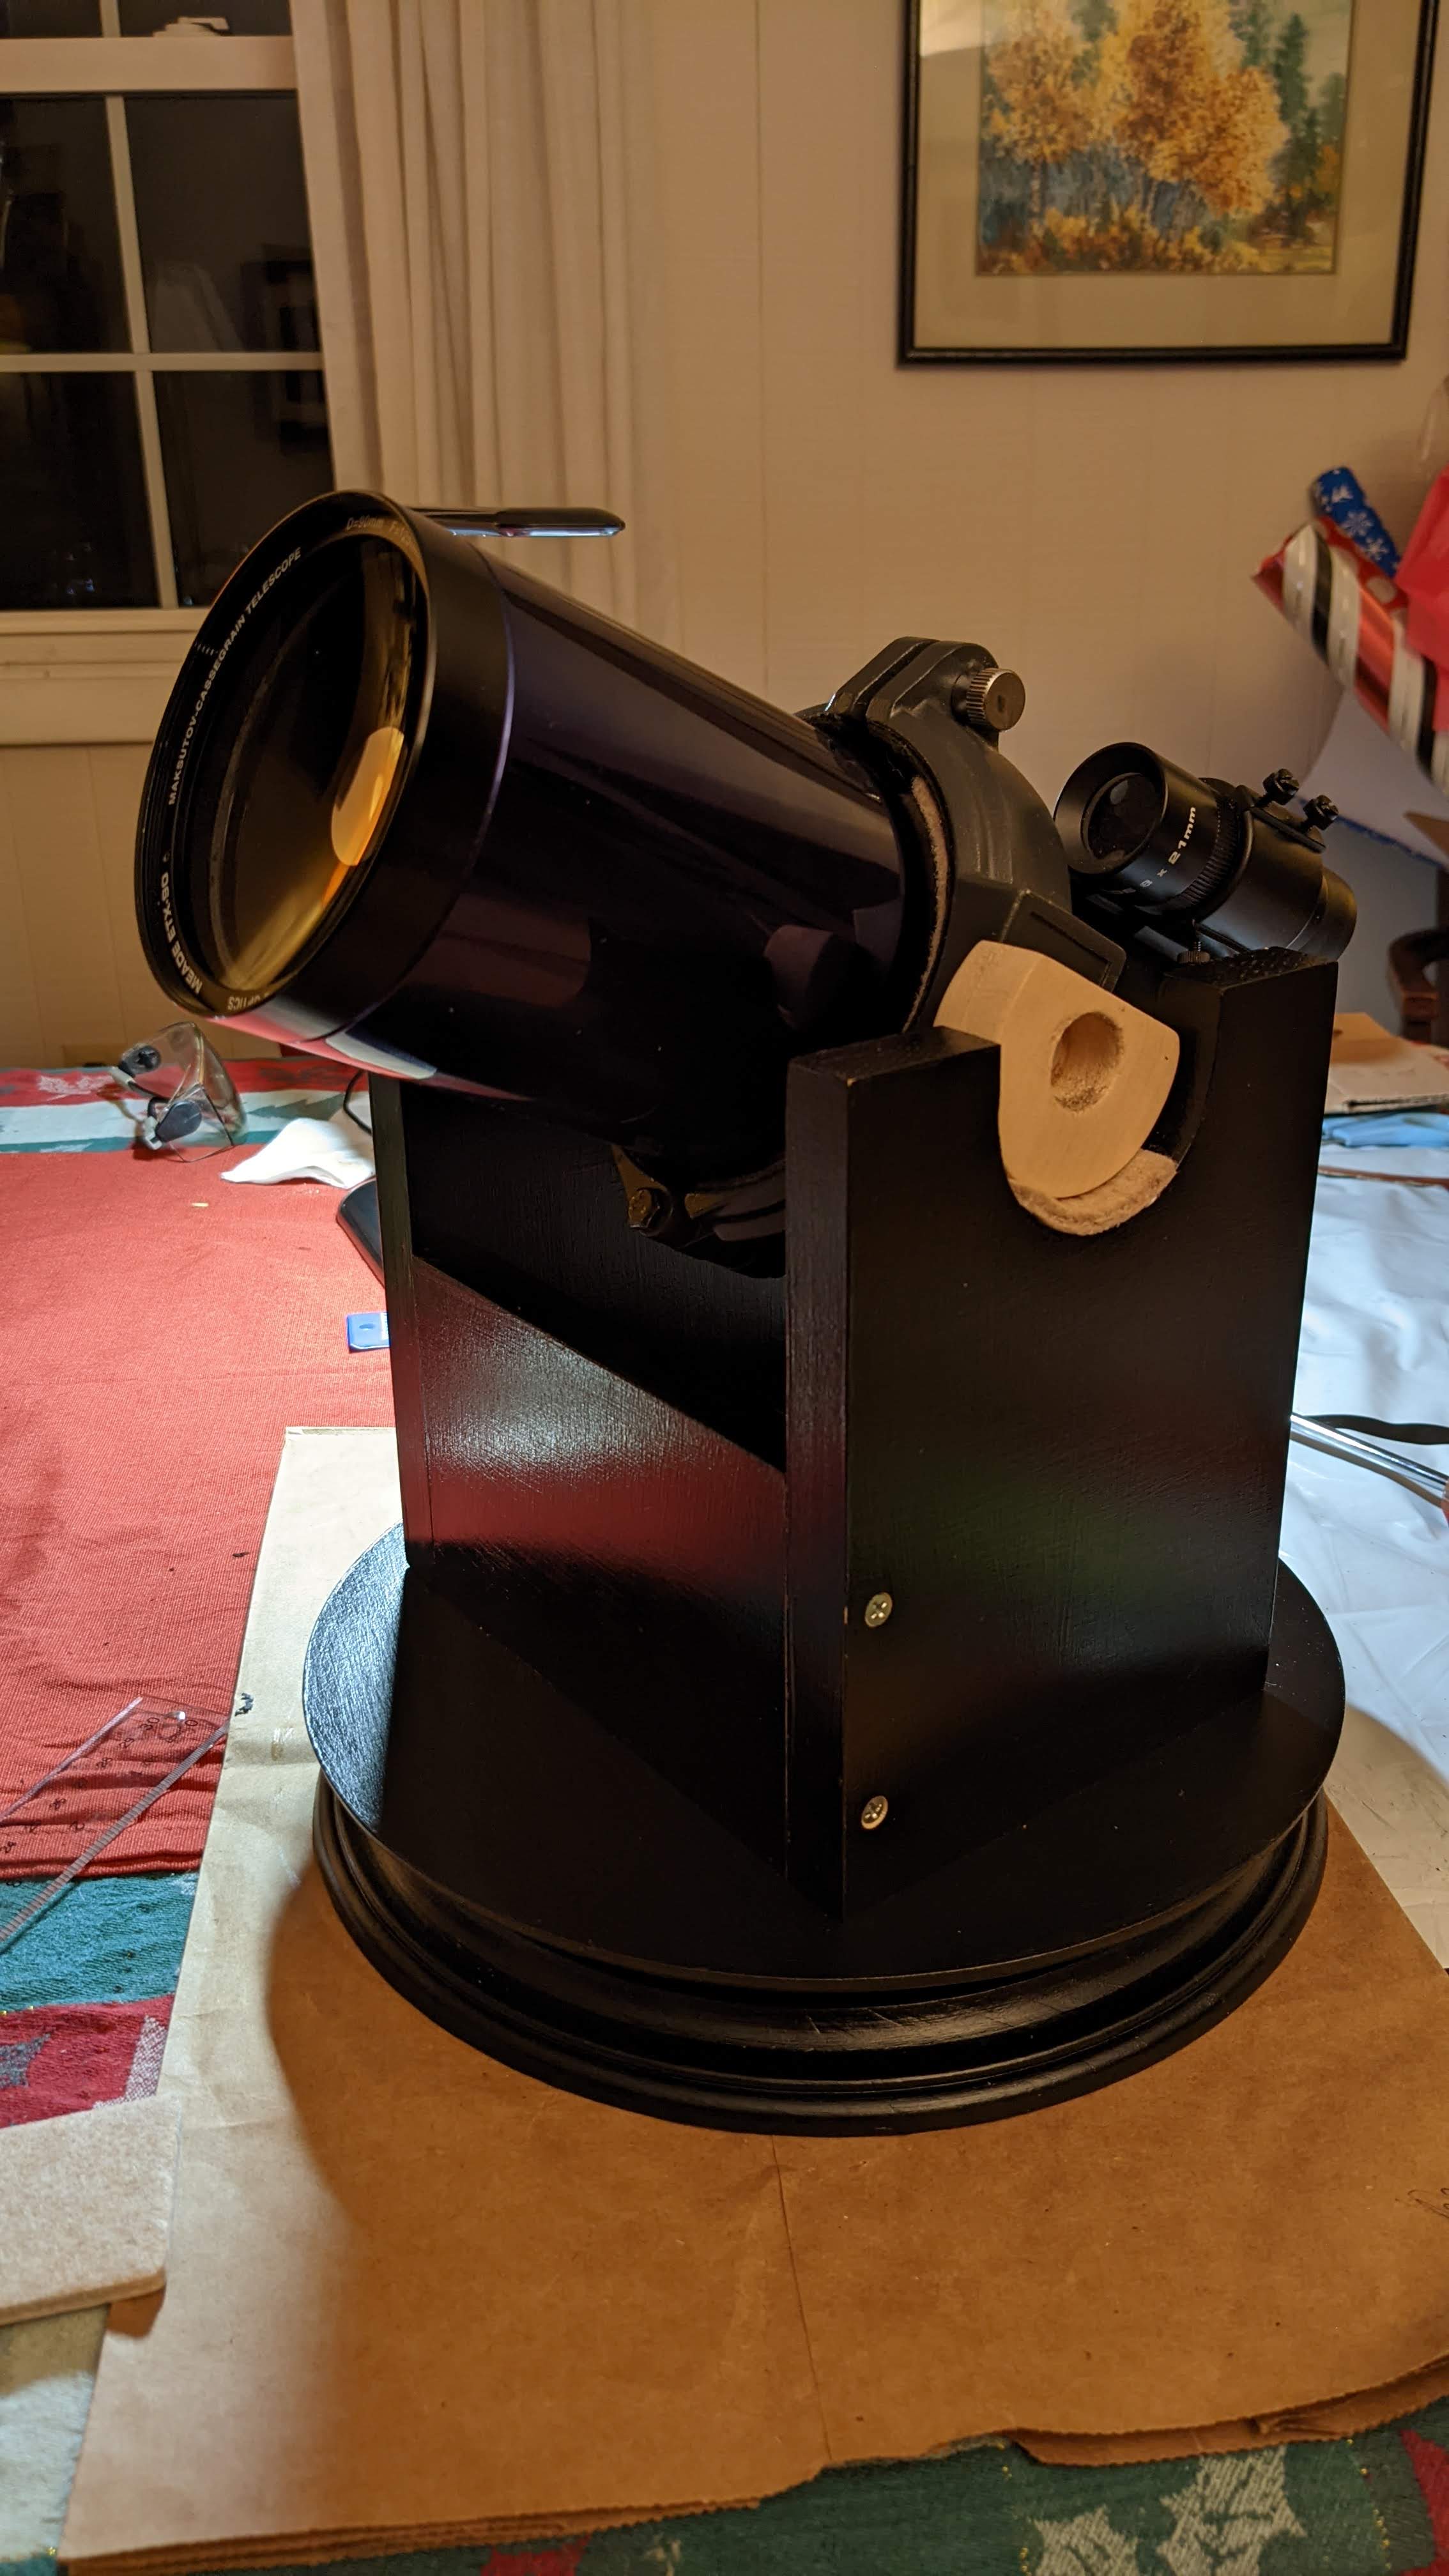
Configuration 1 – Wooden Trunnions

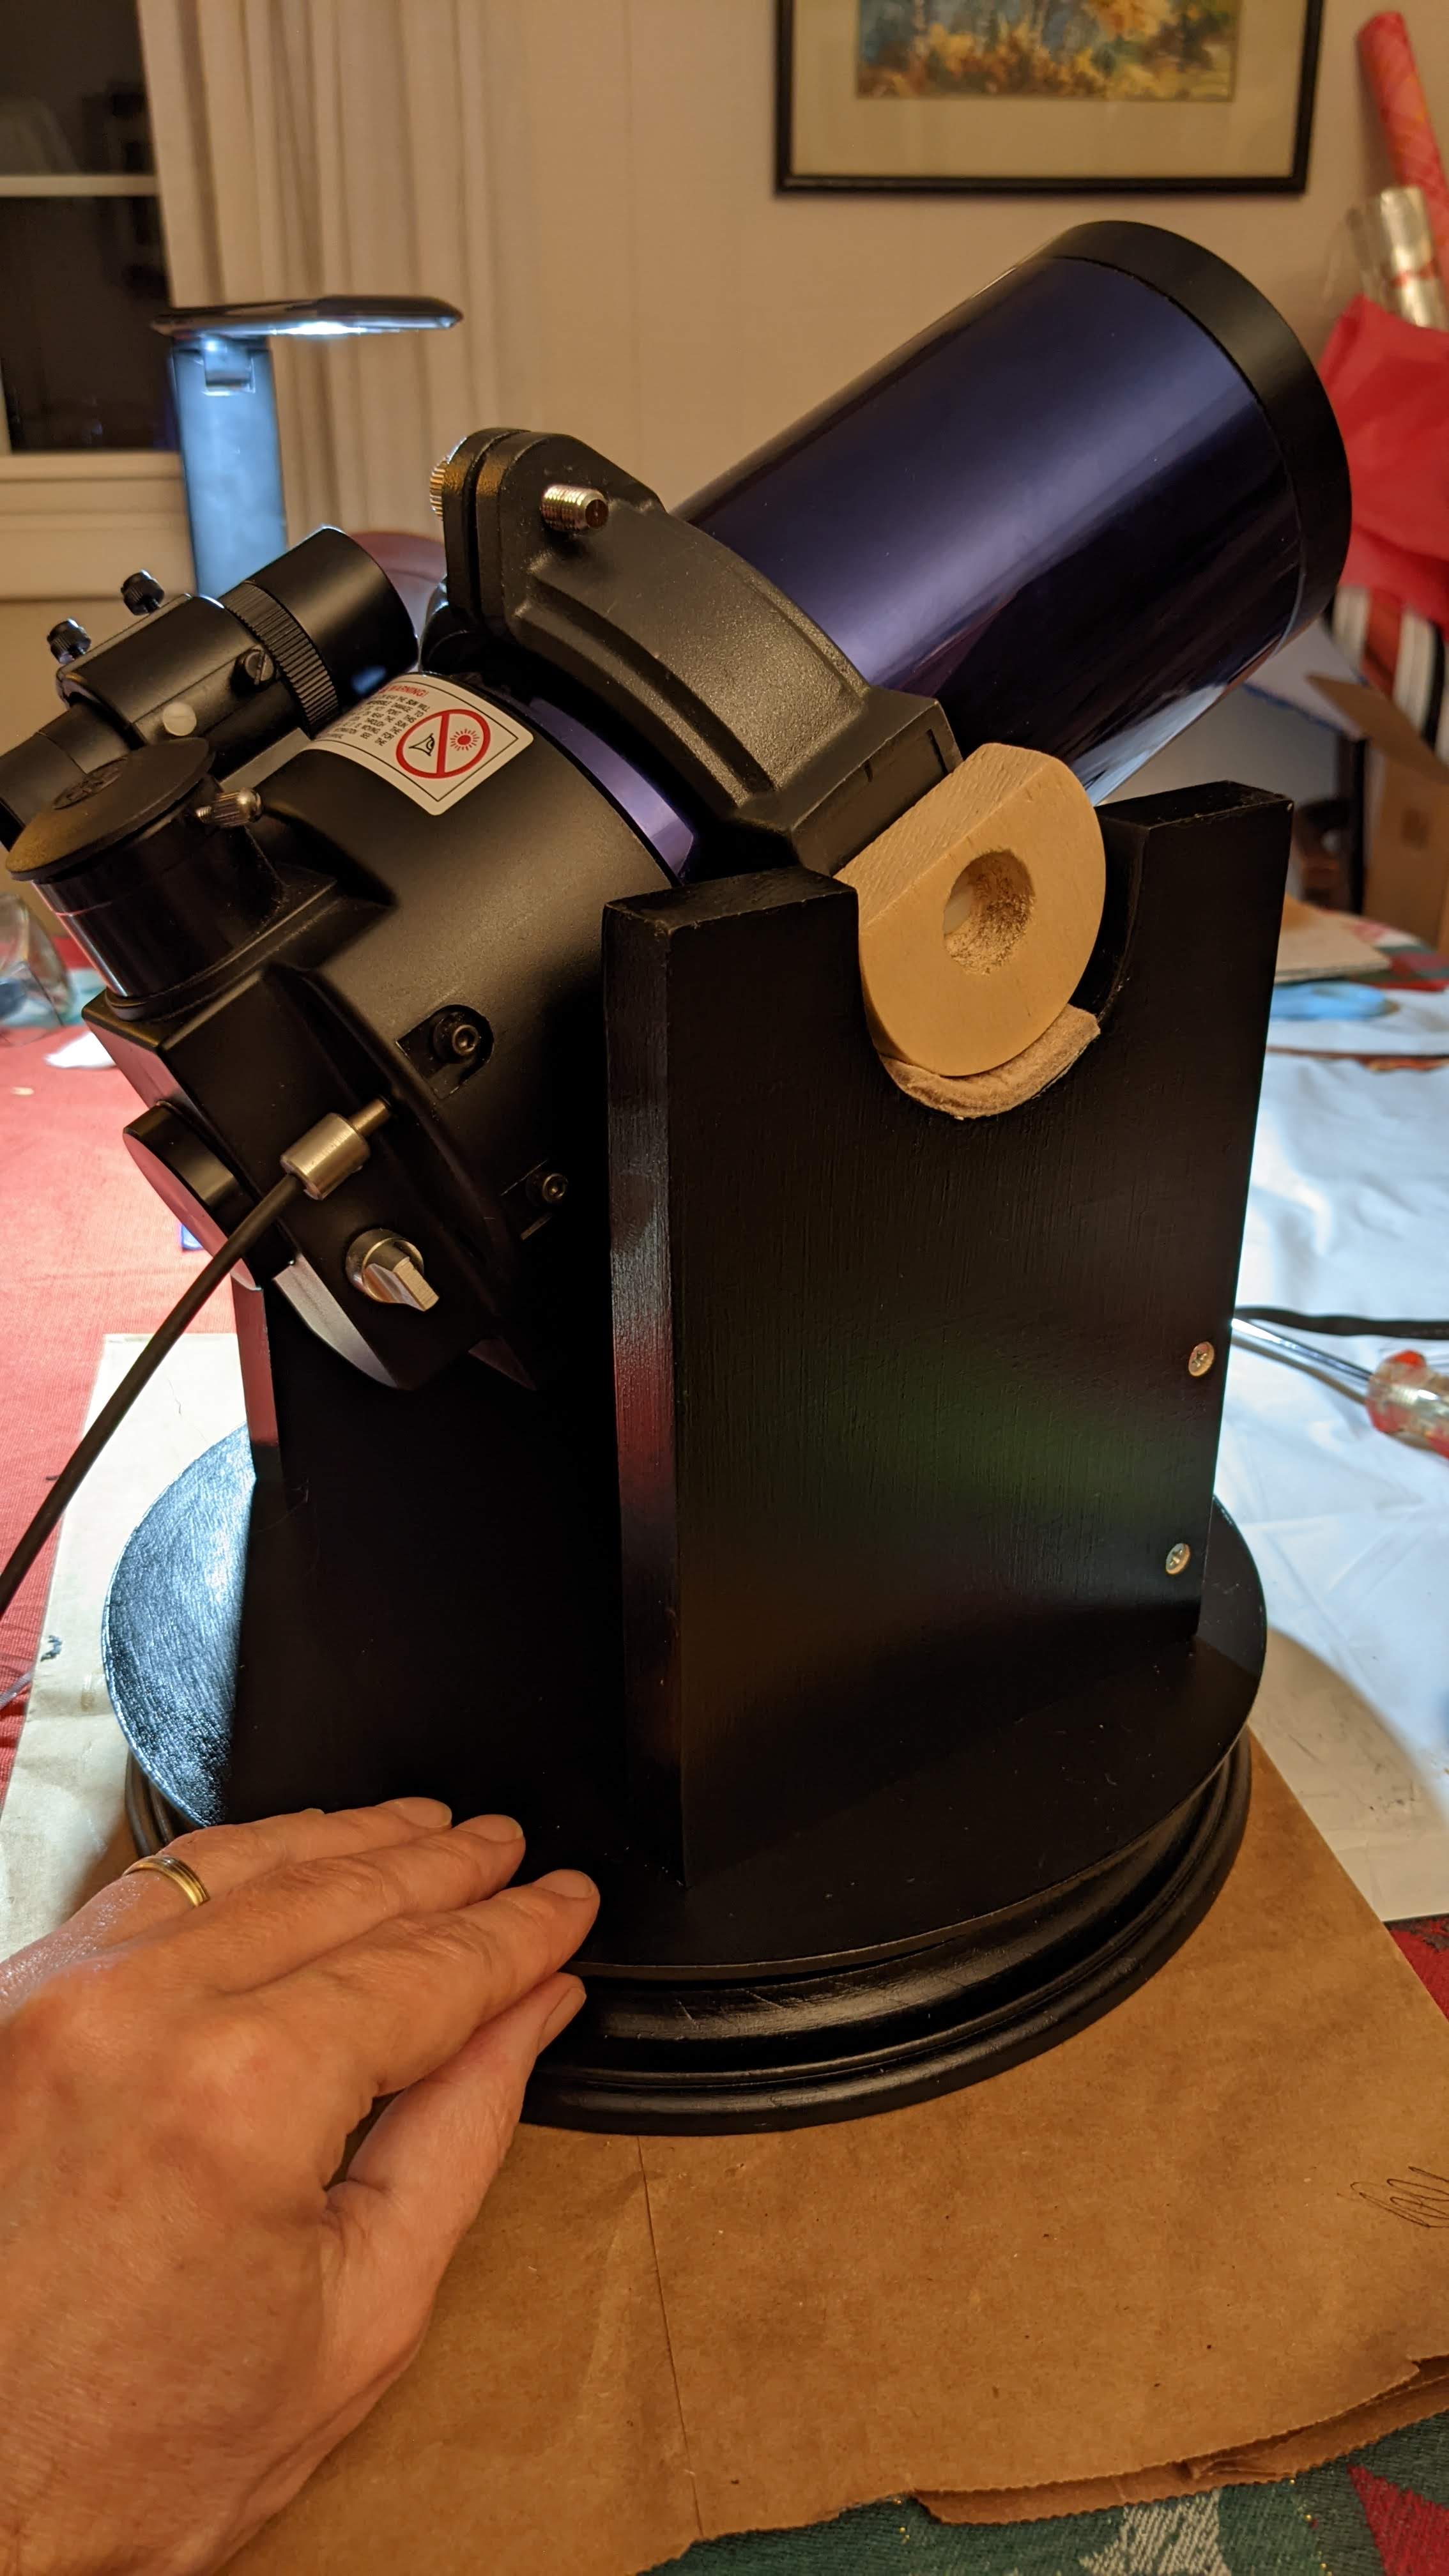
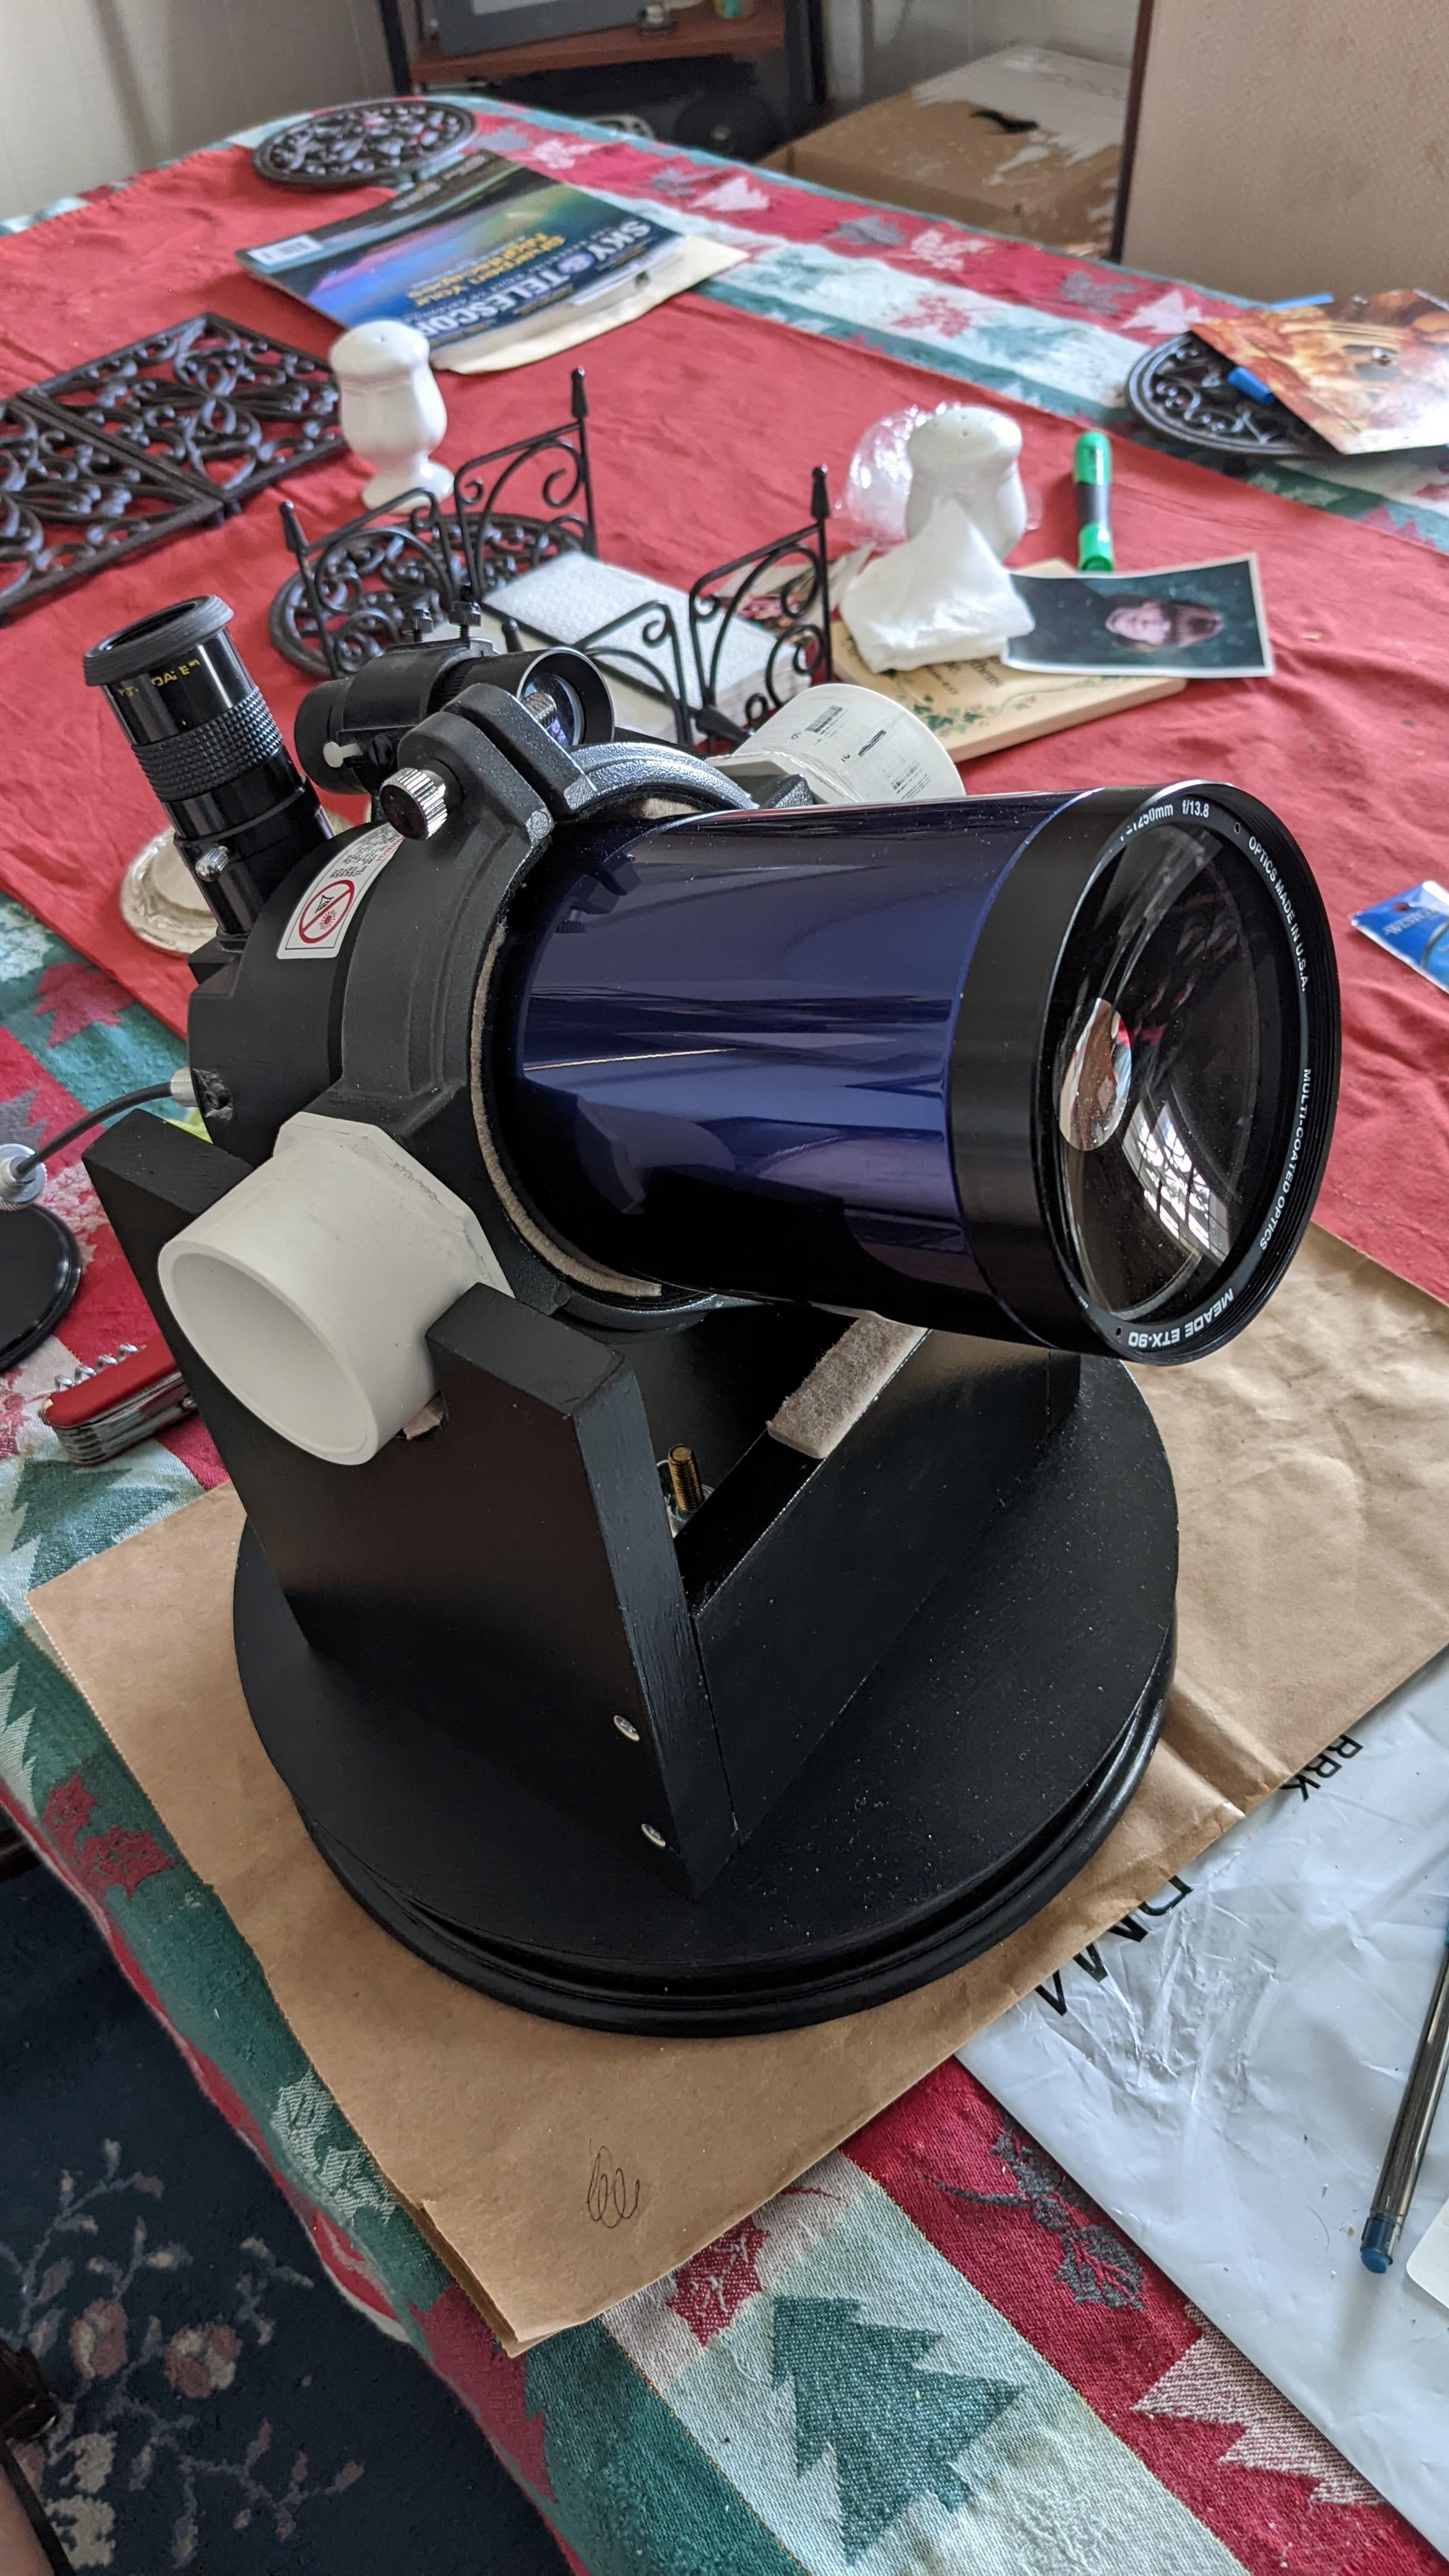
Configuration 2 – PVC Trunnions

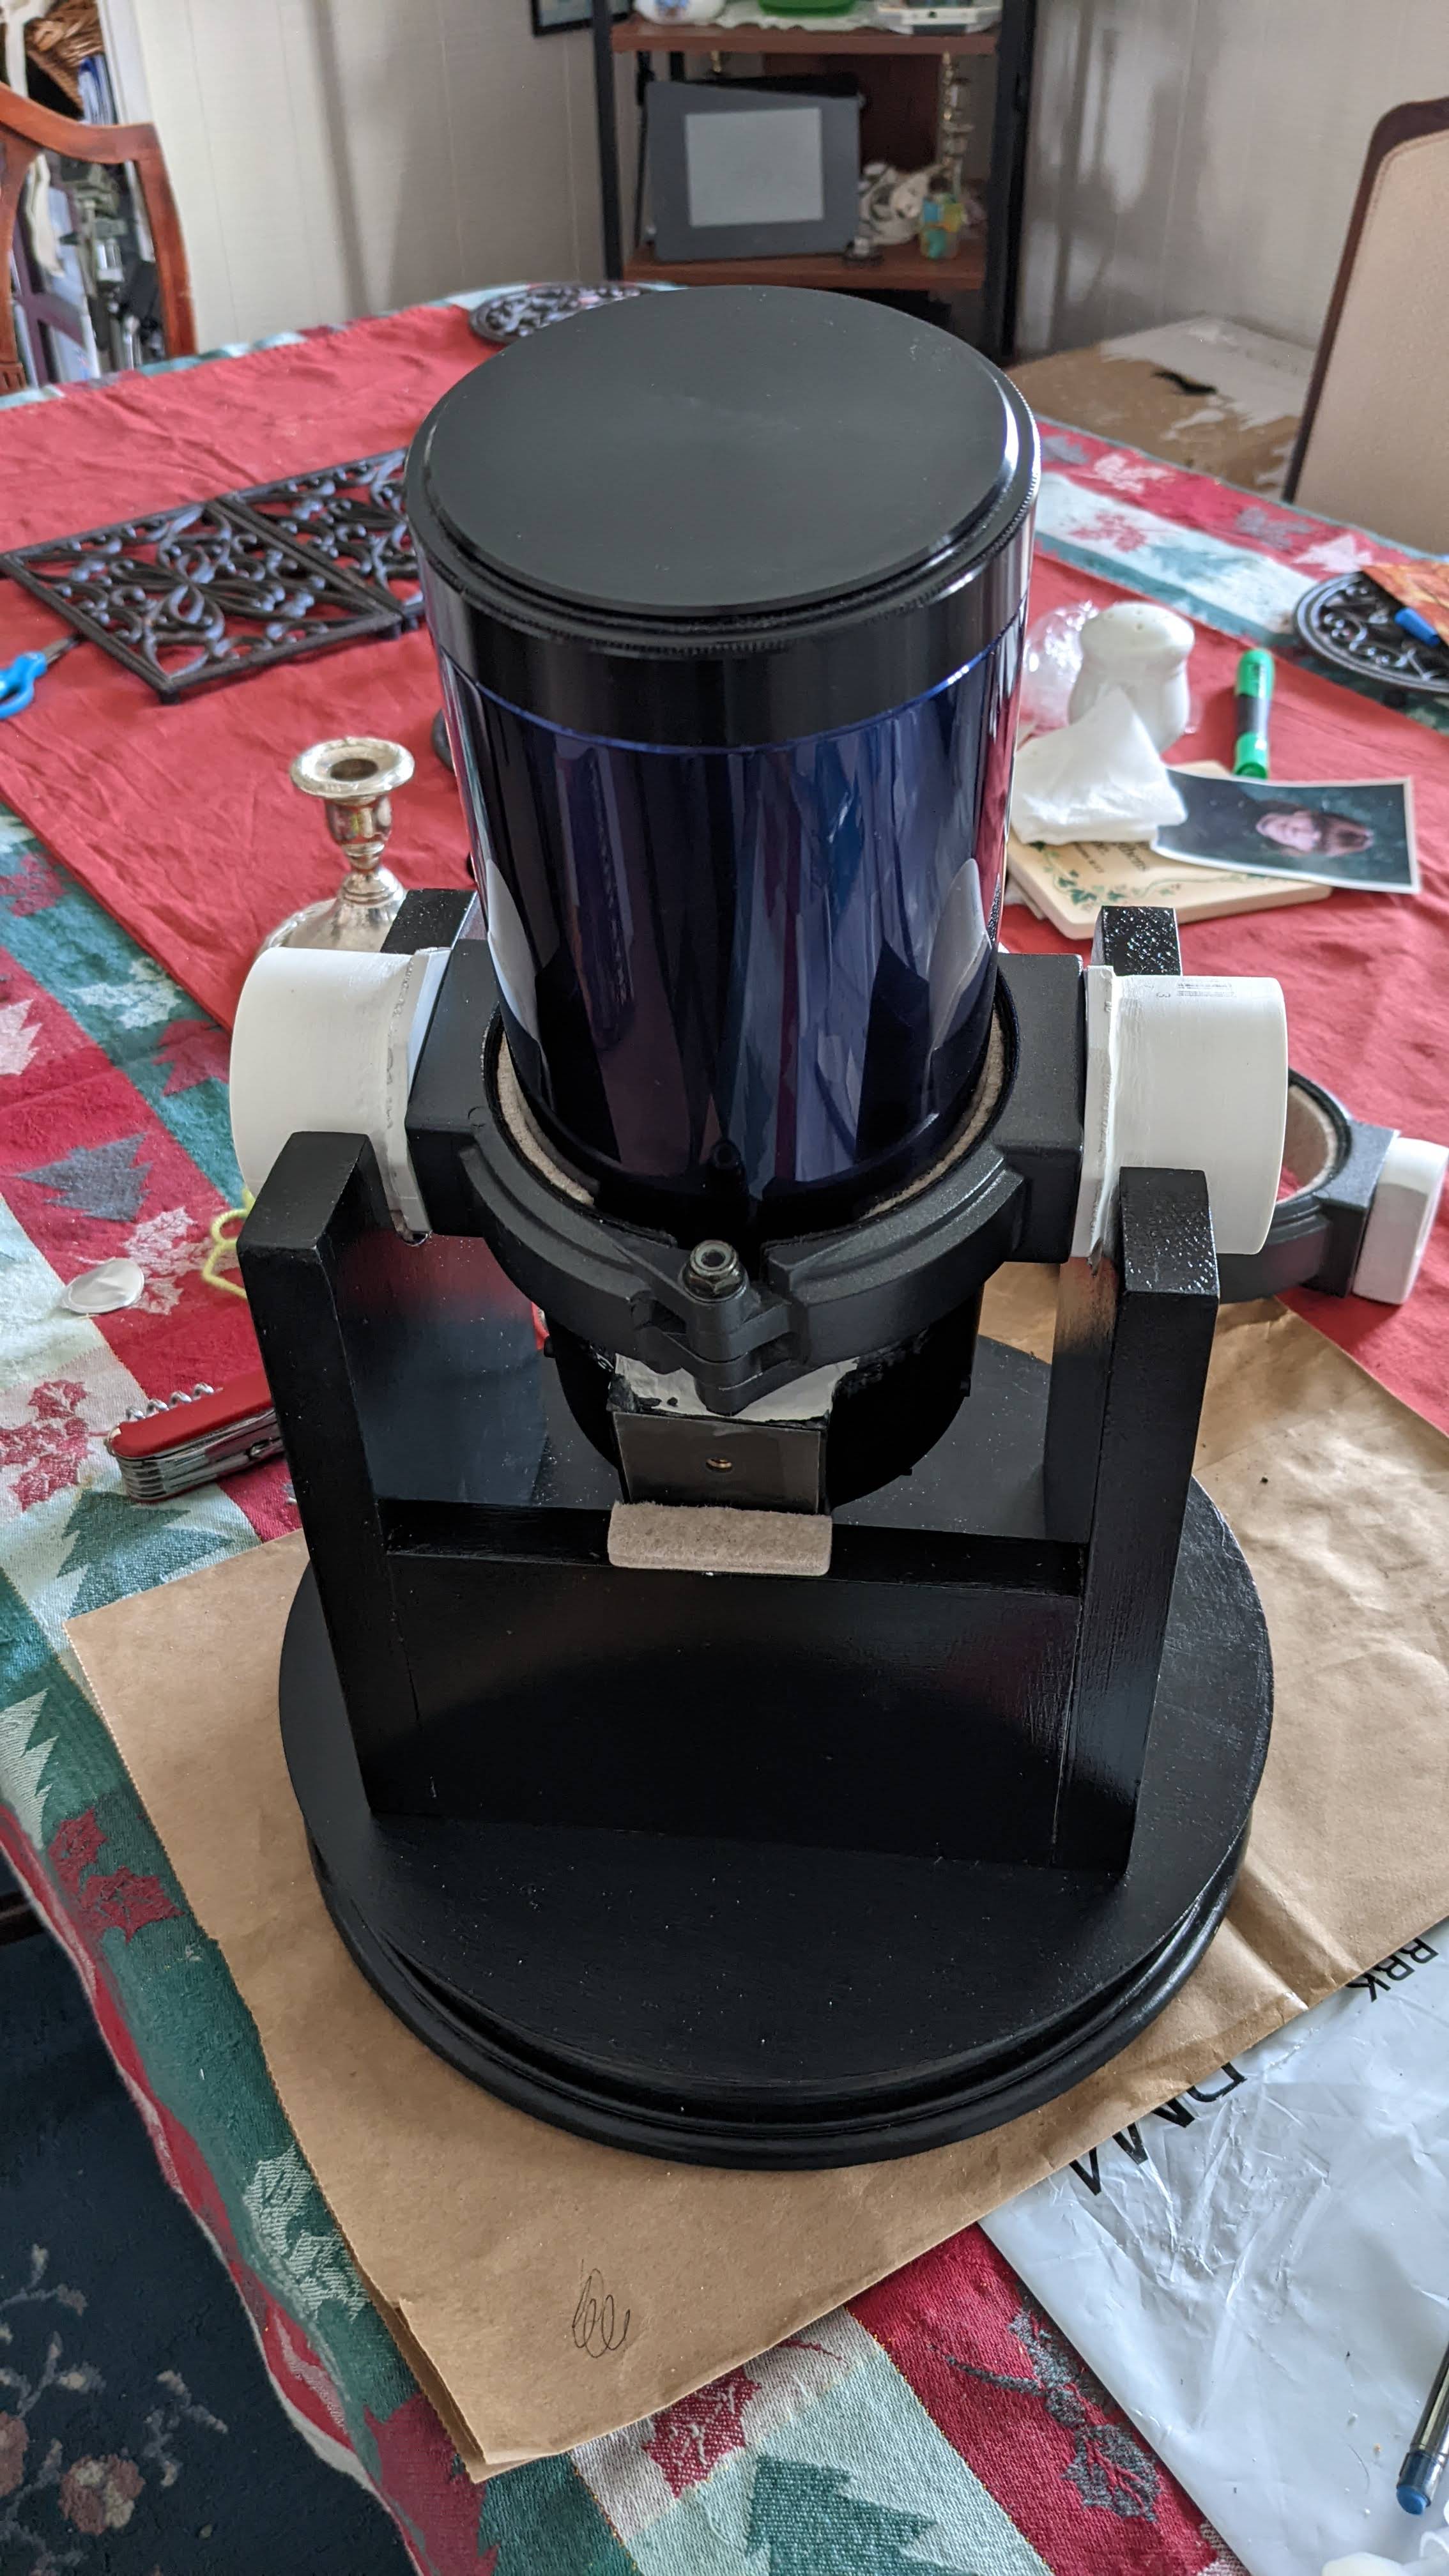
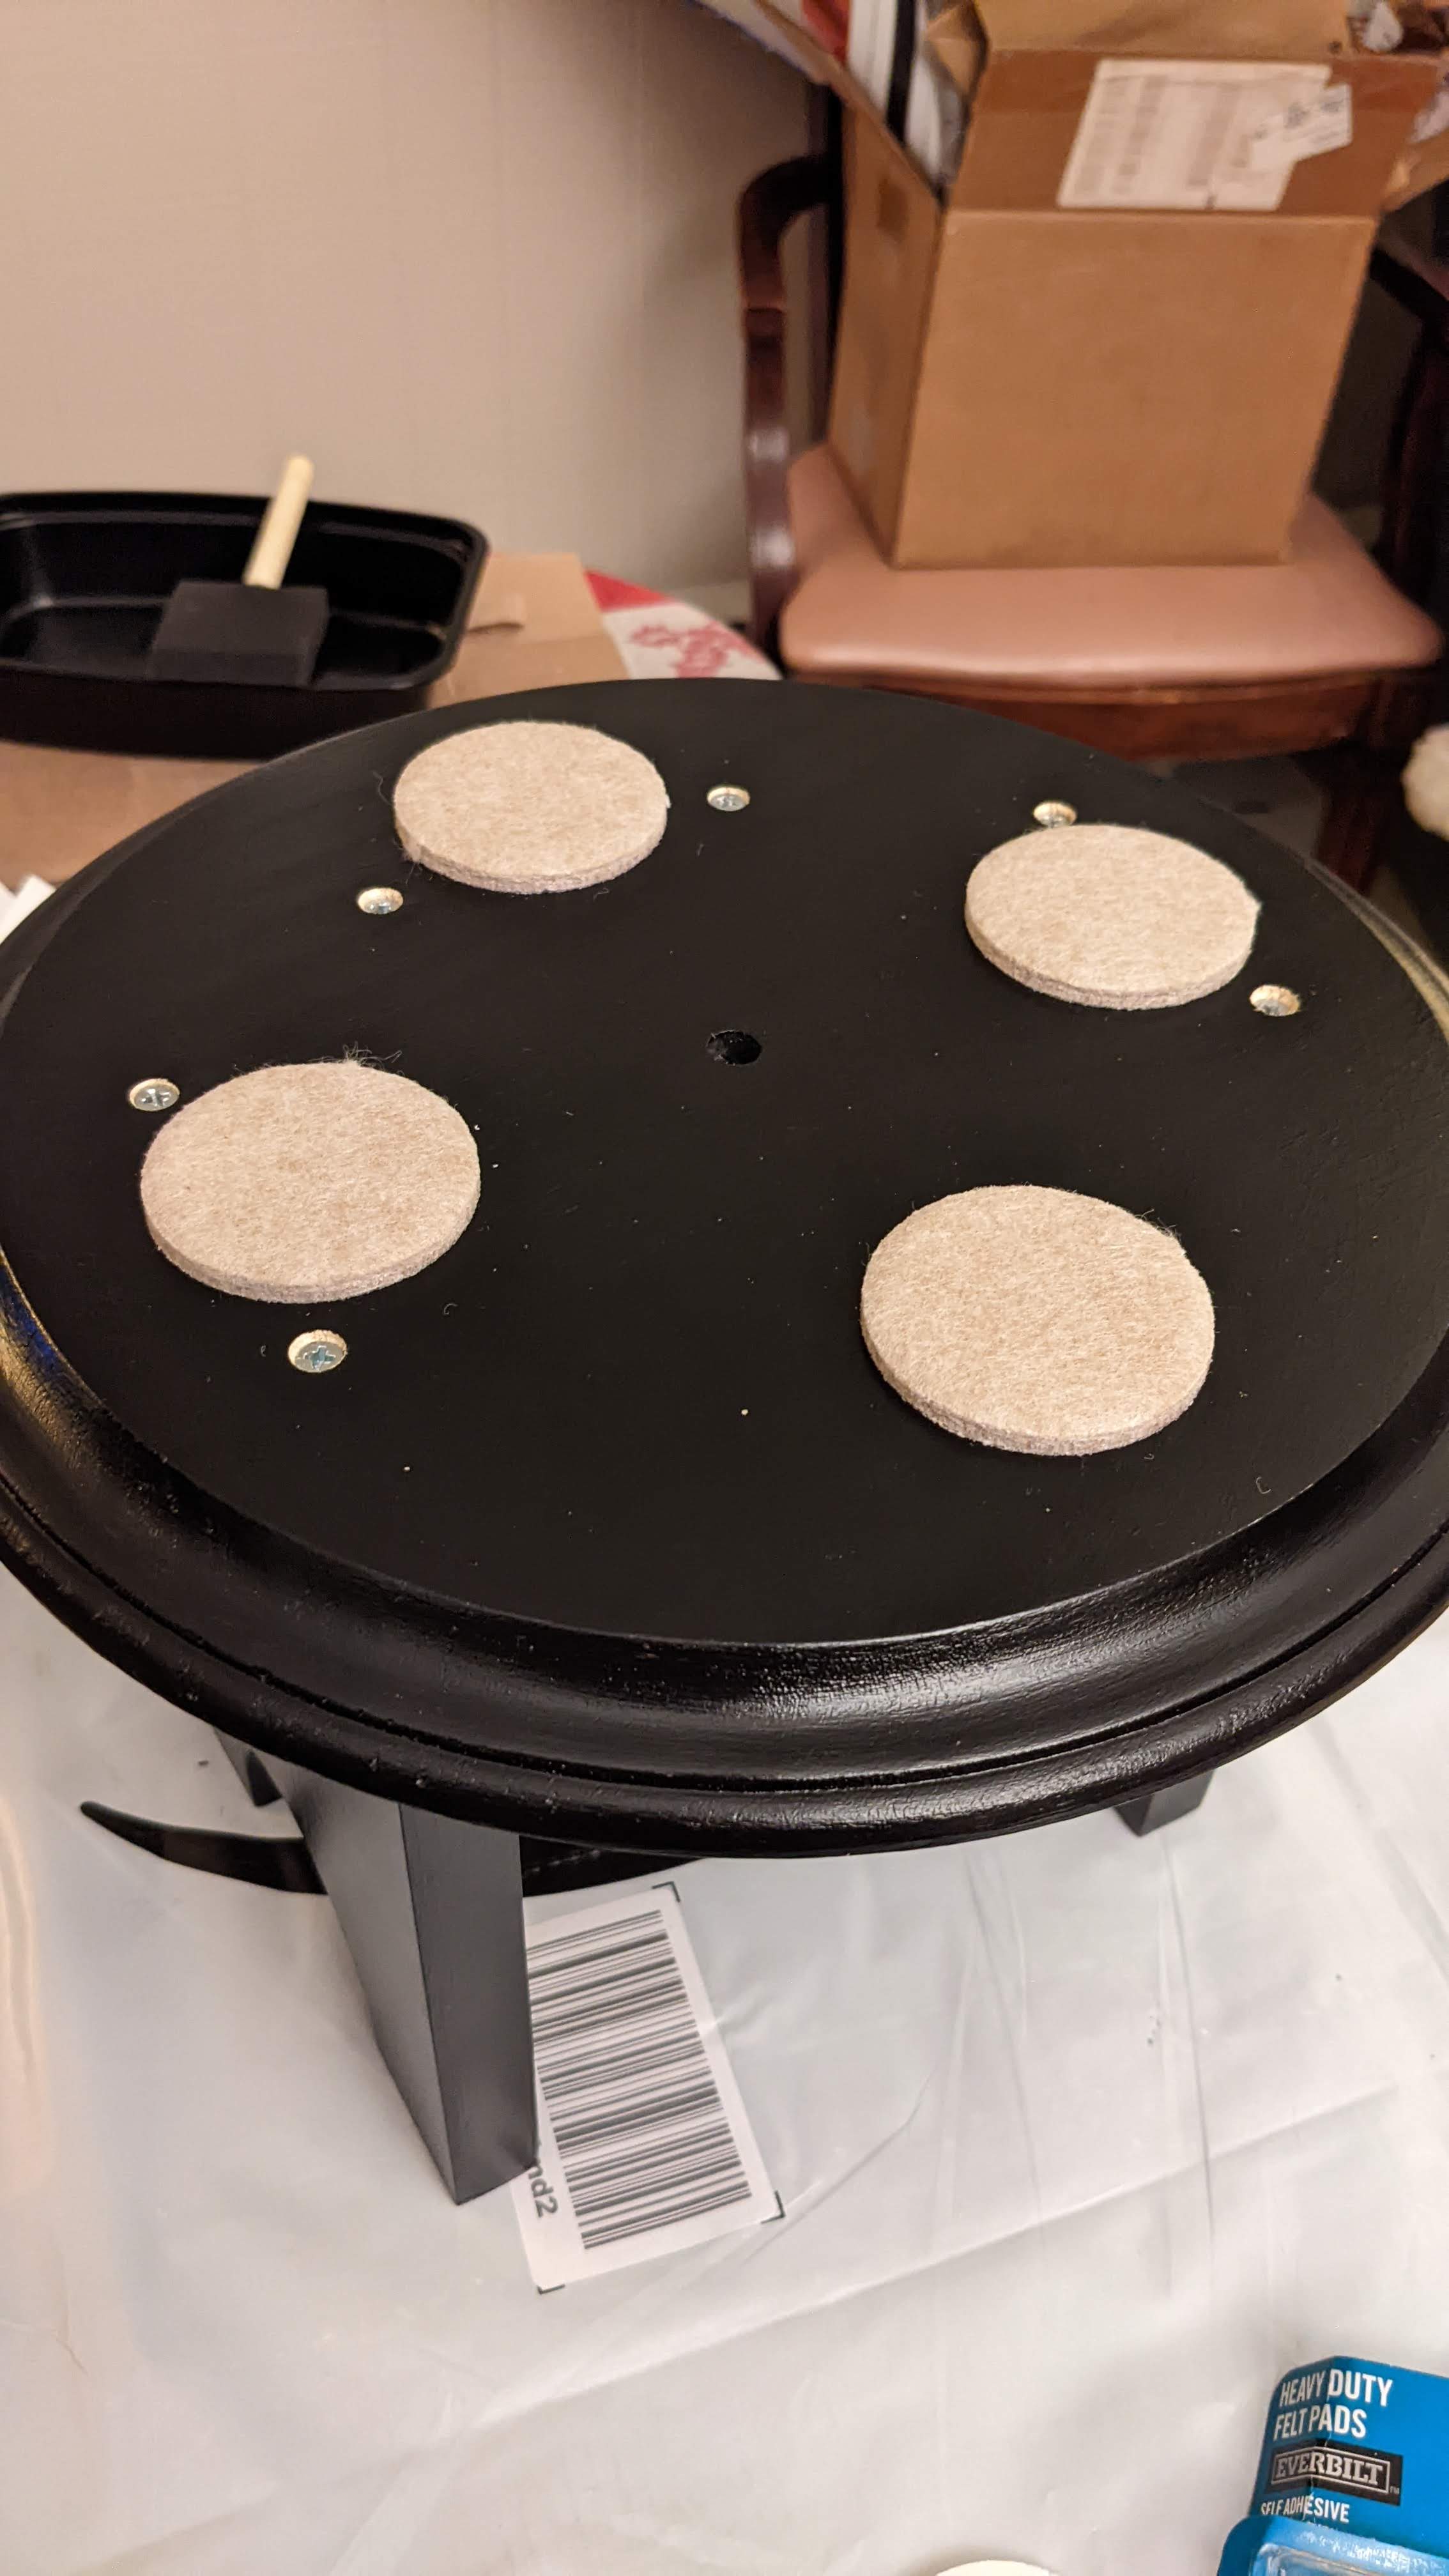
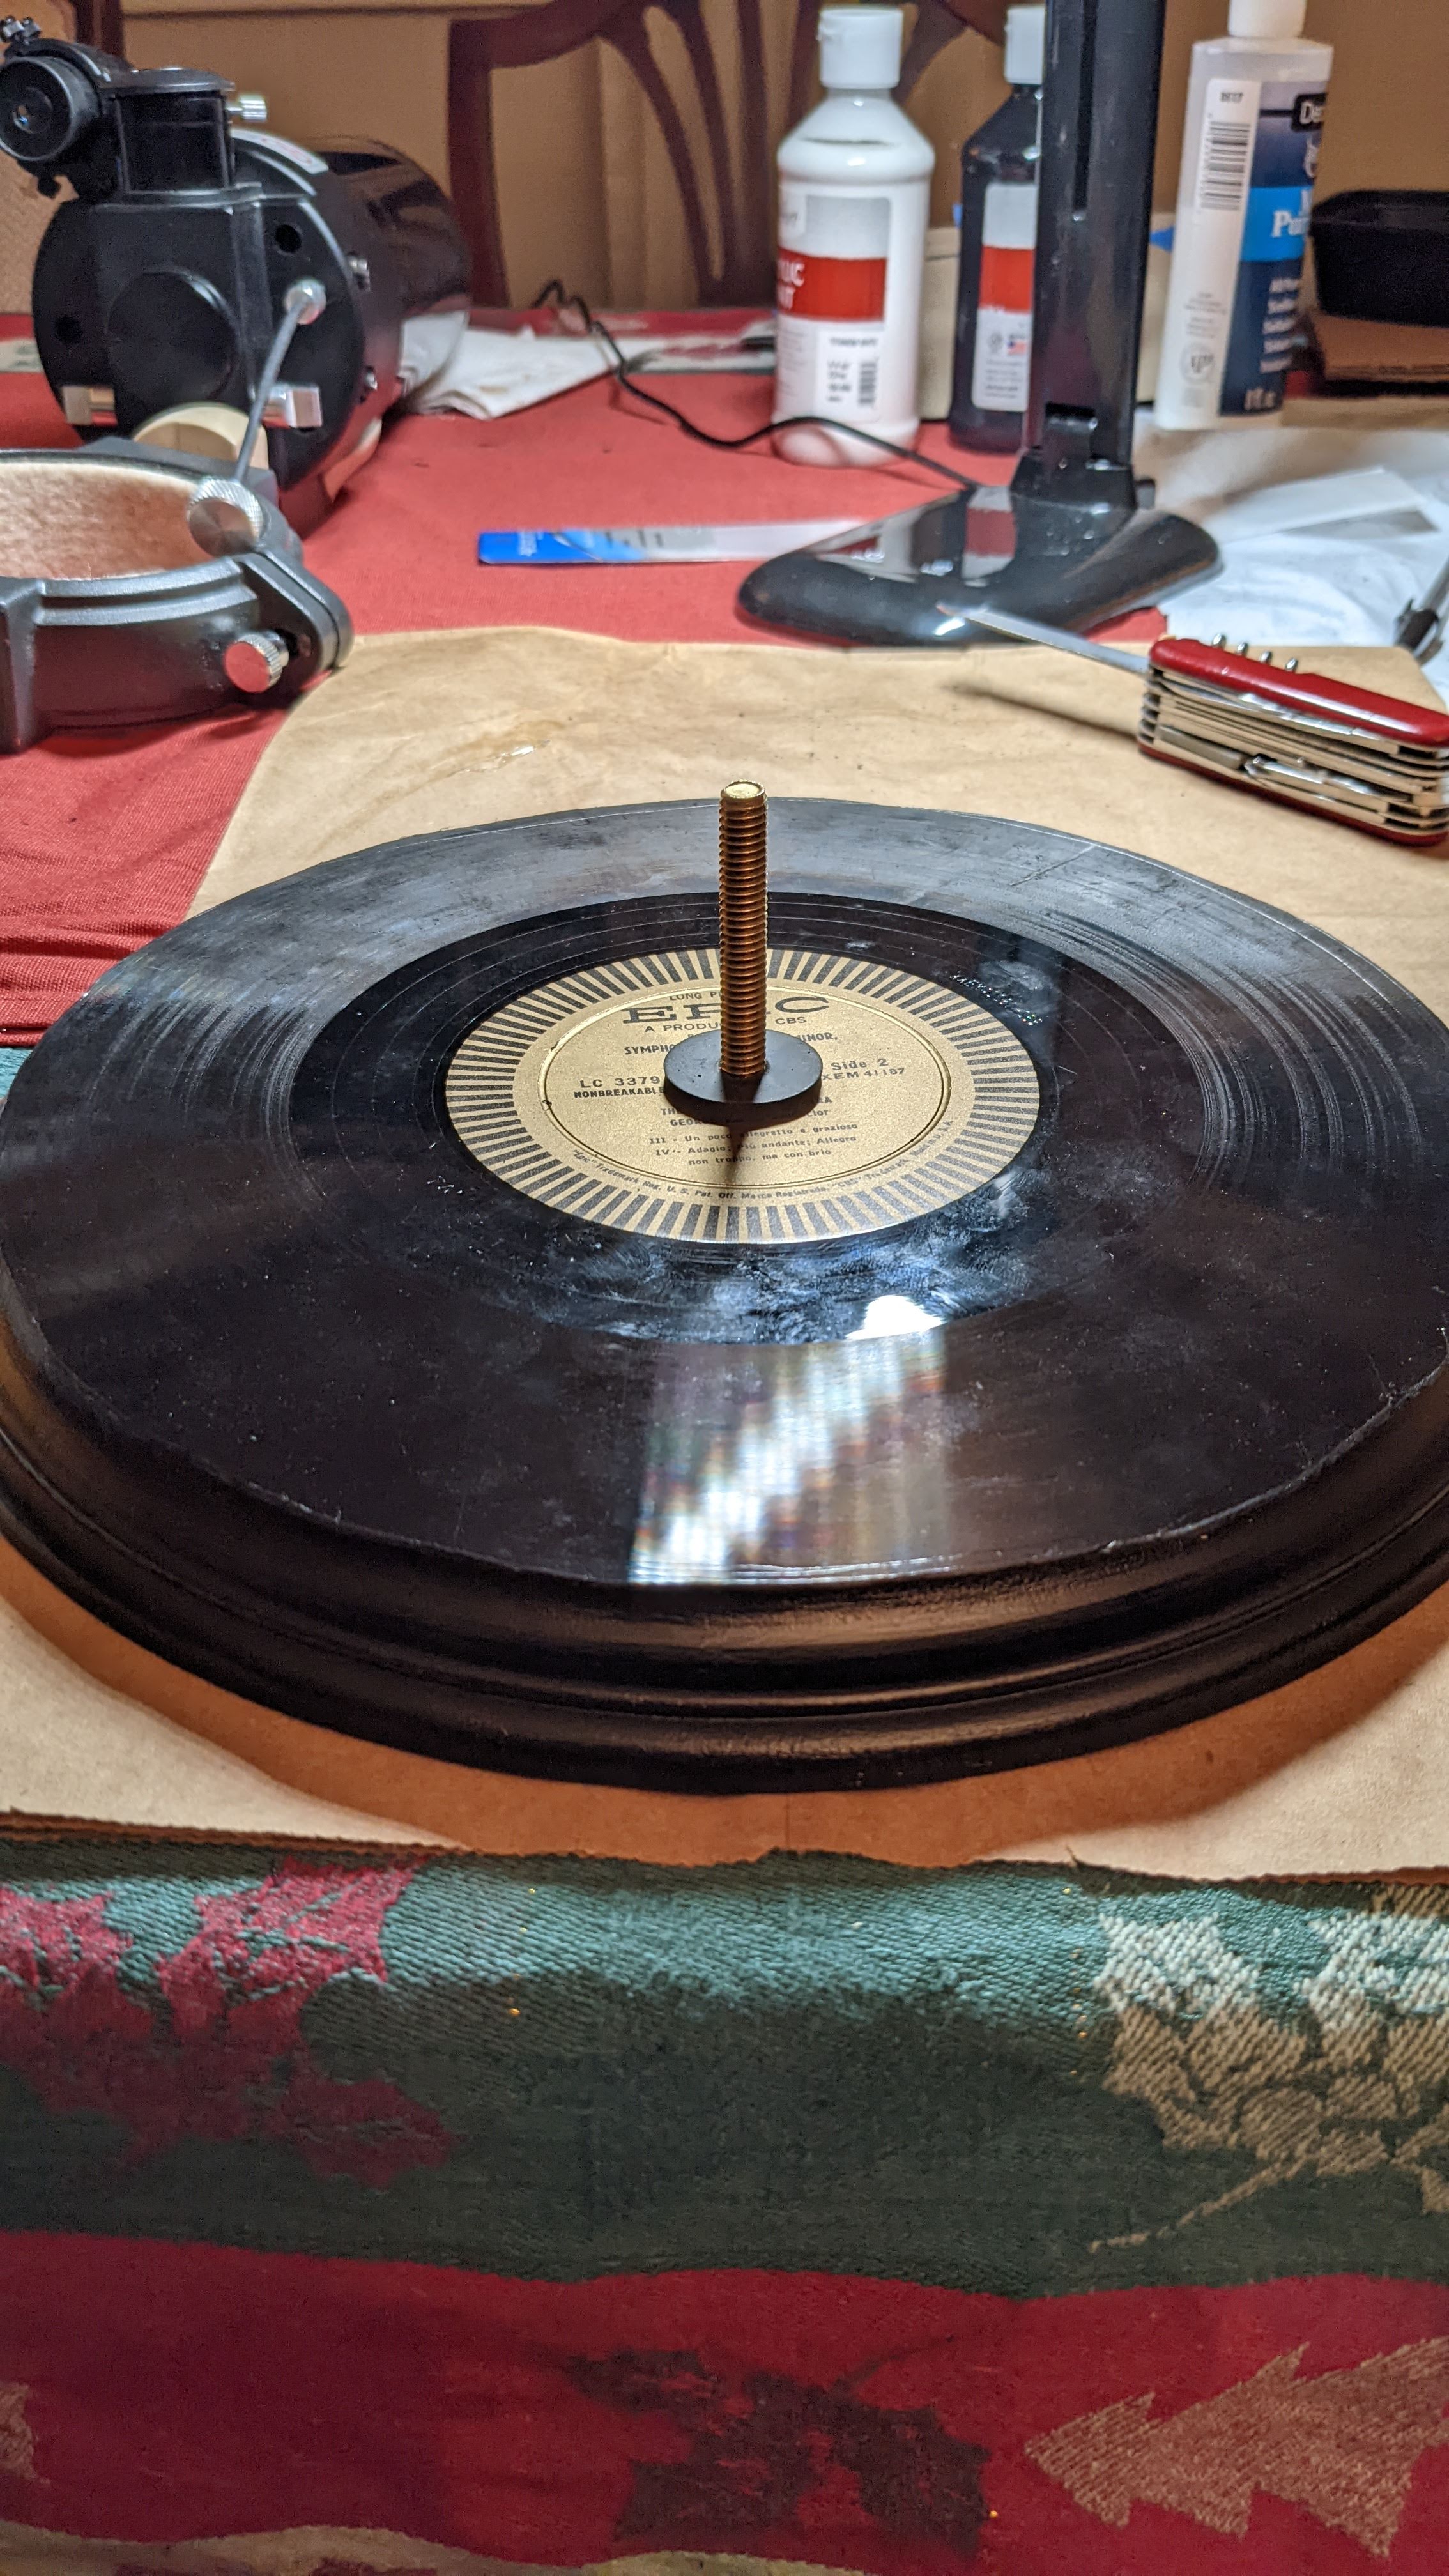
Along with the wood pieces and the Dremel, I also bought a set of hole saws with which to make the round bearing slots on either side. My next purchase was a bottle of wood sealer and some foam brushes, so I could paint the pieces to make them pretty. I bought a variety of felt pads to use in the bearing slots and between the turntable pieces, some PVC pieces to use as the trunnions, and some rubber feet to go on the bottom of the base. Other bits I had on hand include the central bolt and washers to act as the axle for the turntable, various screws, an LP record to serve as the bearing plate for the turntable, and the black acrylic paint. On the whole I spent a lot more on the project than I intended, and probably more than if I had just bought a used ETX base on eBay in the first place. But I learned a lot and have increased not only my woodworking skills (a bit) but also my courage to try. That’s worth the price of all the bits.

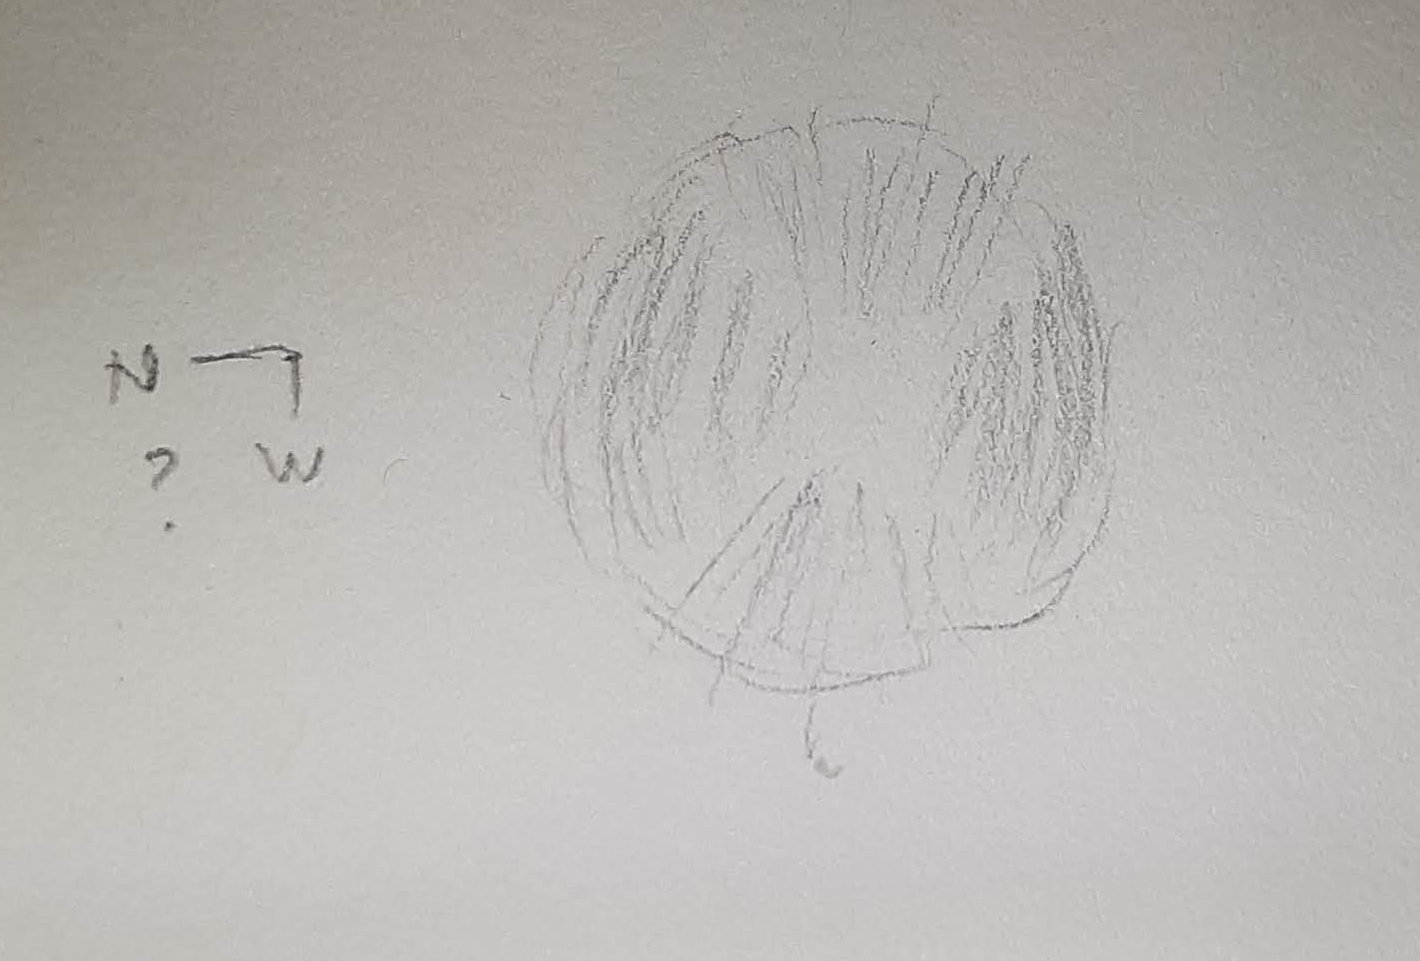
Today, I managed to get the tube balanced with an eyepiece in and the objective lens cover off. I also aligned the finder scope. The movement of the turntable is pretty smooth — not quite as smooth as I’d like, but I think it will do. The same is true with the rotation of the OTA on the altitude bearings (trunnions); it’s a little sticky, but should work. Now I just need a decent, clear night that isn’t too dang cold so I can try it out and see if it really does work.

Here’s a link to a video showing the balanced scope functioning nominally.

Observatory 12: Griffith

In my last entry I described the day I arrived in Los Angeles, including my visit to the California Science Center. That was a Wednesday, August 29, 2018. The next day, according to my journal and my now vague memories, was spent doing laundry, getting groceries, and watching Netflix, a luxury with which I was pretty unfamiliar at the time. Doing laundry was also a luxury, as I didn’t have the opportunity during my week in Arizona, and my last attempt was that time in New Orleans when the machine flooded the kitchen in my apartment. Good times. This was a much better experience than that, entirely without incident. But that’s not why you’re here reading this! So let me tell you about the next day.

Griffith Observatory – Short Form

Here’s what I wrote in my journal a week after I left L.A., then I’ll add some details after that.

Griffith Observatory [is a] classic science center from the 1930s with a huge underground gallery added in 2003. Saw the sky show and got to look through the 12″ Zeiss refractor at Saturn. View was nominal, expected for look over LA, but still glad to have done. Four moons visible, Cassini Division, disk shadow. Stood in line with Gita, a science teacher from India. She was fairly knowledgeable about many things, some more than me, some less. She had never seen a planet through a telescope. I think she was a little disappointed at 175x, but that’s how it goes. There were a lot of people there, which is heartening. Lots of adults.

My Journal, 9/5/2018

Griffith Observatory – Long Form

The Approach

I’m sad that I didn’t write more in my journal, and I’m sad that I haven’t written up my memories before now, because things are getting pretty foggy after two years. But let’s see what we can do here. I was not really familiar with Griffith before going there, so I didn’t know what I was getting into. Well, that’s not entirely right. I had explored the website, of course, so I knew it wasn’t a research facility. And I knew that they had public telescope viewing every clear night. What more do you need to know? Let’s go! Sundown was about 7:30 p.m. local. Since I wanted to do the viewing, I knew it would be a late evening before getting home. Consequently, I wasn’t in a hurry to get there when the doors opened.

It wasn’t very far from my apartment to Griffith, about six miles, but decided to take a Lyft. It was about 4:00 in the afternoon. My driver was an interesting young man, a musician and song writer, as it turned out (hence a Lyft driver?). When I told him I was a pastor on sabbatical, he said he was a PK (“preacher’s kid”) and had learned his love of music in the church. That was cool. So after that pleasant drive, I was in the parking lot. The Griffith is a beautiful building to begin with, but there’s also the view. Griffith Park is in what I think is the Hollywood hills. One reason I think this is you can see the Hollywood sign just opposite the observatory! It was surprising to me to have these lovely, rugged, sort of wilderness hills overlooking one of the most populous cities in the world.

Art Deco. Very nice!

The observatory itself is, again, the beautiful, white, art deco building with a decorative dome and planetarium dome in the center and observing domes on either end. There is a monument in front, also art deco in style, commemorating six great historical astronomers. The approach to the front door also has markers in the sidewalk showing the scale distances of the orbits of the solar system planets. There were quite a number of people of all ages milling about outside, making their way in or out. I was excited to see the inside, because the outside was such a pleasant start.

Remember the Buhl!

Inside, the Griffith Observatory is a classic planetarium. High ceilings, subdued lighting, two main wings for displays and the planetarium / sky show theatre in the back. It reminds me of the Buhl Planetarium in Pittsburgh that I loved when I was a kid. Another similarity is the Foucault pendulum in the lobby. This is a 19th century experiment in which a pendulum, free to swing in any direction, with a very long cable for its arm and a large bob demonstrates the rotation of the earth. The pendulum thinks it is traveling in a the same plane with each swing and wants to do so, but it is actually moving in a slight arc as the earth turns under the pendulum. This is proven by a circle of little pegs set up on the floor that the pendulum very slowly knocks down every so incrementally.

Anyway, the one wing had a variety of telescope models, replicas, and displays including a replica of Galileo’s telescope and a Faraday cage with a big Tesla coil, and the other had various science-y alcoves, ending with displays about the sun. This part is under the solar observatory/coelostat in one of the two domes on the roof. There is a large screen showing an image of the sun’s surface, which unfortunately was blank because the sun was in the minimum phase of its 11-year activity cycle. I enjoyed exploring all these displays for some time.

I took in the sky show in the Oschin Planetarium at about 6pm, as I recall. It was a pretty standard planetarium show with digital images, star patterns, and whatnot projected on the dome with dulcet narration. I don’t really remember the content, just the pleasant contentment of sitting in the big comfy reclining seat in the dim light, digging on the science, and feeling nostalgic about the whole planetarium experience. I always love the giant spider projectors, again, going back to Buhl Planetarium in my childhood, and more recently in the Hopkins Observatory in Williamstown. This one, like many such, is made by Zeiss.

The Zeiss star projector in the Oschin Planetarium, not quite as buglike as the older ones were.

Space, Underground

Had I visited Griffith in my youth, that is all I might have found. Some years ago (2002-2006), though, they underwent a major renovation by adding an enormous gallery and a second theatre underground! They actually have a movie about this in the underground Leonard Nimoy Event Horizon Theater, which I watched dutifully and enthusiastically. It was a fantastic engineering project! They didn’t want to change the beautiful original art deco building, and since it is perched on the edge of a hill, there was no room to expand outward. Their only option was to go down. So they had to figure out how to dig out a cavernous space under the building while artificially supporting said building so it wouldn’t fall into the new hole. This they did successfully! The result more than doubled the size of the facility. 

The Big Picture in the grand gallery downstairs. It shows a bit of the Virgo Cluster of galaxies.

Much of this space is given to the cosmos beyond earth, so the solar system (displays about each of the planets and whatnot, with scale models hanging from the ceiling) and beyond to far-flung galaxies and discussion of cosmology. The entire back wall is a single photographic reproduction of a section of sky that includes the Virgo Cluster of galaxies. According to my notes and a short film telling about it on the floor of the gallery, it is the largest such astronomic reproduction in the world and includes millions of galaxies and hundreds of thousands of foreground stars. The whole area on the sky can be hidden by your thumb at arm’s length. This is brought home by a sculpture of Einstein sitting on a bench holding up his thumb to do exactly that. It is a remarkable display, and all the more because they have telescopes on the balcony that you can use to look at it as if you were under the night sky. I found this to be very cool, as I have explored that region of sky with my own telescopes.

Into the Night

Sunset was about 7:12 p.m. on September 5, 2018, with astronomical twilight lasting until about 8:30 p.m. I don’t remember if they said when the viewing through the big telescope would begin. I do remember getting something to eat at the Cafe at the End of the Universe (with a tip of the hat to Douglas Adams). I’m not sure if I did this before or after looking through the telescope. I think it must have been before, because the time stamps on my pics shows I was at the telescope at 8:52 p.m., and the cafe closes at 9:00, as does the gift shop. I distinctly remember eating in the cafe and then going to the gift shop for some time. I also remember that there was not much available at the cafe other than grab-and-go stuff like microwave hotdogs, which I think is what I had. This was somewhat disappointing as meals go, especially since the cafe is listed under WolfgangPuck.com. I also remember that some staff person was mopping the floor and putting chairs up. My reconstruction is that I was eating at around 8:00, well after the dinner rush. It was a disappointing meal, as I said, also because I was really hungry. It had been pretty long since lunch, and I had been burning a lot of calories in walking and braining. Afterward, as I said, I went to the gift shop where I bought some refrigerator magnets and not much more. At this point I was still thinking I didn’t want to get too many t-shirts, because I had very limited carrying space. Eventually, I gave up on that, as I was able to pack more and more efficiently with every move. But really, this isn’t very important, is it? Let’s get on with it, shall we?

It was in fact dark by 8:30 p.m. when I emerged on the roof. The sky was clear and full of light pollution from the remarkable lights of Los Angeles. The city (at least its downtown) is like a lonely mountain in the middle of plain. Just a flat grid of lights all leading to a central peak of skyscrapers. It is kind of pretty, but of course it blots out all but the brightest stars and planets. The line for viewing through the 12″ Zeiss refractor was long enough but not depressingly so. I fell in, and it took about 20 minutes. As I mentioned above in my journal entry, I got to talking with a science teacher from India named Gita who was ahead of me in line. It took me quite a while to realize she was from India, because she had virtually no discernible accent. I don’t remember much of what we talked about, except that she was well versed in earth sciences but had never seen a planet through a telescope. I remember being eager to engage and encourage her about astronomy, and also feeling somewhat rebuffed. I wish I’d written more down at the time. Otherwise, there were quite a lot of people in line or milling about on the roof. It was a very pleasant night weather-wise, and there was a pleasant atmosphere among the museum patrons, with lots of lighthearted banter and the murmur of many energetic conversations going on at once.

The target for the evening was Saturn, which was high in the southern sky. Venus and Jupiter were low in the west and close to setting if not already set by 8:30. Mars was rising over the city. As you may recall, it was near its close approach but had been covered by a global dust storm since the end of spring. That left Saturn as the best candidate, and let’s face it, Saturn is always a good candidate. The line made its way into the observatory dome and wrapped around and up a narrow wooden staircase to the eyepiece. Staff were stationed here and there to direct and assist, and while I seem to remember someone being at the top of the steps, my pictures show that wasn’t the case. Huh. Anyway, one would go up to the eyepiece, get in a good look, then come back down and head to the exit, and then the next person would go.

The Zeiss 12″ refractor, looking as much like an antiaircraft gun or laser turret as weapon of scientific inquiry.

The Zeiss refractor is a 12″ diameter tube, about 16 feet long (f/16, I guess). It has a variety of other scopes mounted with it for guiding, spotting, and additional views, whatnot. The whole lot is on an equatorial fork mount, kind of. As noted above, the view of Saturn was, well, standard and adequate. Since Yerkes I had been tempering my expectations, and what would one expect of heavily light-polluted skies over a major metropolis? So, the seeing wasn’t great, kind of wavy. The magnification was 175x, which I can often beat at home. On the other hand, it is a 12″ refractor, so lots of photons to look at, which makes for a brighter image, which probably counters the light pollution some. Plus, it’s the Griffith Observatory Zeiss refractor, which is said to have had more humans look through it than any other telescope in the world. That makes it worth being on my list.

After admiring the view of Saturn for a minute or so and then the view of Los Angeles for a while, I decided to call it a night. I made my way to the parking lot and called for a Lyft, which was also true of about a few hundred of my close Griffith friends, or so it seemed. Anyway, it was pretty crowded. While I waited for my ride, I could hear the sounds of baseball from the valley below, which was I guess coming from Dodgers Stadium, about 5 miles away. It sounded like it was just over the hill from me. My Lyft driver had to make a couple passes, as I didn’t see him on the first one. We eventually connected, though, and had a quiet ride back to my abode, as he was pretty much the opposite of the driver I had on the way to Griffith. Well, it takes all kinds.

Conclusion

My trip to Griffith was a delight. I thoroughly enjoyed the blend of old and new, nostalgia and innovation on display there, as well as just soaking up the astronomical goodness of it all. I was very pleased to see how many people, and particularly adults, were there, not just for the displays but for the nighttime observing, on a Wednesday. Although I hadn’t been familiar with Griffith before, I am really glad I put it on my list and that I got to look through their historic Zeiss refractor. With the possible exception of those hot dogs for dinner, it was a wonderful experience.

To see the rest my pictures from the Griffith, click >HERE<.

My First Wide Field Astrophotos

After the encounter with the Pretty Good Comet of 2020, F3 NEOWISE, and not getting any good pictures of it, I got it in my head to get DSLR camera so I could do wide field astrophotography. That means wide shots of the sky that look sort of like what you see with your eyes, not a closeup through a telescope. The idea wouldn’t go away, even though the comet did. So I set out to find something used and useable that I could afford, something that would be good for a beginner and with enough capacity to grow with me for a while. After a few weeks of research and shopping online, I found a Nikon D3100 body in great condition for what seemed to be a reasonable price. After a misfire, I found an AF-S 18-55mm DX f/3.5-5.4 zoom lens, also in great shape, to go with it, and again for not too much money. So off we go.

My Photographer Cred

My dad used to do a lot of photography as a hobby. He even had his own darkroom, developing his own film and printing his own pictures in black and white. My brother was something of a photographer, too, having got in pretty early on the digital revolution with a Canon Rebel, which my daughter now has. While I’ve never owned an SLR before, being around a couple good photographers gave me a general conceptual knowledge of how they work. Plus, I have used plenty of point-and-shoots and have developed a pretty good eye, I’d like to think. Still, actually using a DSLR, and for a specialized brand of night photography, presents a pretty steep learning curve.

Not Gonna Do It

For one thing, on my first attempt, I found that my camera is finicky and stubborn in low light conditions. Even having figured how to set the aperture wide and the shutter speed long in manual mode, I couldn’t convince the D3100 to actually take a picture it was sure would be bad. This led to a great deal of frustration on my part, causing me to question whether I had made a terrible mistake. I managed not to rage quit and instead resigned myself to discover through further study how to be smarter than my camera. Reading the owner’s manual seemed a good first step, but before too long I got bored and did an interweb search for my problem.

It turns out the “AF” in the AF-S lens stands for “auto-focus,” which the D3100 takes very seriously. This line of cameras performs auto-focusing with motors in the lens rather than in the camera itself as the lens and camera discuss the shot you are trying to take. Consequently, there is a switch on the side of the lens to go between automatic focus and manual focus. When in auto mode, the camera tries to give the lens all the information it can in order to get a sharp focus. If the camera can’t see well enough to know if the shot will be in focus, it won’t flip the shutter. Putting the lens in manual focus mode solves this problem. The camera still boldly announces that the shot is too dark, but assured by the now-manual lens saying, “I got this,” it allows the picture to go ahead, even though you clearly don’t know what you are doing, in its not so humble opinion. Thanks, internet photography forums! You saved me from having to slog through the boring owner’s manual!

And so it was that, having switched to manual focus, I accidentally took a 20 second exposure of the inside of my lens cap. At first I was confused, because, as noted, the camera was still declaring the shot to be invalid. But having heard the shutter flip, I realized I had broken the code. Actually, taking a “dark frame” is an important part of astrophotograph processing, as it reveals any hot pixels and biases and stuff that the camera and lens may have that can then be subtracted from the final product, or so I’m told. I’m nowhere near ready for that level of postproduction yet. Nevertheless, that first unintentional black picture was the start of something wonderful. I hurried outside with my camera and tripod, found a mostly clear sky (not sure how this was allowed, but I’ll take it), and started taking long, dark pictures of the night sky at 1:00 in the morning.

The Pictures

You can see the whole collection except the dark frame >here< (plus all of what you just read), and I’ll put a few in here directly below. I’m pretty pleased with how they came out straight from the camera. Obviously there is so much more that can be done that I intend to learn, but for the first run, this is pretty cool.

Technical

Most of these shots are 25 seconds long, with a couple at 20 seconds. If you zoom in you can tell there is just a bit of a trail on the 25 second stars, but not so much that you notice it much when zoomed out. As expected, the 20 second exposures have less of that effect, but they are significantly darker. I suppose about 20-25% darker. The 20-25 second figure is a product of what is called the “500 rule” that I read about on a number of websites. Divide 500 by the lens focal length to get the max shutter speed without trailing. For certain types of digital sensors, such as the one in the D3100, you have to adjust for the architecture by using 1.5 x the lens focal length. So I was shooting at 18mm zoom, times 1.5 is 27, and 500 / 27 = 18.5. So I was really going too long at 25 seconds by that calculus. Some folks I read recommended more like 8 seconds, take lots of images, and stack them in processing. That’s a lot of work for a beginner. The other option is to get a tracking mount of some sort that would essentially remove the limit altogether. By following the stars as the earth turns under them, you never get any trails. Well, we may get there eventually, but for now I’ll play with the math.

Observing at Home (mostly) – Comet 2020/F3 NEOWISE – 14-22 July 2020

First of all, the featured image on this post comes from JPL-NASA. It’s Comet NEOWISE over Deer Valley, Utah. I tried to take some pictures of the comet with my phone. They all came out like this:

My 8th image of C2020/F3. Or is it the 6th? Oh, no, that’s right. It’s what EVERY single image I took of the comet looks like!

NASA photos are public domain. Thanks, NASA!

14 July: 21:30-23:00 EDT

Conditions

Warm – 70s; breezy; variable clouds; humidity 35%; seeing average, transparency average-below average

Observations

This is the first naked-eye comet to come our way since… Hale-Bopp 1997? There was McNaught, but it fizzled in the northern hemisphere. And this is just barely naked eye here, but we’ll get to that.

Molly and I went up to the top of the “mountain” at the commuter parking lot on the SE corner at the intersection of Rt 9 and Rt 115. Good clear view to the NW, but looking across the lights of Charles Town/Ranson and under several bright street lights. Several others standing about when we got there, about 9:30 pm. At about 9:40 I spotted the comet in my 10×50 Bushnell binoculars. There was still a good bit of fading sunlight low in the sky, but the comet appeared, as you would expect, just where the sky got dark. It was about 12º above the horizon in the constellation Lynx (as charted later). The head was obvious, bright, and had a slightly brighter center, all fairly compact. A bit of a halo and a long and obvious tail slightly wider than the head. If my binocular field of view is 5º, the tail appeared to be 1.5-2º long, but a good solid 1º any way. The tail was tilted maybe 10º from horizontal, tipping slightly to the east. As night continued to fall, we were both able to see it with our naked eyes. It appeared as a faint, fuzzy strip of white, about “an inch” long (two finger widths at arm’s length), better with averted vision.

My sketch, inverted
View from the top

A family in a pickup was there, and I asked if they had found it. The dad came over, and I showed him where to look. He was excited to see it and went to show the family. It was fun to hear the kids yell, “there it is!” and “oh, wow!” We decided to go down away from the streetlights and stopped on a side road near Rt. 9. The sky was about full dark by then, and the comet stood out better. Still much better with binocs or averted vision, clearly there.

The ISS made a nice pass from SW to NE.

15 July: 21:45 EDT

Saw C2020/F3 from the back deck, low ever the trees in the NW. First with binocs, then vaguely naked eye. Similar in appearance to last night. Near 26 Lynx.

17 July: ~21:15-23:00 EDT

Started the evening with a great pass of the ISS – very cool!

Slightly enhanced photo of humans orbiting earth

As to the comet:

Head and tail seem to be spreading out slightly. Rising eastward night by night. Tail angled higher, maybe 45º to horizon? Streaky clouds.

18 July: ~21:30-23:00 EDT

Neighbors having a bonfire to the south, shooting fireworks to the west. Not helping my observing – the nerve! Any way, C2020/F3 continues to march east. Between the toes of the Big Bear tonight in a beautiful arrangement. Something like this:

A thorn in the Bear’s paw?

Mostly clear, some clouds to the south. “Heat lightning” filling 1/2-1/3 of the sky. Turns out to be from a storm near Staunton and Harrisonburg, 75-100 miles away (120-160 km). Must be a heck of a storm.

19 July: ~21:45 EDT

Saw it briefly through clouds, which soon overwhelmed.

20 July: 22:10 EDT

Conditions

warm – upper 70s; humid; variable clouds – 10-40%; new moon

Observations

Another triangular setting; inverting didn’t work as well on this on, so….

About 25º above horizon, visible naked eye in Ursa Major. Angled at about 12:45 ~ 20º from vertical? Tail is wider and longer looking, 3-4º long visible in binoculars. It fades a lot toward the “open” end, giving a suggestion that there is more out there. The head is wider and more uniform than before.

22 July: 21:30-23:00 EDT

Conditions

warm – upper 60s-lower 70s; very damp after rain; no moon (2 days old); seeing good, transparency, no so good; some clouds, then fewer, then more

Equipment

10×50 Bushnell binoculars; Celestron NexStar Evolution 8″ f/10 SCT

Observations

Arrangement (above);
Binocular view (below)

It was clear enough after an afternoon of heavy rain to try the scope on C2020/F3, which was visible naked eye (averted) over the trees from the deck, and clearly visible with binoculars. About 3º NE (straight up) from 𝛌-UMa. So that µ-𝛌-F3 made a right triangle with 𝛌 at the corner. The tail still looks pretty solid for about 3º in binocs, but with the sense that it goes further. It is still fairly compact laterally, broadening slightly as it stretches from the nucleus. It’s a little stronger on the northern edge.

As for views in the C8 NexStar, it was not a great improvement over binoculars. There is a bright, tiny nucleus, then a much larger coma that is pretty even for maybe 0.2º (based on 0.8º field of view in 32 mm eyepiece at 62.5x). The coma then fades gradually for quite a ways, so that it is hard to say where it ends. The tail went off to the east mostly.

I did have the experience of seeing a gap or a dark patch with averted vision, at the edge of the uniform coma. This gap/patch would move around depending on where I looked. Not sure if it was an illusion or an actual feature. I found a graphic of comet structure online that showed a gap between the coma and the surrounding hydrogen envelope. If that’s a thing, that might be what I saw.

Telescopic view, annotated

I first found the comet in the scope at around 21:45, then went in for a bit to finish watching the finale of the Great British Baking Show, season 5, with Molly. We both then came out at maybe 22:15, and F3 was no longer centered in the field of view but was about 1/3 from the top — not a lot of motion, but noticeable! It could be because of the tracking on the telescope, but that seemed to be pretty steady across the rest of the night. So I presume it was the actual motion of the comet. Neat!

Astromechanics in action

I eventually tried higher magnification just to see how it looked – 9mm eyepiece at 222x – a big jump from 62.5x. It did not improve the view. It really didn’t look that much different except that the fuzziness of the coma filled the field of view. Probably should have tried a lower magnification, like 50x with 40mm, but I didn’t. Sue me. About then, a bank of clouds started creeping up from the west, and it wasn’t long before the comet was enveloped and disappeared.

Other stuff

I pressed on for a bit with a few other objects. Sky&Telescope had had a feature article about M101 (face-on spiral galaxy) not long ago. I’ve never had much luck observing it, even with the 25″ scope in New Mexico (2010). I’ve been trying to see it with my binoculars all summer with no success. But I thought I’d give it a try. The GOTO went and found… nothing. I poked around some but still saw nothing. You’d think an enormous galaxy would at least give you a hint of its existence. I mean, Messier saw it with a tiny telescope, right? I tried M51 (face-on, interacting spiral galaxy), which I know I can see with this scope, just to make sure all was well, and because I love looking at it. The GOTO went and found… nothing! Hmm. I poked around again, and finally found it about a field of view to the north. Aha! The GOTO alignment was off. (M51 was beautiful, as always, with both partner galaxies clearly visible.) Went back to M101, corrected for the GOTO, and found… nothing? Well, wait. Is that…. ? Yeah, I think so. Found it. It appeared about as large as C2020/F3, but much fainter. Mostly a fuzzy blob, maybe some hint of structure? Maybe?

Went on to M97 – Owl Nebula (planetary nebula) just under the bowl of the Big Dipper, but the clouds beat me to it. Went up to Mizar (double star, 14 arc-second separation), which split easily at 62.5x and looked very cool at 222x. (Descriptions from here out are a little fuzzy as I was rushing to beat the clouds and not taking my time to observe.) White primary with a bluish companion to SW (? – lower right). Looking at a suggested list of double stars on the paddle control, I went to Xi Boötis and then Epsilon Boötis. Both were tighter (7 arc-seconds and 3 arc-seconds, respectively), just hinting at their companions at 62.5x. Both yielded at 222x. Xi was a yellow primary with an orange companion (I think), while Eps was a white primary with a reddish companion. I even tried 4mm – 500x – on Epsilon, but the vibrations were crazy on the deck, making it virtually impossible to see anything. It wasn’t really much better at 222x, to be honest.

Between the vibrations, clouds, and lateness of the hour, I called it a night.

Observing from Home – Mercury Transit – 11 November 2019

On Monday, November 11, 2019, the planet Mercury lined up in such a way that it crossed the face of the sun from our vantage point on Earth. Because of the eccentricities and inclinations of the planets’ orbits, this is something that happens from time to time, like a lunar or solar eclipse. The last Mercury transit, as it is called happened in 2016, and the next will be in 2032. As it happened, this time our house was in a prime location to observe the event, and it was my day off. So I made some plans to have a look.

If you ever have opportunity to look at the sun, DON’T!! At least not if you don’t have the right equipment. Here’s a link to an article at Sky & Telescope with the right way to do it. If you follow the steps in the article, then it is a pretty cool thing to be able to do. Just be careful, or you or someone with you could go blind. You have been warned.

First viewing – Binoculars

Fortunately, I have the right equipment. I started out with my 10×50 binoculars equipped with solar filters that I had made for them before the 2017 solar eclipse. The sky was mostly clear but with patchy, high-level clouds, so not ideal, but a lot better than I expected. The transit started at about 7:30 a.m. EST, but I hadn’t convinced myself that I was going to be able to see anything yet, due to clouds, trees, and breakfast. I mean, it was my day off, and I don’t like getting up that early. By 8:15 I finally had enough coffee to begin executing my aforementioned plan. As you can probably tell, I’m not a really good planner, so when I say “I made plans to observe” what I mean is “I decided that I might give it a try and had a few options in mind about how to do so.” Any way, I went out in the front yard, which faces east and also a mess of trees, and found a spot on the front steps, actually, that had a clear line of sight to the sun. I got my binoculars fitted with their filters. Looking freehand was pretty much a No-Go. I had some hints that there was something there, but it was nothing I would swear to. So I got my camera tripod and attached the binocs, and that made all the difference.

I was surprised at how very small the planet Mercury appeared to be against the face of the sun. VERY small! Just a pinprick at about 8 o’clock and in from the edge maybe 1/6 to 1/4 the sun’s diameter. It’s no wonder I couldn’t make it out freehand. The streaky clouds often obscured it altogether. I tried taking some pictures with my phone, but that didn’t work well at all. The clouds were increasing, the sun was heading behind a tree, and I had seen the thing, so I felt pretty good, and went in, thinking I might be done. Then again, I might not.

Typical fall sky making it a little tough on solar astronomers, but I still had a good observing experience of the transit.

Second Viewing – Reflector

The sky cleared a bit, and the day warmed a bit, so I decided to break out a telescope. I thought about trying to quickly build a filter for my 8″ Celestron Schmidt-Cassegrain telescope, and this is where being a real planner would have been useful, but there just wasn’t time on the spot to get a workable and safe solution. The other choices I had were that I have full aperture filters for my 60mm Meade ETX Maksutov-Cassegrain and my 5″ Orion SpaceProbe reflector. The 60mm is motorized for tracking, but it’s only slightly bigger than my binoculars. The 5″ is significantly larger but was at the time unmounted. I have two manual equatorial mounts that would work, one that came with the 5″ that is pretty wobbly, and one that came with my 8″ reflector that is more stable but sticky in its movement. I opted for the functional but wobbly 5″ reflector set up.

Wide angle view of the sun with Mercury left of center. North is down, west is left.

About 11:45 a.m. EST, I set up on the pool deck, which worked out well with an unobstructed view of the sun. Clouds were intermittent and didn’t hinder the viewing as much as they had through the binoculars. I was able to watch the second half of the transit. Using a phone adapter by Gosky or GoSky, I was able to take pictures and video of the event with my Samsung Galaxy J3. This was a mixed blessing as I have documentation of my observing and pictures and video I can share with you, but it’s a different experience viewing directly through the eyepiece as compared to viewing through the camera. I took turns between the two. I did enough direct visual to say I saw it, but I felt especially unsatisfied and satisfied for having video-recorded the 3rd and 4th contacts, that is the end of the transit, which was about 1:05 p.m. EST.

I used 20mm Super-Plössl, 10mm Plössl, and 8.8mm Wide Angle eyepieces with and without a 2x Barlow lens. This provided magnification of 45x, 90x, 102x, 180x, and 204x. Mostly I kept to the midrange 90-102x. The planet was much more obvious than in the binoculars and clearly a disk and not just a dot. Using the zoom on the phone camera means that I have no idea what magnification I actually had for any of the pictures. Because I changed the camera zoom many times, it has been very difficult to try to compare or stack the images, as they are at different magnification with different parallax error and different color balance. Because a Newtonian reflector gives a mirror image both left-right and top-bottom, Mercury appeared to be backing out the way I had seen it coming in through the binoculars, but it did in fact travel from SE to NW all the way.

I’m glad I got the chance to observe this transit directly. The last transit of Venus a couple years ago got completely clouded out. As I mentioned, the next Mercury transit will be in 2032. I wonder what sort of tech we will have to observe that event. I hope we’ll still be around to see it.

Here’s a link to my collection of photos for the event at Google Photos.


Observing from Home – 11 August 2019

Conditions

  • 11 August 2019 – 22:00 (8/11) – 00:30 (8/12) EDT
  • mild – 60º-65º F; humidity 80-85%
  • Moon +11 days ~90% illumination
  • still; clear at first, but increasing clouds toward midnight
  • seeing – 6 or 7/10 – pretty good
  • transparency – inconsequential, as I was hunting orbs

Equipment

  • Celestron NexStar Evolution 8″ SCT
  • Eyepieces
    • 32 mm
    • 15 mm
    • 9 mm
    • 6 mm
  • 2x Barlow
  • Filters
    • Moon, blue, green, yellow

Objects

  • Moon
  • Jupiter
  • Saturn

Observations

A pleasant Sunday night. I pondered long about going out, because, much as I love the NexStar 8, it is a pain to drag it down to the pool deck. I finally discerned that my 3 targets – Jupiter, Moon, and Saturn – would be visible from the deck, so I set up in the northwest corner there. The problems were shakiness (really need to reinforce the deck at some point) and the TV aerial, which turned out to be right in the path of the moon and Saturn. The moon was just a few degrees W of Saturn, both sitting just above the Teapot of Sagittarius. Jupiter was 15º or so to the west just above Antares in Scorpius/Ophiuchus.


Moon

Southern region of the Moon. North is up. Just inside the terminator on the right (West) from bottom to top you can see Schiller, Gassendi, and Kepler, mentioned in the writeup.

I started with the Moon, using 32 mm = 62.5 X with moon filter and variations with 15 mm, 9 mm, and 2x Barlow. I don’t know the moon that well, so didn’t do much more than identify several craters. In the SW quadrant; Schiller, , a long, squashed crater; Gassendi was just east of the terminator – large with prominent central peak; small Flamsteed; up to Encke and Kepler, just on the terminator. On into the NW, Prinz on the terminator, and I think it was breaking dawn on Aristarchus, which sounds like a new age album. Saw Bianchini and Sharp just outside Sinus Iridum. After that I made my way to Mare Tranquillitatis to see if I could find the Apollo 11 astronaut craters: three small craters in a row just north of the landing site and named Aldrin, Collins, and Armstrong. Turns out they are quite small. While theoretically in reach of my scope, I had two problems (at least): 1) I had neglected to add my dew shield and was starting to fog over, and 2) the aforementioned TV aerial was now sitting across the heart of the moon, so that I wasn’t getting good resolution, even at 222 X. [An article in July 2019 Sky&Telescope suggests a 6″ scope can make them out at 250 X with steady seeing.]


Jupiter

Moved on to Jupiter, sitting low in the SW. Tried pushing the magnification to 333 X, and it was just a bit too much. 222 X wasn’t quite enough, but I didn’t think to use the 15 mm + 2X for 266 X, which might have been Goldilocks. Oh well. The GRS (Great Red Spot) was just past transit, very well placed, but so small! It was fairly obvious but just a tight, dark knot (nought? not.) in the SEB (Southern Equatorial Band), which itself was quite light. The NEB (Northern…) was dark and thick, and some “barges” were visible. The equatorial zone remains heavily shaded, darker than the temperate zones. One northern temperate band was visible. The GRS rotated about 2/3 to the limb while I observed, or so it seems to me as I write this. I tried a variety of color filters, including blue, green, and yellow. The blue highlighted the bands and GRS the best, as one would expect. Green and yellow both gave interesting interpretations but were ultimately not that helpful. Of the Galilean moons, I had just missed Io disappearing in eclipse as it turns out, and also just missed Ganymede emerging from eclipse at the other end of my observations. Oh well. Meanwhile, Europa was about 4 Jupiter diameters from the planet to the west. Callisto was about four Europa-Jupiter distances further to the west. I made a sketch at the eyepiece that shows the distances more or less. The GRS in the sketch is bigger than it appeared.


Moon, redux

Went back to the Moon for a bit after it cleared the tower, as it were. Took another stab at the Apollo 11 craters, but no. Poked around the southern highlands for a bit. I’ve always had a soft spot for Clavius, so I looked there for a bit. Noticed a few clouds moving in and wanted to get some Saturn time in, so moved there.


Saturn

Even with deteriorating conditions, Saturn looked pretty good. Again, pushing the mag, it was just a bit much at 333 X, so ended up with the 266 X combo I hadn’t thought of earlier. The rings are tilted so that the other edges are about lined up with the edge of the disk. It’s just a bit past opposition (okay, a month past), so there is just a little bit of shadow on the rings right at the pole, or that’s what I’ve gathered. Any way, the rings kind of squish at that point. Not much color tonight, just a yellowish tint. Darker in the N temperate to polar region with a slightly dark band at the bottom. Very 3-D. Cassini Gap easily visible.


Pics

I took several handheld pictures and videos with my phone at the eyepiece for all three targets. Moon was best, of course, then Saturn. Jupiter was washed out. Clouds were moving in, and I was tired, so I washed out, too.

Best shot of the Moon for the night. North is right and West is down.
Best of Jupiter for the night, which is not that great. North is upper left, West is to the lower left. More or less.
Saturn. Not as impressive as seeing it live. You sort of see the dips where the rings and the disk limb cross, right? North is right.

You can see the full series of pictures I took at my Google Pictures album, >here<.


Observing from Home – 1 July 2019 – The rest of the story

In my last entry I included my first serious attempts at astrophotography with three pictures of Jupiter. Here, then, are my notes from that night’s observing in general.

Conditions

  • 1 July 2019 – 22:00- 00:30
  • warm – 70’s; high humidity – 80%!
  • new moon, essentially
  • still, no wind
  • some streaky clouds, increasing through the night
  • seeing – 6/10
  • transparency – good enough

Equipment

  • Celestron Nexstar Evolution 8″ SCT
  • Orion StarShoot Solar System Color Imager IV
  • 2x Barlow
  • Eyepieces:
    • 32 mm – 62.5x / 125x
    • 15 mm – 133x / 266x
    • 9 mm – 222x / 444x — too much for tonight!
  • Filters:
    • blue, red, purple, yellow, sky glow

Objects

  • Jupiter
  • Saturn
  • M4
  • M8
  • M20
  • M17
  • M22
  • M27
  • NGC 6995

Tech!

Writing this several days after the fact, so we’ll see how bad my memory is. Of course you won’t know unless I tell you! A good bit of time was spent on the new attempt at technology and astrophotography, which ultimately proved successful, but it took a while. The interface between camera and computer is a bit dodgy at first. No image coming through, even though the cam had power. This may have been an interface issue or that the object in view wasn’t centered enough or large enough or focused enough to produce an image. I eventually added the 2x Barlow, doubling the image size and found Jupiter on the monitor in the preview window of the settings screen. In the actual preview window, though, the image was tiled into 4 images that were raked with horizontal lines. Unplugging and restarting the camera seemed to do the trick, and after only half an hour fiddling, I took my first .mov of Jupiter. It was grainy as hell, but I could sort of see that the GRS (Great Red Spot) was on the limb. Over the next 45 minutes or so I took 8 movies of 50-75 seconds each. I tried one of M4, the globular cluster in Scorpius, but that was just dark frames. This camera is not sensitive enough for faint deep sky objects. It barely noticed Jupiter! Any way, I’ve been processing the movies into pictures with some success. They are grainy, and I have much to learn about processing, but they aren’t bad for a first effort. I thought about recording Saturn, too, but I decided to keep it simple on the first try. I also hoped to see several objects by eye on a rare clear night. So I put the tech away and switched to visual.

Observations

Jupiter

I stuck with Jupiter for a good while. It is just past opposition, so it is a great time to observe it. It isn’t very high, sitting on the north side of Scorpius, a few degrees north of M19, about 28º above the horizon according to an app. It’s super bright at -2.6 magnitude. At 62.5x (32 mm) I could see 2 stripes on the disk, on moon to the W (Io), and three to the E. Mostly viewed with the 15 mm and 2x for 266x. It was a pretty stable view. Could make out the GRS easily. The NEB (north equatorial belt) was thick and rusty colored. The SEB was thinner and darker to the … W? of the GRS (toward the direction of rotation). The equatorial zone was orangy and the higher latitudes were lighter. Could occasionally make out another stripe or hints of one above the NEB. I think. Maybe I’m applying that back from my pictures, though.

I tried a couple filters – blue, purple, red, yellow. The purple was a complete washout, making for a big pink blob, and red wasn’t much better. Yellow was okay. Blue was by far the most helpful. That’s when I saw hints of other bands and hints of detail downstream from GRS. This sketch doesn’t look like much, but I watched for a long time with great enjoyment and fascination.

M4 Globular Cluster

I had swung over to M4 before as I mentioned, but went back for more visual. For as big as it is, it’s a challenge. Not to find it but to see it. The surface brightness is pretty low, and I often strain to keep looking at it. Maybe I should have dropped the magnification. I had a hard time making out any detail at all. Just a mess of stars on the verge of vision so as to make my eyes twitch.

M8 Lagoon Nebula

Moved on to several Sagittarius favorites. M8 Lagoon Nebula was beautiful as usual. Not as stand-outish is M42, but up there. Wisps of nebulosity with an X across the center and a swarm of small stars on the east side. At some point in the night I added my sky glow filter – I think much later and then I returned here, I forget – and it really helped bring M8 out from the background.

M20 Triffid Nebula

M20 is hard to compare to M8. Not fair, really. It’s a beautiful thing but so small vs. M8. I think I didn’t use the filter on M20, and it suffered for it. About 1/4 the size of M8 or less. Hints of more complexity maybe and hit of the central star. Should have used higher magnification and the filter. Next time.

M17 Swan Nebula

M17 is always fun to observe. Mostly looked like a checkmark, more than the full swan this night. Not as sharp a line on the swan’t “water line” as often appears.

M22 Globular Cluster

Just a quick look at M22. Enough to say I saw it. I think I was starting to get tired already. Sorry.

Saturn

Not sure of where it fits in the order now, but somewhere in here I went to Saturn. At fairly low power about 4 moons visible. (… Not sure what power I was using now that I think of it. I really need to start writing this stuff down as I do it.) At 266x it was a little rough but some detail. Still very low in the sky, about 20º above the horizon, so not great detail. Plus, it’s just about at opposition, so almost no shadows. Could generally make out the Cassini Gap, some shading on the planet disk. Rings are crossing in front of the disk. A dark band and gray cap on the top of the disk, but not much color.

M27 Dumbbell Nebula

Turning to the north, Cygnus had risen over the house to about 45º. I slewed to M27, a planetary nebula. It is large enough and bright enough that I wonder if it might appear in the SSSSIV camera. Round, but uneven, brighter on the “sides” than on the “top” and “bottom,” and brighter on one side than the other. It seems to shift as you look at it, though. I used 266x pretty much across the board on everything… I think, and I think I used the sky glow filter? Or maybe I came back to it after I added the filter? Maybe that, because I seem to remember adding the filter on the last target of the evening.

NGC 6995 Veil Nebula

I went to the Crescent Nebula, which isn’t really where I meant to go, which is fine, because I couldn’t see it any way. I chose it from the list of named objects on my paddle control for the C8. What I meant to look at and eventually got to was NGC 6995, the Veil Nebula. It turned out to be the Eastern Veil. This is a pretty bright ribbon of cloud in a long, flowing arc. There are two relatively bright stars nearby and not one bright one in the midst, the signature of the Western Veil. It has a few kinks and bulbs, as it were, and is quite an interesting object. Regrettably, I was definitely getting tired and didn’t give it the attention it deserves. It definitely benefitted from the sky glow filter.

I revisited a few previous targets, but as I said, I was getting tired. Plus more clouds were moving in. Plus the dew was getting heavy. In fact, I noticed as I was packing up that the scope’s corrector plate was starting to dew over. On the whole, a good night.

Observing from Home – 1 July 2019 – Pics or Didn’t Happen.

I haven’t written up my notes on this session yet, but I started trying some astrophotography, and that’s been taking some time and attention. It has taken almost a year to get the right combination of learning, confidence, and clear skies, but I finally got out with the astro camera I won at the Green Bank Star Quest 2018. It’s an Orion StarShoot Solar System Color Imager IV, and it doesn’t work with OS X above 10.10. So I had to partition my hard drive and reinstalled 10.8.5. Even so, it is a glitchy proposition. Nevertheless, I succeeded in taking a series of videos of Jupiter on 1 July and have been processing them into stacked photos with an old program called Lynkeos. It’s pretty easy to follow the steps. What is difficult is learning how to fiddle with the settings to maximize the results in the photo. I’m getting there.

So herewith are the three photos I have produced so far. They are stacks of about 350 images each, +/- 100. The images are from video taken between 22:30 and 23:18 EDT. I used the Celestron Nexstar Evolution 8″ SCT with a 2x Barlow lens. I did the stacking and initial processing in Lynkeos, as I mentioned, and finished the processing in GIMP. The first is larger because I processed it on my lappie while the other two were done on the desktop and the resolution settings were different. Haven’t really tracked down the exact cause.

Jupiter, 1 July 2019, 22:30 EDT, CT WV
Jupiter, 1 July 2019, 22:35 EDT, CT WV
Jupiter, 1 July 2019, 23:18 EDT, CT WV

So there. Now I’m an astrophotographer.

Description of the whole observing session to follow in a separate post.

Observatory 7: Kitt Peak, Part 2

This post is about the evening program at the Kitt Peak National Optical Astronomy Observatory. For my post about the 3-tour daytime program, look >here<.

As I mentioned in that article, I signed up for both the daytime and nighttime programs for less than $100 total. They have several night programs, but the ones being offered that night were the Parade of Planets and Night of the Marvelous Moon. The former would enjoy the favorable alignment of Mars, Jupiter, and Saturn with, I think, a 20″ reflector in the dome at the visitor center, while the latter would probe our faithful sky companion, the moon, with a 16″ Ritchey–Chrétien reflector in one of the roll-off observatories up the path. I chose the Marvelous Moon based on the poor performance of planetary observing I’d had from the big scopes so far and on the forecast for a “mostly cloudy” evening due to the monsoon season. I figured if we were going to get to see much of anything, it would have to be big and bright.

The evening began before sundown with introductions and supper in the visitors center. Supper was a box lunch with a sandwich, chips, and a cookie (as I recall these several months later). There were about 16 people there for the programs, and it turned out that only two of us had signed up for the moon. The sky, which had been vacillating wildly all day between sun and storm, was still patchy, so there was hope. That made me feel a little bummed, though, because if there was hope, then there might be cool views of the planets, which I was going to miss. I had to discipline myself to enjoy the program I had chosen.

Sunset

Our first observing of the evening would be of the occultation of a nearby star behind the limb of a local planet, also known as “sunset.” (A little astrogeek humor there. Okay, very little.) We walked up the path to the rim of the mountain with a spectacular view across the valley to the west. The clouds were still hanging out but had broken up some, and as the sun got lower, they lit up spectacularly. Lots of reds, oranges, yellows, blues, and purples. There were places where I could see patches of rain falling miles away, even while the sun glinted off lakes and such in other parts. I experienced a good bit of it through my phone camera, I’ll admit, although I did stop a number of times to drink it all in directly with my own eyes. The good news is that you can share the experience since I was so digitally consumed. Click on >over here< to see my sunset pictures.

Marvelous Moon

Now that it was starting to get dark, we split into the two groups, going to our respective observatories, to respectively hope the clouds would respect us and dissipate. As we began our program on our Marvelous Moon, we had introductions, which was quick since there were three of us altogether. I have forgotten our instructor’s name, but my fellow participant was Jelena. It turned out that she works at the Lowell Observatory in Flagstaff as an event coordinator, and she was spying out what they could learn from Kitt Peak. Meanwhile, there was some lecture about our target that was clearly intended for astro-novices, so Jelena and I aced all the questions. I think Instructor was a bit new at that presentation, as he kept checking his notes and didn’t seem entirely comfortable with his patter, but he did a good job, nonetheless.

After our classtime to prepare us for looking at the moon, we went up to the scope, opened the roof, and …. well, crud. It was totally socked in. Of course. The clouds weren’t so dense that you couldn’t tell where the moon was, but they were dense enough that you could only make out the glow. We talked a bit about the telescope, its specs and mount and software and such. And we talked about some other stuff, stalling to see if maybe the sky meant to clear up after all.

It didn’t.

Plan B

Well, the various instructors and leaders were chattering away on walkie-talkies and arranging a rendezvous and a plan. It turns out the other group was also under cloudy skies and couldn’t see anything. Imagine that 😉 . So we all stood around on the patio by the visitor center for a while. When the leaders were firmly convinced we had no chance to observe anything beyond our planet, they revealed the backup plan. They had arranged a special opportunity for us. We would get to tour the 3.5 meter WIYN Telescope, which is usually not open to the public!

Of course, if you read Part 1, you know that this also ended up as the Plan B for my afternoon tour, so I had already had the rare chance to tour the WIYN. If you haven’t read Part 1, I recommend that you do, because I’m not going to repeat my description here, as it looked pretty much the same as it had a few hours before.

Epilogue

After the tour of WIYN, we returned to the visitor center and chatted a bit. I told Jelena about my pilgrimage and that I was planning to hit Lowell in a week or so. She gave me her card and told me to let her know when I was going to be there, and she’d show me around the joint. Cool!

Then came the part where we all would be driving down the mountain together with our headlights off, because, you know, astronomy was going on! Except it was socked in, so there wasn’t any astronomy going on. So we didn’t have to do that after all, but we still had to go down the mountain in the dark. That was still pretty exciting! And when you get down to the bottom, it’s open range, so you have to be careful, or a cow might jump out into the road in front of you! But none did this time. I made it back to Tucson in about an hour and a half, having had to stop for border patrol check point. I can’t find my journal at the moment, so I don’t know if I wrote it down, but it seems to me now that the skies over Tucson were clear.

So all in all, the night program at Kitt Peak was fun and enjoyable and even useful for making a contact or two, but ultimately, in terms of its intended outcome, it was a bust. But I can say I spent a night observing on Kitt Peak, and not very many people can. And I can say I’ve seen the WIYN Telescope – twice! And not very many people can say that, either. So, take that, very many people! I’m an astro-nerd!

Observing from Home – June 3, 2019

Conditions

  • 23:15-01:15
  • cool – low 50s F, maybe into the 40s
  • still, no wind
  • no clouds
  • no moon (+1 day)
  • humidity 75-80%
  • seeing: poor – 2/10
  • transparency: good

Equipment

  • Celestron NexStar Evolution 8″ SCT
  • Eyepieces:
    • 32 mm = 62.5 X
    • 15 mm = 133 X
    • 9 mm = 222 X
    • 8.8 mm = 227 X
    • 2 X Barlow

Objects

  • Jupiter
  • M104 Sombrero Galaxy
  • M58
  • M60
  • M59
  • M51
  • Saturn
  • a wee satellite going past M104
  • a wee satellite going past M51 (don’t think it was the same one)
  • a flaring satellite drifting through Ursa Minor
  • a fireball, due south, just above the trees

Observations

Jupiter

I’ve really been wanting to see Jupiter lately as the GRS is “flaking” and doing weird stuff and shrinking. It’s been months since we’ve had decent night weather when I was free, but tonight was good. Well, clear. The seeing was crap. Any way, I debated going out at all because it’s a pain to take the scope down to the pool, and the deck is full of plants for the garden. I hit on the idea of setting up in the front yard. At 11 p.m. this would give me about an hour on Jupiter before it hit a tree, so to speak. Lots of trees in the front yard. So, that’s what I did!

Quick sketch of Jupiter, ex post facto

Did I mention the seeing was lousy? I could watch the waves of atmosphere rolling over the face of Jupiter. So it was mostly fuzzy and indistinct, even though I was well below the useful minimum magnification for planetary detail. I started at 62.5 X (32mm) and could identify 3 moons (Io was occulted, and I had just missed its disappearance) and the NEB and the SEB. As I’ve seen in pictures lately, the equatorial zone is relatively dark with a tan color. I have to admit I still get confused about image orientation. I think, from pictures, that S was up, but it should have been corrected by the diagonal. But when I pushed the scope toward the N, north was at the bottom. It doesn’t help that I had turned the diagonal to about 4:00 so I could sit and observe. I think that changes the orientation. Well, let’s say S is up. In watching for about an hour with increasing magnification (133, 227, 266, 444) I could see the NEB was thicker and darker, and I thought I could see some gray blocks along the SEB. The polar regions were quite washed out. The GRS was on the flip side, I think. It may have been just on this side about to roll over, but I couldn’t make it out if it was.

I did manage a few pictures holding my phone up to the eyepiece at 133 X and 444 X. Higher power was better for those.

I processed a bunch of pics into this one image using GIMP and Preview. Not very high tech, but it is my first attempt at planetary image processing. I’m pretty sure I didn’t do it right.

Flaring Satellite

While I was looking at Jupiter I saw a flash out of the corner of my eye. I thought maybe someone turned on a light in the house and it caught in my glasses. Then a few moments later, there was another flash. I looked away from the eyepiece. I was facing north. A third flash, and I found it just to the right of the “handle” of the Little Dipper, Ursa Minor. As I watched, this object, which I surmised to be a tumbling satellite, flared at least a dozen times as it moved from NW to NE until it went behind some trees. The flares varied in intensity from … I’m going to guess magnitude 1 to -4 or more! (The smaller the number the brighter the object, and each magnitude is a factor of about 2.5). That brightest flare got me to exclaim, “Holy moley!” out loud. It was just a few seconds between flares, and the difference in brightness wasn’t uniform, which is why I think it was tumbling rather than just rotating. Any way, this was very cool. I also noticed how clear the sky was, as I could see all the stars in the Little Dipper.

M104 – The Sombrero Galaxy

Quick sketch of M104 ex post facto.
That’s a star on the left, not just a random dot.

Once Jupiter got into the tree, I went looking for galaxies. My observing spot was not ideal, as I’d be looking just over the house, which can produce heat issues, with some lights on in the bedrooms, but it turned out okay. I used 62.5 X and 133 X mostly. M104 is a longtime favorite and was still just visible from my position. It never appears very large or much at all like the pictures, but I like it anyhow. Sitting next to a 6.5 magnitude star (going by the Pocket Sky Atlas), it was more radiant than I remember seeing it before. Still best seen with averted vision, there is a bright core – really quite bright tonight – surrounded by nebulosity, but it did appear to have rays of light shining to the … I don’t know.. South? I’m not sure how to explain this. Perhaps a defect in my eyes or optics, although nothing else gave this effect over the night’s observations. Maybe it’s just a really, really bright core, seen on a really clear night. Having spent a long time on fuzzy Jupiter, you might think I’d spend more time on this beauty, but I kind of said, “Oh, that’s pretty,” and moved on. Having added a sketch in my notes, I thought that I had drawn something like it before. Looked through my previous journal entries and sure enough, on 1 May 2013 I have a very similar sketch. The rays aren’t as pronounced, but they are implied (or at least inferred). That was with the Meade ETX90, so more than doubling the aperture perhaps makes a difference.

Virgo Cluster Galaxies

I moved on to a couple of the Virgo Cluster galaxies, starting with M58, because that’s one of the numbers I remember being there. Here my weaknesses as an observer really start to show up. First, I was not prepared. I didn’t have a plan for what I was going to look at and had done no research. This is greatly enabled by having a GOTO scope. Second, I have no patience. (This is an obvious lie, as I just spent an hour looking at fuzz ball Jupiter, but what I mean is….) I don’t take time to soak in the details of what I’m looking at. Well, often that is the case. Third, I don’t know the basics of observing, like image orientation in the eyepiece, angular size of objects and how to estimate them, visual magnitudes of objects and how to estimate them, stuff like that. None of this means I can’t enjoy my observing. It just would be more… insightful if I knew what I was doing, and I’d feel more confident. Any way….

M58 is a fairly large, diffuse, fuzzy object. I didn’t notice any bright core, but I didn’t really study it very long. I would say it appeared larger than M104 and not nearly as distinct. There was a star nearby both of them, though.

I followed an urge to move on to M60, which I knew to be close at hand, although it turns out to be in the opposite direction from what I thought. Hard to tell with the GOTO, which jumps away and slews back slowly rather than just gliding a few arcminutes over. M60 has much the same appearance as M58 – big, fuzzy patch with no noticeable core. I scanned around the area a bit, thinking I’d find M58, and I did find another galaxy, but the neighbor star was missing. Upon review, I think this was M59, another elliptical galaxy that lies between M60 and M58. I hadn’t even brought my sky atlas outside, so I had no idea what the layout was. Rather than going to get it, I abandoned Virgo until another night. This was also partly informed by it getting late and cold, but I wasn’t quite done yet.

(I later found my journal entry for 11 March 2019, the last time I was out with the scope, with a similar entry for M58-59-60. Maybe someday if I do it often enough, I’ll learn and remember.)

M51 – The Whirlpool Galaxy

Ex post facto sketch of M51. There’s a star in the upper right, and another in the disk of the galaxy. This second was actually not as bright as the first, although it looks the other way around.

I thought I’d end on a high note, literally and figuratively, turning my scope upward to another favorite, M51, the Whirlpool, the large face-on spiral galaxy and its companion. This was the best I’ve seen it since Mayhill, NM, in the 25″ Dobsonian in 2010. Two fairly large, bright, distinct objects of comparable size at first. As I’m writing two days hence, I forget exactly what eyepiece I was using, but I think I started with the 32mm and pressed to the 15mm for 133X. Any way, as I looked, the larger spiral, which was fairly vague, began to reveal itself. It remained pretty ephemeral, but it seemed to show indications of its structure. The whole was quite beautiful. I kept getting glimpses of a star in the bounds of the spiral playing peekaboo with me. Definitely the best object of the night. Again, though, the orientation has me baffled, to the point that, upon reflection, it is possible I have sketched the reverse of what I was actually seeing. It may be that the larger spiral galaxy should be on the right and the companion to the left.

What is reality?

Saturn, Sort Of, and Out

By this time, Saturn had risen high enough to be seen. So I took a look. It suffered from the same poor seeing and thick atmosphere as Jupiter. No detail at all – no color, no shadows, no Cassini Division in the rings, no nuthin’. I should have left well enough alone and quit on M51.

The night had grown cold, and I with it, so I packed up. Not a bad night on the lawn.